

This is the first in a series of microculture columns in which we’ll explore the culture of larval fish foods. In this month’s column, we focus on phytoplankton, the basic nutritional building block of our home fish breeding effort. We’ll survey useful types of phytoplankton, discuss why they are important in our home fish breeding efforts, and examine what it takes for home culture of these microalgae.
We Are What We Eat
When it comes to raising larval fish, nutrition is one of the most critical factors to success. For fish fry, the principal step in the food chain is phytoplankton, and while it is rare that we feed phytoplankton directly to larval fish, we utilize phytoplankton to enrich a food items — rotifers, copepods, brine shrimp nauplii, etc. These enriched food items are fed directly to larvae. Rotifers, Artemia nauplii, and copepods that are depleted of essential nutrients, have little, if any food valve, and therefore it is critical that we don’t ignore the role of providing these nutrients via phytoplankton. Due to the fact that food items take on a similar nutritional value as the phytoplankton cells that they consume, the nutritional value of the phytoplankton is of paramount importance to success with our larval fish.
Phytoplankton are simple, unicellular organisms capable of photosynthesis. Unlike higher plants that are composed of multiple cells and differentiated tissues, phytoplankton lack a stem, any type of roots, or leaves. Because photosynthetic organisms manufacture their own food, they form the basic energy source that sustains many natural food chains. These plants are the starting point.
So What Makes Phytoplankton So Nutritious?
The focal point of nutrients in these microalgaes is the concentrations of omega-3 fatty unsaturated fatty acids (HUFAs). Numerous studies have shown that marine fish are unable to synthesize sufficient quantities of two essential HUFAs; Eicosapentaenoic acid (EPA), and docosahexaenoic acid (DHA) [Kanazawa, 1979.] These two fatty acids are essential in the growth and development of fish. In general terms, the higher the level of HUFAs, the more nutritious the phytoplankton are to fish.
The Microalgae
Appropriate microalgae that are readily cultivable at home, and are suitable food for prey items which will be fed to fish fry are critical to our home breeding success. There are approximately 7000 species of microalgae, although many of which are not adaptable for home culture. Currently a few species are readily available and readily adaptable to home culture: Nannochloropsis oculata, Chaetoceros gracilis, Isochyrsis galbana, and Tetraselmis sp_._ The nutritional value of each of these microalgae vary, which makes some species more appropriate for our use than others. (Table 1). In the following paragraphs I will describe several useful phytoplankton species.
| Algae | Total HUFA | EPA | DHA |
|---|---|---|---|
| N. Oculata | 16-43% | High | Low |
| C. Gracilis | 5-11.5% | 0.3-2.5% | |
| I. Galbana | 2-4% | 3-4.2% | |
| T. Iso | 0.2-0.7% | 8.3-11% | |
| Tetraselmis | ~5% | ~6% |
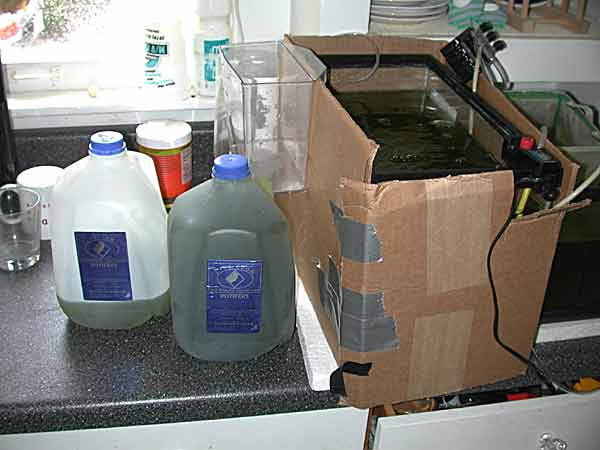
Commercially available phytoplankton. A perfectly acceptable alternative to home culture of phytoplankton is to purchase commercially grown phytoplanktons. Here are two 1 gallon containers of “velvet green” (N.oculata) + rotifers (www.mountaincorals.com). These commercially available phytoplankton preparations offer the ease and convienence of high densities phytoplanktons in a minimal culture media. Unfortunately these products have a limited shelf life, and need to be kept cool to maintain nutritional content. Shown here is a clownfish fry grow out tank setup of James Wiseman.
Nannochloropsis oculata is a 2-4 micron (μm) green flagellate. This is a fast growing species that is easy to maintain. This phytoplankton is the one most commonly thought of when the term green-water is used. This is a dark green alga with a thick tough cell wall that interestingly is readily consumed by rotifers. N. Oculata is high in overall omega-3 HUFAs (ranging from 16-42%), and while most of the HUFAs are composed of EPA, there is little DHA present. A growth study performed by Okauchi et al [Okauchi 1990] determined that the highest level of EPA was attained at 7 days after batch cultures were inoculated. N. oculata has been shown to contain very high levels of vitamin B12, which is critical for larval fish survival, and it has also been suggested that vitamin B12 is important for developing diseases resistance in larval fish as well.
Chaetocerous gracilis is a 6-9 μm solitary diatom with four large spines. It is frequently used in large quantities in commercial shrimp culturing. Because of its protruding spines it has been suggested that this phytoplankton can be problematic in rearing food items; however, this problem has never borne out in commercial cultures. C gracilis has an EPA range from 5-11% EPA and DHA from 0.4-2.5%.
Isochrysis galbana is a 4-7 μm golden-brown flagellate. This species is commonly used in bivalve culture (clams, oysters, etc). While it has been occasionally used as a single rotifer food, it is usually mixed with other phytoplankton such as chlorella or N. ocultus. The EPA levels range from 2-3.5% and DHA is 3.5-4%. Different strains of this species have varying levels of HUFAs, and one isolate found off Tahiti (commonly known as T-Iso) contains high DHA (8-11%) and low EPA (0.2-0.7%). This EPA level is much lower than found in a standard reference strain of I.galbana. An important note for home culture is that this strain requires consistent temperatures, vitamin additives to the nutrient broths and a silicate additive to reach maximum density. According to Wilkerson [Wilkerson, 1998] this algae is too temperamental, fragile, and fastidious to be used regularly.
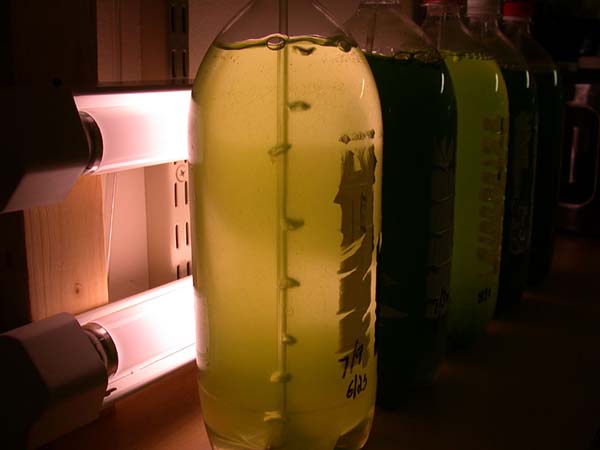
Close up of the phytoplankton bottles. This culture was recently harvested so you can see the inside. Notice the rigid airline tubing extending to the bottom of the container and the stream of large bubbles, of importance is that there is no frothing or skimming on the culture surface. Photo courtesy of Joe Burger.
Tetraselmis sp. is a 9-14 μm motile green flagellate, which has been successfully used in outdoor ponds because it is extremely temperature tolerant. There are several species of Tetraselmis sp. that are available and one such T. tetrathele is frequently used in aquaculture. Studies have shown that while EPA (~ 5%) and DHA (~7%) levels in this phyto are theoretically sufficient, several authors has suggested that rotifers feed diets exclusively on T. tetrahele were not capable of sustaining fish larvae [Fukusho 1985, Wilkerson 1998]. To combat this deficit, aqua-culturists have fed mixtures of T. tetrahele with other phytoplankton species and discovered that these combinations were significantly more nutritious than those cultured alone. Of interest to hobbyists, Tetraselmis sp, produces two antibiotic- like compounds which have been documented to increase survival in larval fish feed on prey items enriched with this phytoplankton.
Given the above information on the available phytoplankton, which one is the best to use? Considering primarily ease of growth and sufficient HUFA profiles, N. oculata is my first choice, followed by C.gracilis and I. galbana, and lastly T-iso. While C. gracilsis and I. galbana has similar nutritional profiles, C. gracilis grows more rapidly and more consistently in culture. Another important consideration is which of these phytoplankton will grow under home water conditions. Each phytoplankton species and strain has an optimum pH and salinity range in which it grows best. It is only through experimentation that you will discover which one grows best for you. A chart of “optimal parameters” is provided to allow you to make some comparison {Table 2} [Wilkerson 1998 pg157].
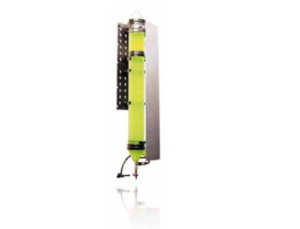
A commercially available culture reactor produced by AB Aqualine. This 2L vessel is designed to accept air or Co2 into the lower port, and the central drain allows removal of the green-water .
| Algae | Optimal pH | Temp Range | Minimum Illumination (LUX) | Salinity |
|---|---|---|---|---|
| N. Oculata | 7.0-8.4 | 60-86 | 4,000-5,000 | 22-25 |
| I. Galbana | 7.8-8.5 | 77-86 | 1,000-6,000 | 28 |
| Tetraselmis | 6.9 | 68-82 | 1,000-20,000 | 30-40 |
According to commercial experts, rarely is the use of a single phytoplankton suitable for aquaculture of fish larvae. Nutritional deficiencies found in one phytoplankton species can be compensated for by adding another phytoplankton species superior in that missing HUFA. As an example; N. oculata which is high in EPA, but low in DHA can be paired with T-Iso, which is high in DHA. Some hobbyists even add a small portion of Tetraselmis to this co-culture just to add an antibiotic effect. Studies performed in commercial fisheries have shown that fish larvae fed prey items enriched on diets composed of multiple phytoplankton species have higher survival rates and quicker growth rates than those larvae fed food items enriched with a single type of phytoplankton. The “take home” message here is that the use of multiple phytoplankton species is advantageous. If you must only use a single culture of phytoplankton use the one with the highest HUFA concentrations.
So what are the basic phytoplankton growth requirements? Phytoplankton are much like more familiar plants, and have three simple needs: nutrients, water, and light. Of course each element has tremendous impact on the growth and nutritional profile of your phytoplankton. Optimizing each aspect will increase your success. Plants require nitrogen and phosphorous, along with some trace elements (such as zinc, iron, etc) and vitamins (B12, thiamin, etc). For water, the home aquaculturist must provide clean, buffered, artificial saltwater. For home phytoplankton culture, pay specific attention to the appropriate salinity range (specific gravity 1.014-1.017), and the appropriate pH (7-8.5). Finally, provide adequate lighting by supplying a light source which gives an intensity of 1000-10,000 Lux on the cultures. Of course, this light can be generated from a variety of light sources, from simple fluorescent tubes to intense metal halide bulbs.
Now Let’s Get Into Specifics
One of the best sources to obtain all your home phytoplankton culture products is Florida Aqua Farms, Inc. (see the shopping list). This company not only has all the phytoplankton starter cultures, but also provides all the fertilizer mixtures, culture containers, and one of the best resources on growing phytoplanktons. This book is entitled “The Plankton Culture Manual” by Frank Hoff and Thomas Snell. If you want to read and learn basic through advanced phytoplankton culturing techniques, this is the book for you.
The phytoplankton: Phytoplankton cultures can be purchased from online suppliers. These cultures contain either live phytoplanktons growing in a nutrient solution, then shipped suspended in a liquid, or as a live phytoplankton cultured in a semi-solid agar medium. These are called algae wafers (see the shopping list) and will last for 2-3 months in a cool environment. Essentially all the phytoplankton species we discussed above are available in wafer form.
Culture containers: The simplest culture container is a clean 2 or 3 liter soda bottle made of clear plastic. Round-bottomed bottles (as opposed to the more common dimpled-bottomed ones) work best, as they allow better water circulation. One important note about the use of any container for phytoplankton culture regards sanitization or sterilization. Sterility is a demanding standard, and means that the culture vessel and medium are absolutely devoid of all forms of life. For our purposes, we can adopt a lower standard: no previous exposure to any phytoplankton, phytoplankton predators or competitors. A sufficiently “sanitized” soda bottle is one that has been emptied of the soda, rinsed with uncontaminated water, and left to dry upside down. You can store excess bottles dried and capped for future use. After you start culturing phytoplanktons in these bottles, you will notice a greenish film buildup on the inside. This film buildup will prevent light penetration and would need to be removed before reusing the bottle. While cleaning this dirty bottle with a dilute muriatic acid rinse will remove the green film, I find it easier to just buy another 2L soda bottle and not bother with the acid wash.
Aeration: The water in the phytoplankton culture must be adequately aerated. Aeration allows proper mixing of air and carbon dioxide in the culture. Aeration will also help stabilize the pH of the culture and maintain a uniform distribution of phytoplankton cells. Airstones are not required in microalgal cultures. In fact, fine bubbles can be detrimental to your culture as phytoplankton can be trapped at air-water interfaces. A rigid, open-ended airline tube is superior to a diffuser for this application. A simple air bubbler can be created by obtaining a three-foot long 1/8″ rigid air tube. This air tube can be cut in lengths that reach to the bottom of your culture vessel (the soda bottle), at the top of this rigid airline you attach the soft flexible airline, which comes from your pump or gang valve. An interesting point about aeration in soda bottle is that you can often determine the quality of your culture by how it bubbles: an old or damaged culture will often produce foam (like that seen from a protein skimmer). You can also detect if you’re over-aerating or have a nutrient depleted (crashed) culture as this will also result in foaming.
Nutrients: As I had mentioned above phytoplankton require nutrients and the simplest way to provide these nutrients is through the use of fertilizers. The fertilizer Guillard formulation is common f/2 (f/2 = 1/2 full strength, full strength is listed as f) http://www.florida-aqua- farms.com/Section04/FAFw4.htm and is easily available. This mixture is a concentrated stock solution of essential elements and trace elements. In our home phytoplankton cultures we will be adding 1-3 milliliters of f/2 per liter of culture.
Lighting: One of the easiest and inexpensive lighting sources is a Home Depot 48″ dual bulb shop light. This seven-dollar light fixture will support 2-48″ long 40 watt fluorescent bulbs. An adequate bulb for home phytoplankton culture is the GE-F40 DX. This is a 6500K bulb, which costs three dollars and emits more than sufficient light for our needs. These 48″ long shop lights will allow us to use 7 2-liter soda bottles in a row as our culture station, while a 24″ bulb will easily house 4 2-liter bottles.
Required Equipment For A Basic Phytoplankton Culture
- Algae: a liquid culture (such as DTs) or an algae disk, (i.e., Nannochloropsis algae disk)
- Fertilizer: 1 bottle of Microalgae Grow (f/2 nutrients)
- Culture containers: 2-8 cleaned, rinsed, with caps, 2liter soda bottle (round bottom perferred)
- Lighting: inexpensive Home Depot shop light (dual 48″ bulbs), or a dual bulb 24″ inch, 2-4 fluorescent bulbs (6500K is sufficient)
- Aeration: 1 or 2 high-powered air pumps, either with 2 or 4 outlets, controllable. The more bottles you have the more air you’ll need.
- 2 or 4 outlet gang valve(s), metal or brass tends to work better than cheap plastic ones. Sufficient 1/8″ flexible airline tubing, 1-2 3 foot long rigid airline tubing.
- Other items: Aquarium salt, pH strips, salinity hydrometer, filter floss, measuring cups, plastic dropper pipettes, plastic medical syringe (1-10mls: for measuring volumes of fertilizer).
Where To Begin
There are a number of online websites that offer a do-it-yourself (DIY) version of green-water culture stations (see DIY sites below). These sites provide a good visual representation of what will be described below. Additionally, there are a number of written resources which describe green- water culture in detail [Hoff, 1987 Moe 1989, Toonen 1996].
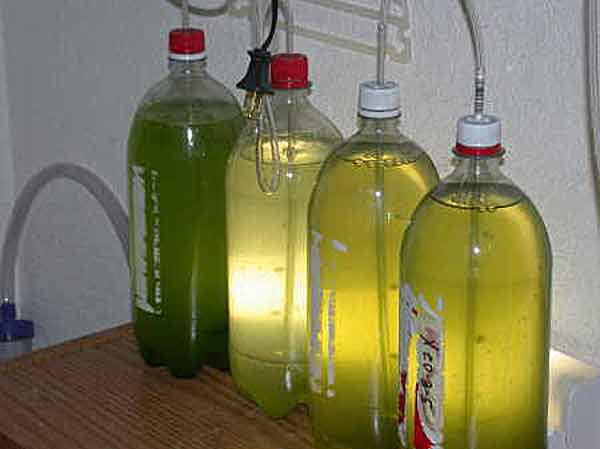
Close up of 2L soda bottle phytoplankton culture containers. Using this arrangement, the soda bottle caps were drilled and rigid airline tubing was inserted. To ensure optimal aeration make sure the rigid tubing goes to the bottom of the soda bottle. If all the vessels contain approximately the same amount of liquid you will get equal distribution of air bubbles. Shown here are 4 new starter cultures of phytoplankton. Photo courtesy of Scubadude http://www.coralfragz.com
The first time making a new culture medium, it is important to use new saltwater and a fresh culture container. New saltwater means just that: “never-been-used-for-anything” water and a clean, dried, and capped 2L soda bottle. This is not used tank water or saltwater you bought at a local fish store and stored away. Our concern is that bacteria will be present in this water and these containments will readily overtake your phytoplankton cultures. A simple method that can be used to pasteurize water is to boil it in a microwave. However, I use “fresh out of the tap” water mixed with a salt mix and dechlorinated. A recipe recommended by Wilkerson is 3/8-cup aquarium salt, 1-gallon tap water, 3 milliters (mL) of “MicroAlgae grow” (f/2). [Authors note: I actually prefer to use 1/2 mL of f/2 per liter (or 1mL/2L bottle)]. According to Wilkerson a good reason to use tap water is that tap water contains nitrates, phosphates and metals that are beneficial in phytoplankton culturing. However, I have also used water obtained from a reverse osmosis unit, and this has also worked well. To begin the actual culture, use your starter culture (the algae wafer or a few milliliters of your liquid suspension) and add it to your fresh culture medium. One algae wafer can be used to start a two 2L bottle of culture medium. After adding the algae to the culture medium, you will notice a light green tint. This is what you want. Place the culture bottles within 2-3 inches of your light source and add the air bubbler. Adjust the air bubbles to between 10-20 air bubbles/sec. After the airline is placed, add a wad of filter floss to the bottle opening to prevent any contamination. Within five to ten days you will observe a rich green algae growth (or brown is you use T-iso.) From this culture you will start new bottles. A word of caution here is to be patient; often the starting cultures will require a few extra days to reach its dark green potential. Remove a few milliliters of green-water from the existing culture to “seed” the new bottles. Again, you want a slight green tint to the new culture. As you continually remove culture medium from the bottles, add new fresh culture media to the existing culture. Once you have established a sufficient number of green-water bottles (at least 3 to 5) you can start harvesting your green- water to feed your prey items (rotifers, brine shrimp nauplii, copepods).
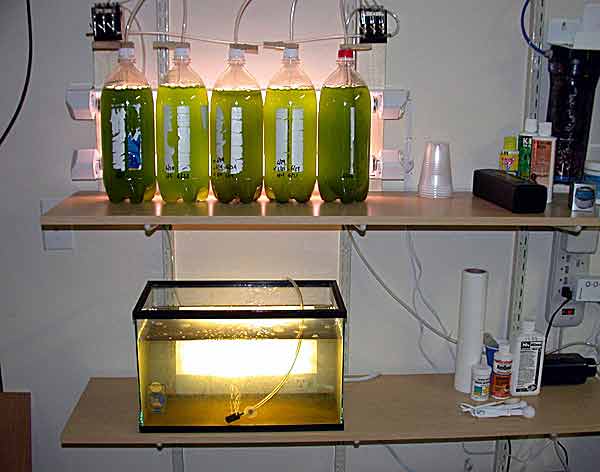
4 bottle phytoplankton culture station. This arrangement utilizes 2-24″bulbs, and 4 2 liter soda bottles. Note the culture containers are marked with the date of inoculation, and labeled. The upper shelf houses the phytoplankton and the bottle shelf contains the rotifer culture. Photo courtesy of Joe Burger www.cnidarianreef.com
Next let’s discuss some tips that will allow us to maximize our phytoplankton yields and accelerate their growth. The first parameter to focus on is lighting. If we provide lighting for 16 hours daily, we should get the best growth. Remember cellular growth and protein production occurs during the plants dark cycle and if we were to illuminate for 24hrs we would not increase our yield of phytoplanktons proportionally.
It is particularly important to know that many species of phytoplanktons poorly tolerate 24 hour photoperiods. While the cultures don’t “crash,” they fail to grow to expected levels. Some commercial firms utilize 24hr illumination, but they also have light barriers in their cultures. The phytoplankton cultures are exposed to the light side 1/2 the day and then pass behind the light barrier into darkness for half the time. So these “revolving cultures” have a built-in dark cycle. In our case, 16 hours of light and eight hours of dark is sufficient for N. oculata. Next, to ensure that we obtain optimal concentrations of green-water, we should count the number of phytoplankton cells per milliliter of medium. This procedure is simple to perform, but it requires a microscope, or a calibrated cell counter. For visual cell counting, simply remove one ml of culture media, and then take a drop from this. Place the drop on a slide and count, you don’t have to count every single cells, but the idea here is to get an rough estimate between having a few cells per drop and a lot of cells per drop. To the human eye, a dark green phytoplankton culture may only have 10-20 thousand cells/mL, but to others “dark green” might correspond to 100-200 thousand cells per mL. Quick cell counting is a “ball park” method to get an idea of how many cells/mL are present, and to train your eyes to better estimate your phytoplankton concentration. While you’re counting cells, make sure to scan for contamination. Not surprisingly, cyanobacterial contamination will often make your green-water cultures appear much more lush. Next we monitor pH and maintain a useful pH throughout the culture process. A fully grown green-water culture will have a high pH (a culture containing >100 thousand cells/mL can be easily around pH 9-10). Advanced hobbyists may chose to utilize CO2 bubbling in their cultures to maximize the growth of green-water and maintain a proper pH. However for the average hobbyist, since we will be maintaining cultures containing 20-100 thousand cells/mL, the pH will remain around 8.4-8.6. I would recommend monitoring pH and salinity in your cultures to ensure you’ve obtained the appropriate values. The reason for maintaining proper pH and salinity is that these green-water cultures will be used directly in feeding prey items (like rotifers) and having vast differences in the pH and salinity between the rotifer stocks and your phytoplankton media often results in “shocked” food items.
To maximize our green-water production and to ensure we can feed our food items (rotifers, etc) let’s start to rotate cultures. Mark the culture bottles with letters (eg. A, B, C and D) and start your cultures. Once all the bottles become dark green, harvest 2/3 of A, then add 2/3 new culture media to this bottle, the next day remove 2/3 of B, and refill w/ new culture media, then on the next day remove 2/3 of D and repeat. Using this pattern you will feed two- thirds of a bottle to your food items daily and restart the green-water cultures from the remaining 1/3. Once you have completed this cycle culture A should be ready for harvest. The key is to leave behind a sufficient amount of rapidly growing green-water which will inoculate this new culture. Since you only have to regrow 2/3s of the new bottle, this occurs quite rapidly.
I would be remiss if I didn’t include a few key tips that will boost the nutritional levels of the phytoplanktons. There are a number of factors that will influence the levels of HUFAs in our home production of phytoplanktons, and we can pay particular attention to these as we optimize our production. Phytoplanktons are most nutritious when their growth is still within the “exponential growth” phase. This is before the culture is saturated, and growth rates begin to roll off. Ultimately, the culture will enter what is called “stationary phase” and the algae will be much less nutritious. If our standard technique is followed, the exponential growth is maintained for approximately 7 days from when the culture was first inoculated. Phytoplankton cultures past this exponential phase move into the stationary phase (days 8-10) of growth and begin to decrease their nutritional values. A second tip is that the growth medium has a significant impact on the quality of the phytoplankton. While the standard phytoplankton fertilizer f/2, a report by Wilfors [Wilfors, 1992] determined that changing any of the components of the f/2 resulted in a significant change in the biochemical composition of the phytoplanktons and had the resulting effects of decreased survival of fry which fed on food item enriched by this. F/2 is readily available from a few sources I’ve identified in the shopping list. One word of warning, do not omit ingredients from or otherwise change the f/2 composition.
Of course there are alternatives to growing your own phytoplankton. A great advancement for hobbyists is the availability of aquacultured phytoplanktons. N. oculata is available from some sources as live cultures. This product is commonly known as “DTs phytoplankton” and is a concentrated stock of enriched phytoplankton in a minimal culture media. When stored in cool conditions, this green-water product has a nominal 2 to 3 month shelf life. While purchasing liter-to-gallon containers of this green-water allows you to bypass any home culture or expansion, what you save in time you pay for in dollars. However, for a busy hobbyist this is a perfectly acceptable alternative. Other phytoplankton species are also becoming available to the hobbyist as live mass cultures.
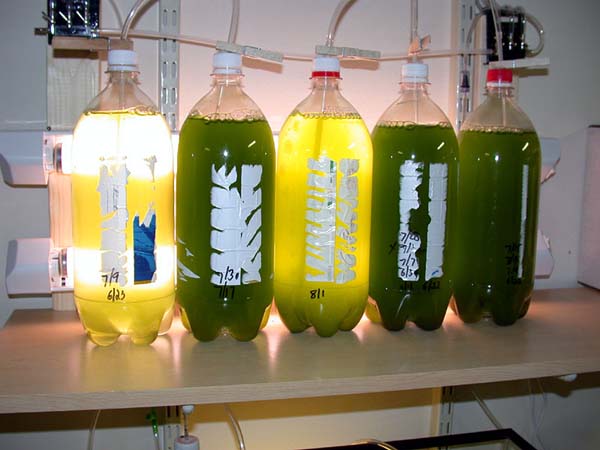
Shown here is the phytoplankton culture after the left most bottle has been harvested. As you can see in the photo there is a large color difference between the freshly started culture and that of the rapidly growing cultures. (bottles 2, 4, and 5 L-R ). Photo courtesy of Joe burger.
There are also a number of green-water alternatives that can be used in place of live phytoplankton to enrich prey items. These alternative foods attempt to provide similar levels of nutrients to the prey items, and take advantage of rotifers ability to consume a number of similar size particles. Hopefully this month’s column has given you a fresh interest in culturing your own green- water and has ignited your interest in at home breeding of fish. In next month’s column we’ll discuss rotifer culture and the use of both phytoplanktons and alternative foods for enrichment. We will also discuss hatching Artemia nauplii and ciliate culture.
I’ll conclude by suggesting you go thru the link list provided below and check out some of the online suppliers of these aquaculture products. This will leave you with plenty to do until next month, when we again peer through The Breeder’s Net.
Online Suppliers
- Aquaculture Supply, LLC. 668 Time Saver Avenue, New Orleans, LA 70123-3144, U.S.A.Telephone: 504-736-9360, FAX: 504-736-9373
- Aquatic supply house http://www.aquaculture-supply.com/
- Aquacenter, 166 Seven oaks Rd Leland MS 38756, 800-748-8921, http://www.tecinfo.com/~aqcenter/ (source for f/2, culture containers, enrichments products)
- Aquatic Eco-systems Inc, http://www.aquaticeco.com/, (source for f/2, culture vessels)
- Brine Shrimp Direct, P.O. Box 13147 Ogden, UT 84412-3147, U.S.A., 800-303-7914 toll-free, http://www.brineshrimpdirect.com/
- Carolina Biological Supply, 2700york rd Burlington, NC 27215 800-334-5551, http://www.carolina.com, (source for phytoplankton starter cultures, culture vessels, nutrient mediums)
- DTs Marine Phytoplanktons, Hamshire Il 60140, Phone 847-683-4564, (source for commercial N. Oculata)
- Florida Aqua-Farms Inc, 33418 Old Saint Joe Road Dade City, FL 33525 Phone: 352-567-0226, http://www.florida-aqua-farms.com/, (source for f/2, phytoplankton cultures, measuring dip sticks, reading material)
- Northeast brine shrimp: http://216.25.82.220/nebs.htm
- Provosoli-Guillard National Center for Culture of Marine Phytoplankton(CCMP) http://ccmp.bigelow.org/, (source of living stock cultures collection of marine phytoplankton)
- SACHS Systems Aquaculture: http://www.aquaculturestore.com/
- University of Texas-Algae culture site: http://www.bio.utexas.edu/research/utex/, (excellent scientific source for information/background on algae, also sells phytoplankton starter cultures)
- DIY green-water culture stations: http://reefkeeping.com/issues/2002-07/ds/index.htm
- http://community.webshots.com/user/matthewbeaman Matt Beaman, an advanced hobbyist who has tremendous practical experiencing growing phytoplanktons and food items
- http://www.sjwilson.net/reef/ Flame Angels Homepage: a hobbyist who has a nice DIY green-water reactor and food item grow-out tanks
Additional Reading
- Hoff, F.H., Snell, T.W., Plankton Culture Manual, Florida Aqua Farms Inc; ISBN: 0966296001; 5th Rev edition (July 1999)
- Wilkerson, J.D., Clownfishes, Microcosm Limited; ISBN: 1890087041; (June 1998)
- Rearing a Plankton Menagerie by Shawn Carlson http://www.sas.org/E-Bulletin/2001-10-19/labNotes/labNotes.html
References
- Cripes, D., Algae Nutrition, J MaquaCulture 7(3): 57-64. 1999.
- Fukusho K, Okauchi M, Tanaka H, Kraisingdecha P, Wahyuni S, Watanbe T., Food Value of the Small S-strain of Rotifer Brachionus picatilis cultured with Tetraselmis tetrahele for the Larvae of Black Sea Bream. Bull Natl Res Inst Aquacult 8:5-13, 1985.
- Hoff, F.H., Snell, T.W. Plankton Culture Manual, Florida Aqua Farms, Inc.; ISBN: 0966296001; 5th Rev edition, 1999.
- Kanazawa A, Teshima S, Kazuo O., Relationship Between Essential Fatty Acid Requirements of Aquatic animals and the Capacity for Bioconversion of Linolenic Acid to Highly Unsaturated Fatty Acids. Comp. Biochem Physiol 63:295-298. 1979
- Moe, M., The Marine Aquarium Reference: System and Invertebrates, Green Turtle Publications, Plantation, Florida; 1989.
- Okauchi M, zhou W, zou W, Fukucho K, Kanazawa., Difference in Nutritive Value of a Microalgae Nannochloropsis oculata at Varous growth Phases. Bull Jap Soc Sci Fish. 56(8):1293-98. 1990
- Toonen, R.J., Invertebrate Culture, J. Maquacluture 4(4): 6-25, 1996
- Wilfors G, Ferris G, Smith B., The relationship between Gross Biochemical Composition of Cultured Algal Foods an growth of the Hard Clam Mercenaria mercenaria (L). Aquacluture 108(1): 135-154, 1992
- Wilkerson, J., Clownfishes, Microcosm Limited; ISBN: 1890087041; June 1998.

0 Comments