

A selection of useful tidbits of information for the aquarist. Readers are encouraged to send their tips to [email protected] or to post them to our Hot Tips sticky in the Reefs.org General Reefkeeping Discussion forum for possible publication. Next month’s Hot Tip theme will be “Lighting Tips“.
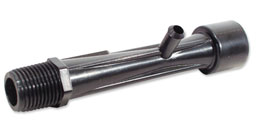
Part No.: V34 – Turbo-Venturi Injector 3/4″
Skimmer Tips
Red Sea Berlin in-sump skimmer. The first thing I did when I bought this used was to remove the OEM venturi from the skimmer housing and replaced it with a 3/4″ mazzei venturi from Aquatic Ecosystems.
All you do is unscrew the OEM RSB venturi with the key that comes with the skimmer and then screw in the new venturi.
I then powered it with a Mag12 pump and placed a gate valve between the pump and the venturi. I’ve had to valve it back by almost 50% so I’m pretty sure that I bought too big of a pump for the setup. Other people I have talked to have used Mag7’s or Mag9’s and have had very good results as well. You do need to keep the venturi clean with weekly cleanings but other than that it’s been working very well.
This was a simple $20 mod that really increased the performance of the RSB skimmer.
— Author: Shane Graber
Speaking of cleaning out the venturi, knowing exactly when to do this tedious task is great, especially if your skimmer isn’t easily accessible…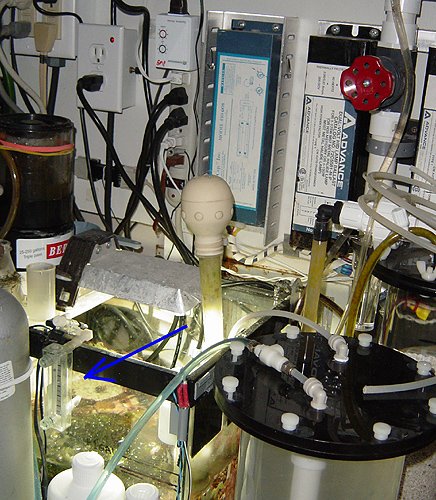
I installed a small floating ball type flow meter on the airline to monitor and precisely adjust the air going in. They aren’t cheap (~$30), but it takes the guesswork out of venturi performance.
When I can no longer set to the normal flow at 2.0 l/min (Stock RSB w/Mag9), I let the airline slurp in a cup of RO/DI water, which usually cleans it out pretty well (perhaps every week or two). If flow isn’t completely restored, then it’s time for a tear down; it’s been almost a year since the last one!
I use the Dwyer MiniMaster series. My particular one reads .25-2.5 LPM. For larger skimmers, one should probably step up a range.
The cost isn’t as bad as I thought, under $20 (with a 21 day lead time): http://www.dwyer-inst.com/htdocs/flow/qsseriesmm.cfm
Attached is a picture of the right side of my cabinet, showing the flow meter in the lower left. It pulls air in through the bottom inlet, through the meter and via tubing into the venturi. I used some aquarium air needle valve that clamps on the sump to hold it.
I chose the range honestly because I had a couple sitting around from another experiment. I got lucky that my skimmer sucks just enough! The next size up would be better for a larger skimmer; you just loose a little resolution.
— Author: playfair
Aqua-C most models:
If you submerge the output pipe in your sump, make sure you add an air hole. This will then allow you to keep a constant water level in the skimmer, regardless of the water level in the sump (assumes skimmer is somewhat elevated).
One way to do the air hole is like a Durso pipe, or you can add a Y to the output.
— Author: Hal
On my ETSS I replaced the small bio balls with larger ones. It seemed to make a fairly good difference.
— Author: jbpig
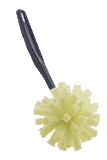
For any skimmer: I use a sponge dish-mop to clean the riser tube. Many skimmers have riser tubes that are too narrow for the average hand to fit in, and a dish mop is just the right size to clean the gunk out of the riser. Skimmers work much more efficiently when the riser is cleaned out regularly, and this $2 tool makes the job easy.
— Author: JennM
I know this one’s been mentioned before, but doesn’t hurt to remind people of it either: If you’re skimmer is located in a confined cabinet (for example, an aquarium stand), it’s a good idea to plumb the air intake outside of the cabinet. The difference in water chemistry, especially pH levels, can be drastic.
How does having air from outside the “tank area” affect a skimmer?
You’re recycling trapped air. You know how air becomes “stale” in confined spaces? Same thing happens in aquarium stands or closed rooms. This air is thoroughly mixed/saturated in protein skimmers and thus the qualities of the air have a great effect on how it interacts with your aquarium water.
In my case, my pH rose by 0.1 by simply running my air intake outside the stand. Others have reported greater differences. FWIW, opening up a window can make a big difference too.
— Author: Len
Run them wet. Don’t allow foam to concentrate so much that it becomes dry.
— Author: galleon
Tip 1: (Reef Skimmer tips for cleaning, Aqua-Medic and Euro-Reef) To get the best performance from the in-sump model raise or lower it till approximately 6″ of the skimmer is under water. This will improve over all performance of this skimmer by reducing backpressure on feed pump and give the mix chamber equilibrium. A long time dealer gave me this advice as he received it from Aqua-Medic. I found that the skimmer produced a lot more skimmate.
Tip 2: Your skimmer not have a collection cup drain hole? Install your own. Drill through the flat bottom of the collection cup about 1/2″ from rim and install 1/4″ nipple and feed waste to collection container of choice.
Tip 3: Tired of seeing calcium and other deposits buildup in and on your skimmer, venturi and pumps? Well you can remove them entirely and restore them to like new condition in less than 1 hour. First remove them from your sump and to a well-ventilated area. Next mix up 3 or 4 to 1 DI water to muriatic acid in large 5gl bucket. BE SURE TO WEAR GLOVE, EYE PROTECTION AND LONG SLEEVES AND ALWAYS ADD ACID TO WATER.
Set all equipment into bucket if possible and stand back and watch as the acid will totally dissolve all deposits. And for better cleaning power run the mix through the skimmer. Let all items sit and or run for 30 minutes to 45 minutes rinse thoroughly. Your pumps will thank you and your skimmer and venturi will too.
Tip 4: If you are an owner of a Euro-Reef and are tired of having to clean the goofy sponge filter that’s standard on their output piping you can remove it all together. Install a Durso style return instead using thin walled PVC. This will reduce evaporation and help quiet the skimmer as well as improve performance because it should never clog and will let skimmer maintain constant level of output.
— Author: leftovers
WHEN I owned a venturi skimmer, I cleaned the venturi opening by attaching airline tubing to the opening and letting it suck in a few ounces of HOT tap water. If you can’t attach airline tubing to your venturi, you can inject hot water with a syringe. This works to dissolve salt and dust deposits without taking the skimmer apart.
— Author: Greg Schiemer
A friend just suggested to me that I place my entire skimmer in a 50/50 mix of vinegar and water and run it for about 30 minutes, then just fresh water for 10 minutes to rinse. He states this cleans the skimmer and the pump.
— Author: Deadhead1450
I own a ETSS RD3 (about 5 years old) I had my Mag9 tuned back because I could not control the foam once it actually kicked in. I was ready to toss the skimmer when I attached an air control to the intake at the top of the tower. Turned the Mag9.5 on full and adjusted the air intake to the right level…. MAN Huge difference. The skimmer is finally working how a skimmer is supposed to work. I walked into the room yesterday and could not believe the smell coming form my tank, it was actually my skimmate cup.
— Author: daveyakiwchuk
After cleaning your skimmer rinse it with water from the aquarium. Doing so will hasten the wait for the skimmer to return to normal operation.
— Author: Bone

0 Comments