

The star Sirius has risen and the hot Dog Days of summer are upon us, giving good reason to examine our aquarium’s water temperature more closely. As we all know, reef inhabitants enjoy a relatively stable temperature environment where excursions of just a few degrees outside of the norm can result in coral bleaching and fish/coral mortalities. We base our decisions on maintenance of adequate temperatures and purchases of expensive water chillers on measurements made by thermometers. These may be familiar mercury or alcohol thermometers, or those of later technology – digital thermometer and liquid crystal thermometers. It is not uncommon to see an aquarium housing hundreds (or even thousands) of dollars worth of exotic animals while using a very inexpensive thermometer to report this critical parameter. Is this practice a shrewd use of financial resources, or frugality inviting disaster? In order to answer this question, a series of observations were
made in order to judge the accuracy of several different types of thermometers. This month, we’ll discuss the most common of aquarium thermometers:
Liquid-in-Glass Thermometers
Liquid filled thermometers are perhaps the most recognizable of devices used to monitor aquarium water temperatures, and are potentially the least expensive way to do so. These operate on the principle that an internal liquid will expand or contract at a given rate when exposed to varying temperatures.
The least expensive thermometers are filled with ‘spirits’ – alcohol, kerosene, or citrus-based oil – and often tinted with a red or black dye for increased contrast and ease of reading. ‘Laboratory-grade’ thermometers operate on the same principles as the less expensive devices and are often filled with mercury.
Before continuing, we’ll examine some common terms used throughout this article.
Glossary
- American Society of Testing and Materials International (ASTM International)
- A voluntary worldwide standards development organization. Formerly just ASTM. Originally organized in 1898 to address problems with America’s nascent railroad system.
- National Institute of Standards and Technology (NIST)
- A non-regulatory agency of the United States Department of Commerce specializing in the science of measurement. Formerly known as National Bureau of Standards, or NBS.
- NIST traceable
- A NIST-traceable instrument (such as a thermometer) is one that the manufacturer calibrates it using well accepted, scientifically sound and appropriate measurement equipment, practices and procedures. Measurement values and uncertainties are calculated or established according to accepted protocols. The uncertainties must be within accepted high and low norms. NIST-traceable equipment is advertised as Traceable®.

Figure 1. More expensive liquid-filled thermometers are often designed to be used in exact ways, such as immersion depths.
- Bulb
- The reservoir at the bottom of a thermometer holding the indicator liquid.
- Calibration
- In the case of liquid-in-glass thermometers, calibration is actually a comparison of its reading compared against a reference of known value (such as water’s freezing or boiling points). The difference is noted and the thermometer is labeled with the correction factor. Note: Calibration must be performed carefully with due consideration given to barometric pressure and elevation. Electronic thermometers can be truly calibrated.
- Immersion Depth
- Liquid-in-glass thermometers are designed to be immersed to a certain depth. There are partial immersion thermometers (these are clearly marked with an immersion line) and total immersion (See Figure 1).
- Meniscus
- The interface between the liquid and gas filled cavity within a thermometer which indicates temperature.

Since a calibrated liquid in glass thermometer was used to judge all other thermometers (including the NIST Traceable one), we’ll begin with an examination of a ‘lab-grade’ thermometer, reasons for calibration and two protocols for doing so.
Stresses on Thermometers
Nothing lasts forever and this holds true for the accuracy of liquid-in-glass thermometers. These devices depend on expanding or contracting liquids resulting in varying pressures on the wall of the internal tube and, as such, the vessel is warped (usually expanded) over a period of time. Minor changes in the apparent temperature measurement will result.
Calibrating Liquid-in-Glass Thermometers
For reasons we just discussed, a liquid-filled thermometer should be periodically calibrated. In reality, we do not truly calibrate (although it is the official term) but instead we observe the reading of the thermometer in question to known temperature(s). There are two easily observable reference temperatures – that at which water freezes and that at which it boils. These, in turn, are influenced by atmospheric pressure (the higher the pressure, the higher the boiling point). Barometric pressure must be considered as well since the commonly recognized boiling point of water (212ºF or 100ºC) is understood to be at sea level at a barometric pressure of 29.921 inches of mercury (in Hg). We must take into account the amount of dissolved material in the water (for instance, we add alcohol to the radiators of our cars to alter – lower – the freezing point of the solution of alcohol and water).
Not all thermometers have the ranges to include the freezing and boiling points of water. In this case, the thermometer must be compared to a calibrated thermometer.
Calibration Procedure
A well-equipped lab will have all equipment necessary for thermometer calibration. This includes a magnetic stirrer/heater and stir bar, 1000 ml flask, support stand and clamps. Not all hobbyists have access to this equipment, so we’ll look at a simple setup for the home. Remember – this procedure works for thermometers capable of registering 32ºF and 212ºF. But first, we must know what the true temperature actually is.
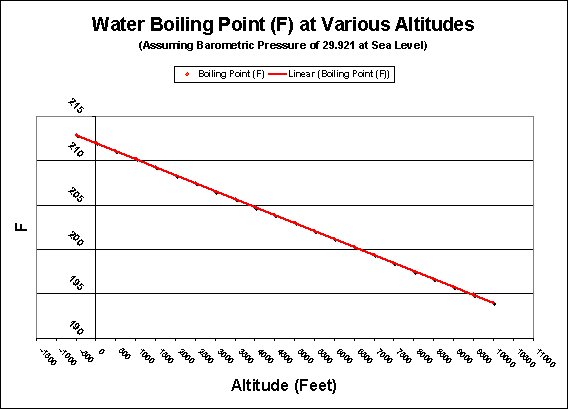
Figure 2. Water boils at a lower temperature with increasing altitude. See Table 1 for this information in tabular form.
Conversion Factors
The following formulae were used to convert degrees Fahrenheit to degrees Celsius, and vice versa:
- Fahrenheit to Celsius: (Degrees F – 32) / 1.8
- Celsius to Fahrenheit: (Degrees C * 1.8) + 32
Correcting for Atmospheric Pressure and Altitude
Barometric pressure and altitude play a part in determining the boiling point of water, and to a much lesser degree, the freezing point of water (we’ll assume the water is ‘pure’).
| Altitude (Feet) | Boiling Point (F) |
|---|---|
| -500 | 212.9 |
| 0 | 212 |
| 500 | 211.1 |
| 1,000 | 210.2 |
| 1,500 | 209.3 |
| 2,000 | 208.4 |
| 2,500 | 207.5 |
| 3,000 | 206.6 |
| 3,500 | 205.7 |
| 4,000 | 204.8 |
| 4,500 | 203.9 |
| 5,000 | 203 |
| 5,500 | 202.1 |
| 6,000 | 201.2 |
| 6,500 | 200.3 |
| 7,000 | 199.4 |
| 7,500 | 198.5 |
| 8,000 | 197.6 |
| 8,500 | 196.7 |
| 9,500 | 195.8 |
| 10,000 | 194.9 |
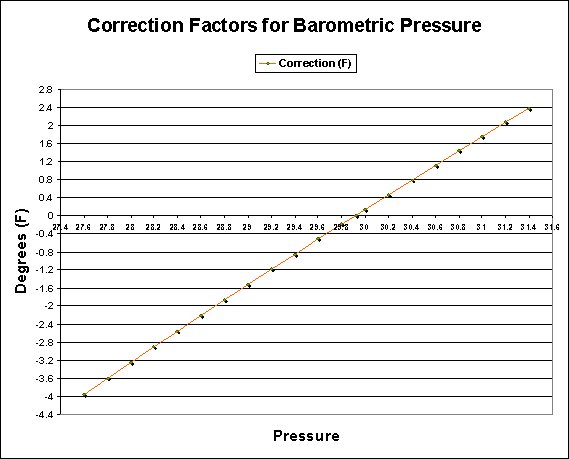
Figure 3. Barometric pressure affects water’s boiling point. This information is also shown in Table 2.
| Barometric Pressure | Correction (F) |
|---|---|
| 27.6 | -3.96 |
| 27.8 | -3.61 |
| 28 | -3.25 |
| 28.2 | -2.9 |
| 28.4 | -2.56 |
| 28.6 | -2.21 |
| 28.8 | -1.87 |
| 29 | -1.53 |
| 29.2 | -1.19 |
| 29.4 | -0.85 |
| 29.6 | -0.52 |
| 29.8 | -0.19 |
| 29.921 | 0 |
| 30 | 0.14 |
| 30.2 | 0.46 |
| 30.4 | 0.79 |
| 30.6 | 1.11 |
| 30.8 | 1.43 |
| 31 | 1.75 |
| 31.2 | 2.07 |
| 31.4 | 2.38 |
Now, what do all these numbers mean? Let’s look at some examples.
Example 1: At 5,000 feet altitude the barometric pressure is 28.2″ Hg. What is the approximate boiling point of de-ionized water?
Answer: Look in Table 2 to determine the boiling point of pure water at an altitude of 5,000 feet – it is 203°F. Now we must correct for barometric pressure of 28.2″ Hg – this correction (shown in Table 1) is -2.9°F, hence the boiling point is 203°F – 2.9°F. The answer is 200.1°F.
Example 2: The barometric pressure is 30.01″ Hg at 60 feet altitude. De-ionized water boils at approximately what temperature?
Answer: 212° – 0.05° = 211.95° +0.14° = 212.09°F.
Calibrating to Water’s Freezing Point
This method depends upon the thermometer being immersed in icy slush, where there is an interface between frozen water and water just at the freezing point. We use de-ionized water since dissolved substances can alter the solution’s freezing point. We can disregard the minimal effects of atmospheric pressure on the freezing point.
Here’s what you’ll need:
- De-ionized water (although water produced by reverse osmosis or distillation is a fair substitute)
- 4 ice trays (standard size)
- Blender, or icemaker capable of delivering crushed or shaved ice
- 1-quart jar
- Thermos Bottle (poor man’s Dewar flask)

Figure 4. Calibrating a thermometer using water’s boiling point in the laboratory. This can be replicated in the home with a little effort.

Procedure:
- Allow the thermometer(s) to equalize to room temperature for several days (especially if they have been used to read temps of hot water). This allows the thermometer to contract.
- Freeze de-ionized water in 4 ice trays. Place 1 quart of de-ionized water contained within a clean and covered jar in the refrigerator.
- In the blender, shave ice cubes to small particles, such as used in a snow cone or daiquiri. Pack this shaved ice into the empty Thermos bottle and then add the previously chilled water until full. Allow to sit for a few minutes and pour off water. Repeat this procedure twice.
- Place the thermometer in the ice bath and stir gently. Allow the thermometer’s reading to stabilize (this usually takes about 3 minutes).
Calibrating to Water’s Boiling Point
This method is easier than the Ice-Point Calibration but we must pay more attention to atmospheric pressure. The setup in Figure 4 should be self-explanatory. Bring the water to a rolling boil and do not let any part of the thermometer touch the container. Wear a heat-protective glove if you’re holding the thermometer in the water (it is better to devise some sort of jig to hold the thermometer while conducting the calibration).
Granted, you are a hard core hobbyist if you go to this amount of work to establish true aquarium temperature.
ASTM Thermometers
It is possible to buy highly accurate thermometers constructed to specifications of the American Society of Testing and Materials (ASTM). These are fairly expensive, ranging in price from ~ 50 to over $100 US. Table 3 lists the details of recommended ASTM thermometers.
| ASTM # | Test Type | Range (ºF) | Range (ºC) | Resolution | Immersion Type |
|---|---|---|---|---|---|
| 17C/F | Saybolt Viscosity | 66 to 80 | 19 to 27 | 0.1 C/0.2F | Total |
| 45C/F | Kimematic Viscosity | 74.5 to 79.5 | 23.6 to 26.4 | 0.05C/ 0.1F | Total |
| 23C | Engler Viscosity | n/a | 18 to 28 | 0.02ºC | Partial |
| 90C | Solidification Point | n/a | 0.1C | Partial |
Now that we have reviewed how thermometers function, effects of various factors and how to calibrate them, let’s put inexpensive ‘aquarium’ type thermometers to the test and compare their results to a calibrated thermometer.
Hagen Liquid-in-Glass Thermometer
These thermometers were chosen at random for testing purposes (they were simply the first I found during my search). These are the particulars:
- Measurement Type: Liquid-in-Glass
- Range: 40ºF to 120ºF (5ºC to 50ºC)
- NIST-Traceable: No way at this price!
- Length: 4 3/8″ (11.1 cm)
- Diameter: ½” (~12mm)
- Out of Range Alarm: Visual only
- ºF and ºC Readings: Yes
- Resolution: 1º F or C
- Accuracy: Not advertised
- Ballast Material: Magnetic, indicating ferrous material
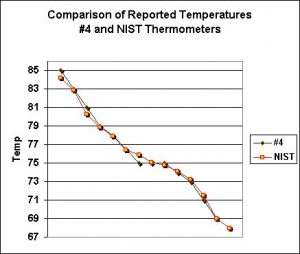
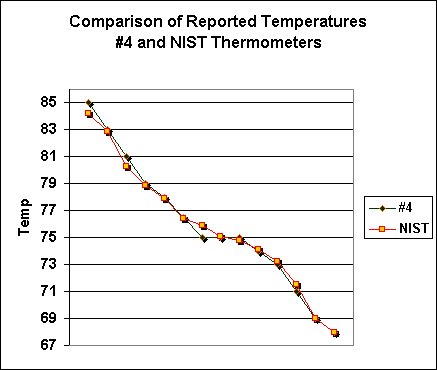
Figure 5. The thermometer with the ‘best’ accuracy (labeled as #4).
These thermometers do not have the range to allow calibration hence their measurements were compared to a NIST Traceable thermometer.
Testing Protocol
Ten Hagen thermometers were purchased through normal retail channels. These were placed in a 500 milliliter beaker that was slowly heated by a hotplate to about 85ºF (~29.4°C). A NIST-traceable electronic thermometer’s probe (previously compared to a calibrated liquid-in-glass thermometer) was also placed in the beaker. Measurements were recorded as the temperature fell to room temperature. In order to achieve temperatures below room ambient, the beaker was placed in a stainless steel dissection tray partially filled with water and several ice cubes. When the beaker water temperature had stabilized, it was removed from the tray and allowed to warm to room temperature. This procedure was conducted twice.
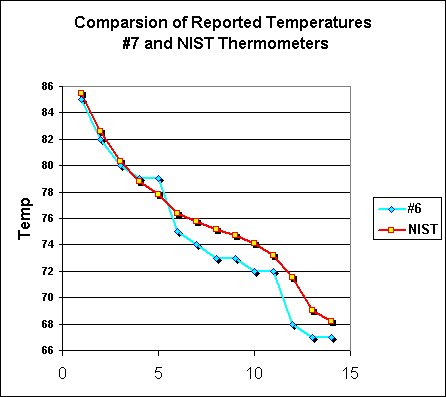
Figure 6. Results from the ‘worst’ thermometer (#7) and compared to the NIST-traceable thermometer.
Results
These thermometers reported a mixed bag of results. Of the ten tested, only two consistently reported results within 1ºF of the NIST-traceable thermometer. Four were within 1.1 to 1.5ºF. Three were within 1.6 to 2ºF, and the final thermometer was off by as much as 3.1 ºF.
Figure 5 shows the results from the most accurate thermometer, while Figure 6 shows the least accurate. Figure 7 shows one that read consistently high.
Obviously these thermometers range widely in accuracy. At best, they are reliable indictors of temperature. Where accuracy is a problem, there are two worst case scenarios. When the thermometer reports temperatures lower than actual, tank inhabitants (especially zooxanthellate corals) might suffer from heat stress while the hobbyist is unable to properly diagnose the problem. On the other hand, those thermometers reporting higher than actual temperatures could prompt the purchase of an expensive aquarium chiller. So what is the solution?
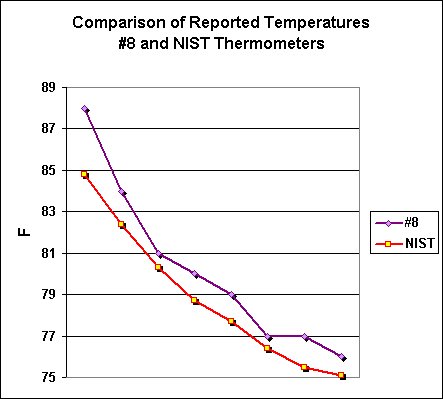
Figure 7. This thermometer (#8) consistently reported temperatures higher than actual.
The least expensive solution – Hobbyists could regard the temperature reported by these thermometers as an estimate and maintain a temperature well within the range considered safe for most corals (74º to 78ºF, or 23.3º to 25.5ºC).
A better but more expensive answer is to purchase a NIST Traceable or ASTM thermometer.
This is not to say that these thermometers are not adequate for some applications. Indeed they are in situations where temperature is not as critical as that for reef aquaria. Certainly, these might be suited for tropical fish-only marine and freshwater aquaria.
The Case For, and Against, Inexpensive Two Kinds of Liquid in Glass Thermometers
Hagen Aquarium Thermometer
Pro:
- Inexpensive
Con:
- Quality varies among units
- Difficult to read
- Fragile
- Breakage introduces unknown liquid and iron pellets to aquarium
‘Laboratory’ Thermometers
Pro:
- Accuracy
Con:
- Expensive
- Breakable
- Some are filled with mercury
Next time, we’ll look at digital thermometers using thermistors and those ‘stick-on’ liquid crystal thermometers.
References
- Wise, J., 1991. A procedure for the effective recalibration of liquid-in-glass thermometers. NIST Special Publication 819.

0 Comments