


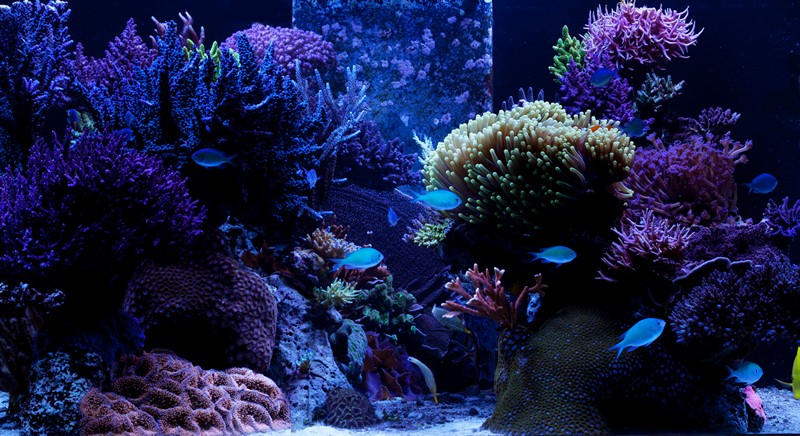
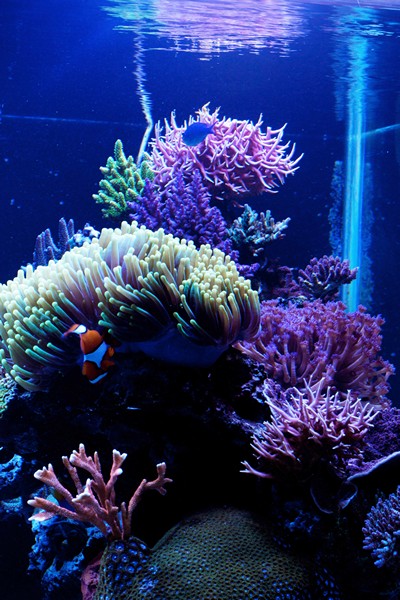
My system consists of over 700 gallons including a 240 gallon display tank, a 300 gallon Agway livestock trough as a sump, and a 180 gallon frag tank. I have over 2000 watts of light including four 400 watt Radium bulbs, four 110 watt VHOs,and four newly added 30 watt blue LED strips. I believe in using the Berlin System and don’t like additives or fancy equipment although I do have a skimmer, a kalkwasser stirrer, and a Calcium Reactor. The latter I have because my corals consume an enormous amount of calcium and alkalinity which kalkwasser alone can not keep up with. I run the metal halides for 10 hours, the VHOs for 14 and the LEDs for 16, and I keep my tank at precisely 79 to 80 degrees F with a Ranco controller and a small fan. So there you have my tank in a nut shell, and a synopsis of what is most common in tank articles. Now let’s talk about the good stuff. How exactly did I become an advanced aquarist and how can you become one too . . . now that’s an interesting story.
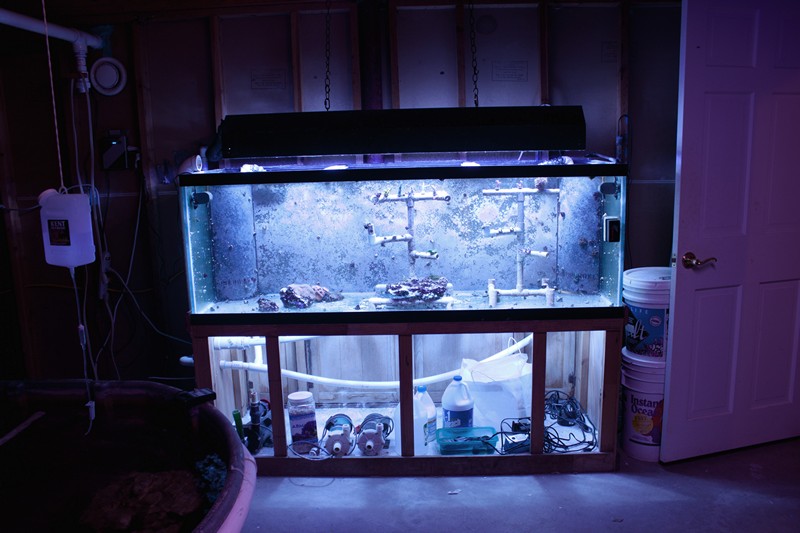
Editor’s Note: There’s more photos of Joe’s awesome 240 gallon tank in his this month’s Feature Aquarium Photo Album.
Beware the Salesman
In the fall of 2001, I walked into one of the local fish stores and was immediately struck with the “bug”. Being a typical American male who is only satisfied with instant gratification I ended up walking out of the store with a 7 gallon bowfront tank, 2 clown fish, a heteractis magnifica, and an assurance from the proprietor that all would be well as long as I kept changing the water weekly. Obviously that was a disaster; so, on to another LFS and an upgrade to a 50 gallon tank with water, live rock, and live sand taken from the shops reef system so I could avoid that pesky cycle. Sadly the 3 hippo tangs, 1 damsel and the still living two clowns could tell you that the cycle was terrible with ich killing 2 of the 3 hippos. Finally after 2 dead fish and a dead anemone, I ran into Chris Jessen who was the owner of Reef & Fin in Stamford, CT. I knew I had found the right spot when I asked to use the stores restroom and found a paper target with the name of the first local fish shop I had visited printed on it at the base of the urinal. The difficulty was I continued to hear conflicting information. I would go online and read about the latest skimmer, lamp, or vodka dosing scheme and go to Chris convinced that I had to have “the thing” to make my system successful. He, of course, would laugh and reach into his vast encyclopedia of knowledge and explain how he had already tried such and such years ago and I didn’t really need it, but if I had to have it, he’d be more than happy to sell it to me. Over the years, I went through this process again and again. At one point I was conversing online with a well known marine biologist who had me convinced that the spectrum of my lighting could never effect the color of my corals, and at the same time a second well known name tried to impress upon me the critical importance of using a deep sand bed never mind that neither of them had reefs of their own they were the voices of authority and I was loath to ignore their advice. Then, quite suddenly, my first aquarium epiphany hit. If someone has a tank and coral I like, all I need to do is copy their system, and my success should be guaranteed. Hah, if only it could be so easy!
Copy the Good – Find Your Inspiration
The first system I tried to copy was Chris Jessen’s show tank. It didn’t matter that he had a retail operation, if he had a 300 gallon sump then by gosh I needed a 300 gallon sump as well. The 280 gallon display tank I created simply by copying everything Chris did came out fantastically and gave me a chance to gain enormous experience in keeping many different corals, but I was always struggling to keep it pest free and to get color on the corals placed in the lower zones.
 After a year or so I had the unbelievable luck to visit Steve Weast’s home in Oregon and got to see what a home reef could look like in the hands of a truly advanced aquarist. After leaving his home and making a brief stop at ReefStuff.com to visit another “old salt” Rick Souta also in Oregon, I left with a new found dedication and a plan for the future. I knew I couldn’t duplicate Steve’s OCD fanaticism for cleanliness, but I also realized if Rick and Steve could grow colorful corals year after year without any special equipment or gimmicks then so could I especially if I used homegrown frags of proven heritage. They had tanks full of nothing but colorful corals of amazing size that they had grown from tiny frags over many years and the only thing I could see different from what they were doing and what I was doing was their maintenance regimem and their reliance on a combination of 20000k lamps and 10000k lamps in the same hood. Not too long after visiting Oregon, I saw my first open top system online. Instantly the benefits were clear to me. The ability to reach and touch any part of the tank at any time meant I could fix any problem that arose quickly and easily. My strategy changed from simple emulation to one of active design. I became determined to create something new and better.
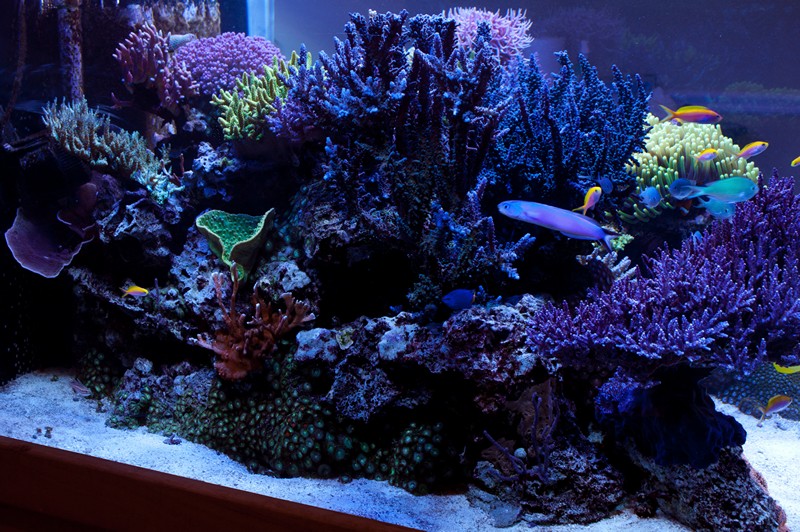
Design with a Purpose
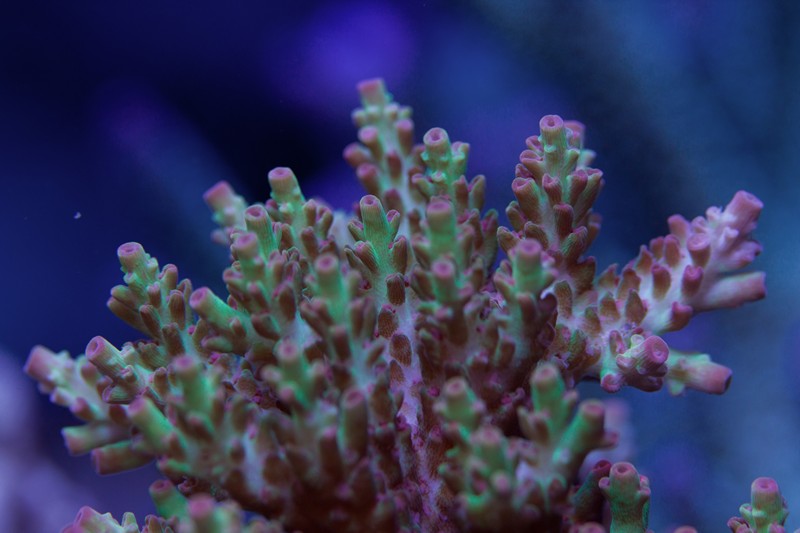
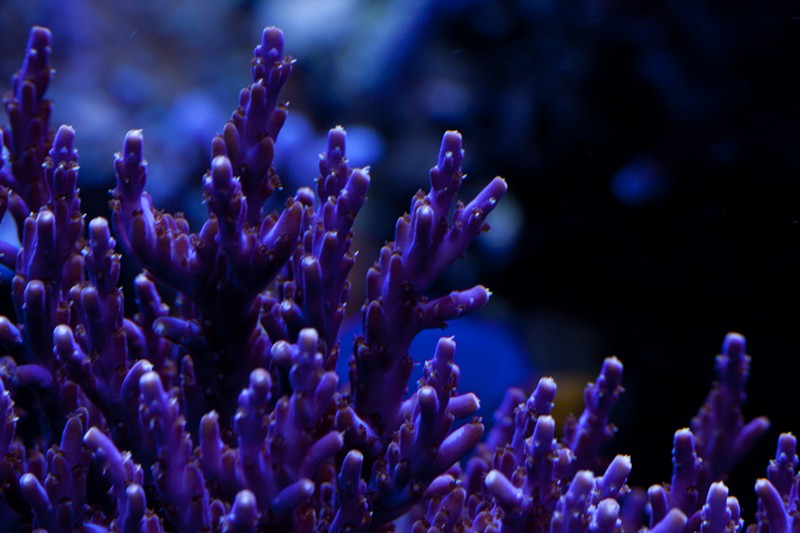
 When I sat down to design my current system I spent considerable time trying to think about what it is I want from this hobby. That’s when I realized that for me reef keeping was akin to gardening. I love colorful acroporas, seriatoporas, and stylophoras. The challenge of learning to grow and keep healthy corals was my driving force, fish and soft corals were but secondary fillers. I began to think of my next tank as similar to learning to grow a bonsai or an orchid. I had a picture of what I wanted it to look like and now all I needed was the skill set to grow the corals in just that way. By relying on corals I had and coral frags grown in others tanks, I would know what colors and forms were possible and therefore I would have a steady barometer upon which to measure my success. If a coral failed to achieve its color potential or took on a strange form I could be certain I was treating it wrong, and in keeping with that same philosophy I wanted space for the corals to grow as big as they might in nature which meant that I would have to restrict my coral selection to a chosen few. Gone would be the days of collecting specimens for the sake of collecting, but then again that fit nicely with my growing sense of conservation. With the areas of coral collection being restricted more and more world wide, I was proud that my new tank would be dedicated to growing captive raised stock. So you can see, everything about my new design was for the benefit of my corals. Beginning with the tank itself.
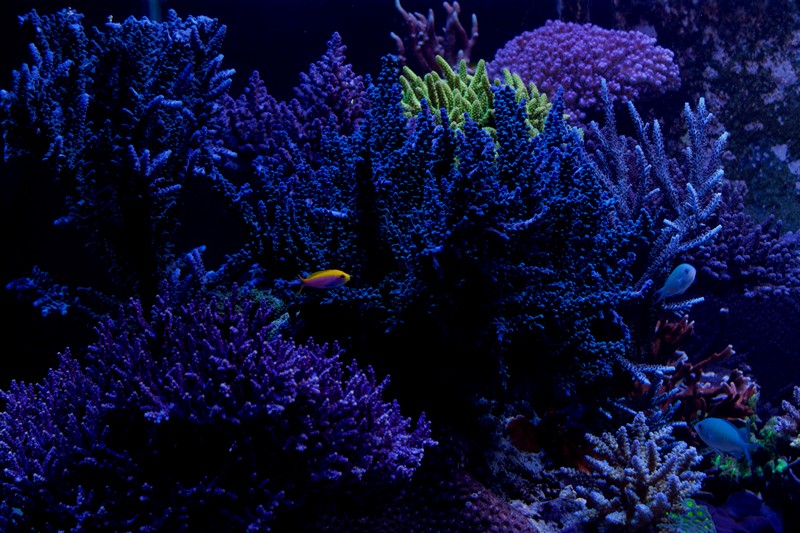
It’s All About the Tank
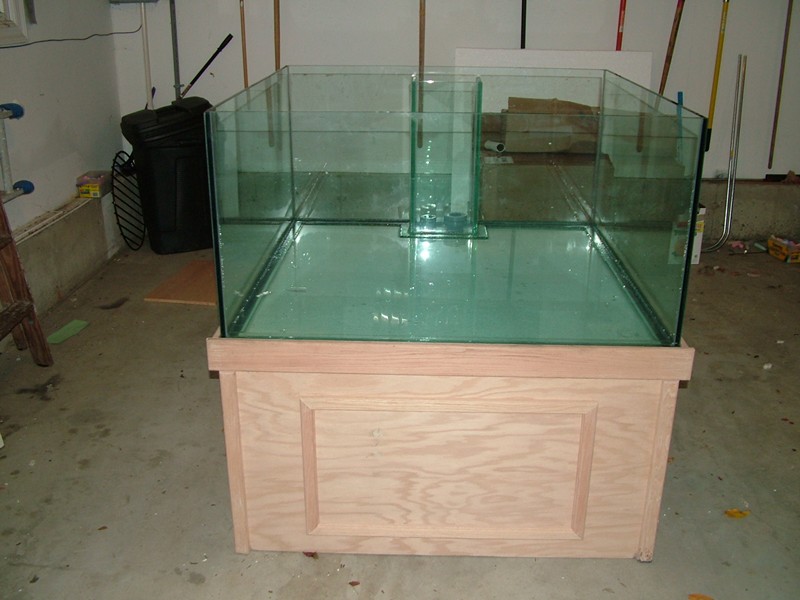
 My biggest problem up to that time was the difficulty I had in working on my display. The 280 I had was acrylic and had 3 small cutouts on the top. The stand brought the front glass up to a height for ideal viewing while you were standing. In order to work on the tank I needed a ladder, and I had to either remove the 72 inch fixture from the hood or contort myself under it. For really big work, I needed another strong person to lift the 100 lb cabinet off the top. It looked great and made for a nice piece of furniture, but it severely hampered my hands on maintenance. My new tank would be the complete opposite. The stand would be low enough to allow access with no ladder. The glass was thick enough so there would be no braces on top to distort light or hinder adding and removing rocks or corals. The tank was limited to 24 inches in height to allow a normal arms reach from top to bottom. Everything about the layout was intended to make working on every inch of the tank easy. The only limitation I saw was that one would have to sit to optimally view the tank, and any fish that had a tendency to jump would not be good for this tank, but since my focus was my corals and not the fish the latter was of little concern, and given my tendency to stare at my tank for hours on end at night sitting was preferable anyways. Lastly, the tank was to be square. This meant I could build two pillars of live rock with a deep channel in between in a small attempt to mimic the basic design of Steve Weast’s tank. Also having a square tank meant I could place two light fixtures above the tank, and if I built the pillars just close enough to each other and slightly off the walls I would be able to insure that every coral was receiving light from all sides thus preventing the corals from becoming brown on the sides facing away from the light. In addition, the plan called for a small overflow to maximize the space for aquascaping. I opted to have an internal overflow to keep the tank from extending too far out into the center of the room, and that is the only element of my design that I would change if I were to start over today. The acrylic cover on the overflow is an unnecessary eyesore and the extra space in the tank would be most welcome. In any case the smaller overflow meant that main tank circulation would be low and the primary in tank water movement would come from my Tunzes. A nice aspect of the two pillar design was that the Tunzes could hide behind the rock work and therefore remain hidden when viewing from the front. Regardless of how small the overflow was the open top did bring an added concern of noise, fortunately I was able to use a modified Stockman pipe design to silence the flow. The drain is 1.5 inches but I added a small piece of 2 inch PVC to the 1.5 inch drain pipe and then put another 1.5 inch piece on top of that with a 3 inch cap at the very top and the drain holes inside the cap along the 1.5 inch pipe. I’m not a plumber, and I’m uncertain of the dynamics involved but the drain is absolutely silent even though it’s flowing an easy 500 gallons an hour or more. Unfortunately for me and my new plans, my wife was on to the costs associated with this hobby so I was also restricted by a tight budget. I found a discount tank manufacturer that made strong but perhaps ever so slightly imperfect tanks and ordered a new 240 gallon 48 x 48 x 24 tank and stand for only $700. Then borrowing from something I’d seen online I went to home depot and purchased electrical conduit that I bent into an L shape for hanging the lights. The only expensive parts remaining were the light fixtures, but I sold some old equipment and made up for the cost of the two new 48 inch PFO combination VHO and MH light fixtures.
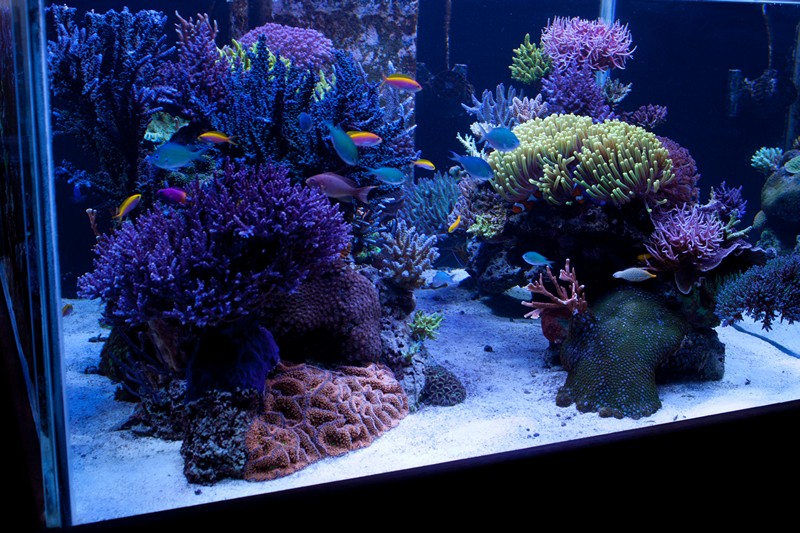
Lighting – Hang It Up but Don’t Get Hung Up
 As has been said many times over, by aquarists far more skilled than I, lighting is a personal choice, and one that can overwhelm beginners easily, but for me it was simple. After years of looking at other successful acropora filled tanks the most common combination I saw was 400 watt Radiums and T-12 UVL Super Actinics and that was what I planned on using initially hence my purchase of the PFO hoods which are perfect for such a combination. I still believed (and do today as well) that certain corals benefit from 10000k lighting, particularly reds and pinks, but when I tried to mix 10000k metal halide with the Radiums the differences in color were quite apparent across the tank so instead I opted to run four metal halide Radium lamps, two UVL 110 watt Aquasun lamps, and two UVL Super Actinic lamps this way I felt I had all the bases covered. (Just recently I mounted four 48 inch ReefBrite LED strips to the sides of the fixtures and removed the Super Actinic lamps and replaced them with two additional Aquasun lamps in the hopes that this will enhance the growth of my elusive red stylophora that has been struggling to grow for 3 years.) The ballast choice was also easy as the whitest look only comes from the venerable and now extinct PFO-HQI ballasts. The overdriven lamps clearly get the job done and I was concerned about life expectancy, but so far I have been getting a steady year of service from each lamp and never had any fail on me yet. I have had to replace the capacitor on one of the ballasts, but that has been the only trouble to date. One of the more challenging aspects of establishing the lighting regimen was deciding on the length of day. Initially I read some research that made me suspect, the average aquarium light system was excessively saturating the corals, but when I tried to reduce the photoperiod to eight hours or so the results were dramatic, negative, and rapid so I quickly returned to my previous 10 hours of metal halide lighting. My hope is that the new LED technology will pave the way for a giant reduction in my electric costs, but I’ll reserve judgement there until I see a few more examples of established tanks grown exclusively on LEDs as proof.
Day One a New Tank
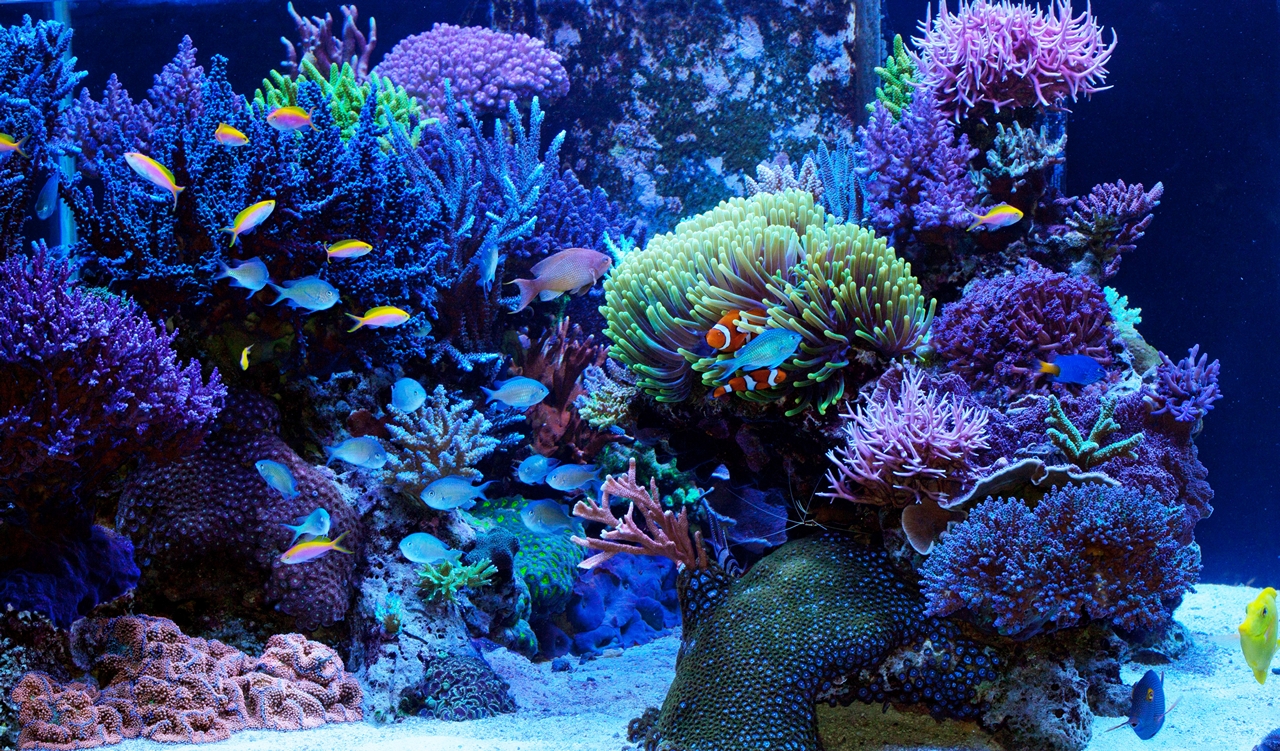 The day of the switch all went well and in September of 2007 my new tank was up and running. The hardest part for me was sticking to the plan. When I was done on that first day my tank looked horribly bare. I was desperate to fill it in with new corals, but then I was dedicated to my new plan, and somehow managed to resist the temptation. I even tried to avoid fast growing corals as much as possible. I put the few fast growers I had on separate pieces of rock so I could remove the entire colony if need be when it grew too large, but growing every coral perfectly isn’t easy and I still had much to learn. Placing a low light Lokani in a high light location simply won’t work. Placing a stylophora in high flow that worked for a humilis didn’t work. Over time I got better at placement and now I even go so far as to research the corals natural habitat when possible. My most recent frag purchase was an echinata and thanks to a conversation with a diver in Australia I managed to place it in an area of medium regular flow and low light that seems to suit it perfectly. Because of my focus on corals from other reefers tanks I am keenly aware of how the corals can look both in color and form. So if my lokani isn’t purple or my seriatopora isn’t brilliant pink something isn’t right, and that I think is the secret to a great reef and being an advanced aquarist. When you can look at your tank and see a coral losing color, AND you know you skipped a water change or haven’t checked your parameters lately that’s when your tank will get to the “next level””. This awareness is what forces one into a strict regimen.
Maintenance is Everything
 Gone are the days when I skip a skimmer cleaning or a water test. If one of my corals is pale or my goniopora is retracted I know something is wrong and I take action, but slow action. For example, when I test calcium or magnesium and the results aren’t normal, I’ll check the results 3 times and even try to find someway to test the test itself before I make a change. Where I used to accept my brine refractometer calibrated at 77 degrees with only RO water now I use a saltwater dedicated refractometer calibrated at precisely 20 degrees C and double checked with a 35 ppt calibration fluid. I have become a water quality fanatic desperate to keep my water as close to an Indonesian reef as possible. I try not to let my calcium stray more than +_ 20 ppm or my alkalinity vary greater than 0.3 meq/L. (Incidentally, the maintaining of proper alkalinity has proven by far the biggest challenge, and I’d love to see some future work as to why that might be.) I change 50 gallons a week religiously, and keep all my pumps in tip top shape with a regular cleaning in vinegar. If my sand looks dirty I clean it with a siphon or a slotted spoon and replace it with new cups of clean sand as needed. Rather than trying to remember when I last changed my bulbs I keep a journal and even write the date of installation on the ends to be sure, but the regimens alone I don’t believe are the whole answer. The successful reefs I tried to copy all had heavy bio-loads with a resulting heavy reliance on a healthy Berlin System. To me the recent research showing how little organic waste is removed by skimmers is proof enough of the importance of live rock as a natural waste removing factory. I contemplated trying the much discussed Zeo-vit system at one time, but after a great deal of research I decided that the additives were snake oil and the zeolite was doing nothing more than providing an extremely porous rock upon which bacteria could cultivate and the rinsing action of the zeovit reactor was keeping the bacteria barrier clean and active so instead of zeovit I simply added 200 lbs of live rock in my sump and began rinsing it regularly in old tank water to keep it in good waste eating shape, but even with all that extra care and proper maintenance, I still needed more to make it perfect.
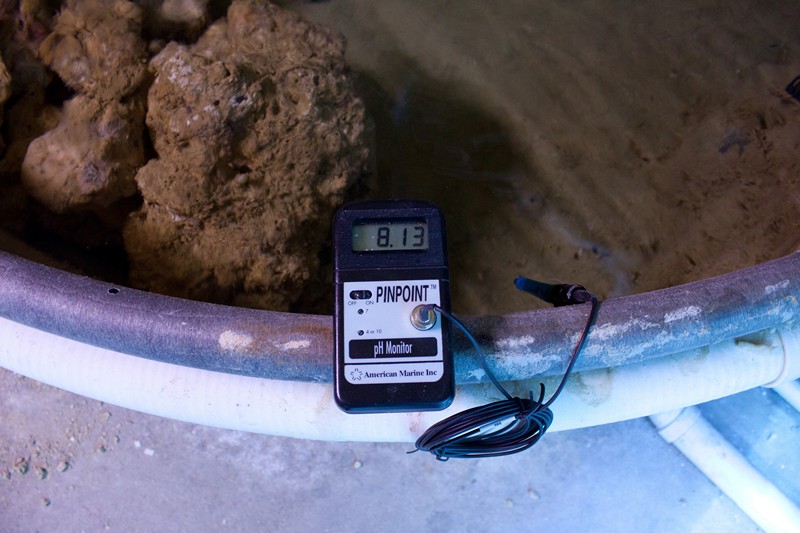
| Parameter | Result |
|---|---|
| Salinity | 35 ppt (D D Saltwater refractometer 1.0265) |
| Calcium | 420 ppm (Elos) |
| Alkalinity | 7 dKH (Salifert) |
| Magnesium | 1300 ppm (Salifert) |
| pH | 8.1 (Pinpoint) |
| Temperature | 79° F |

| Item | Equipment Used |
|---|---|
| Heat/Cooling | Ranco Controller with dual Jager 250 watt heaters and fan |
| Top Off | Maxijet 1200 feeding from 150 gal RO/DI holding tank (70 drips/min) |
| Dosers | Kent Marine gravity feed for B-Ionic 2 part dosing |
| Drain | DIY modified Stockman |
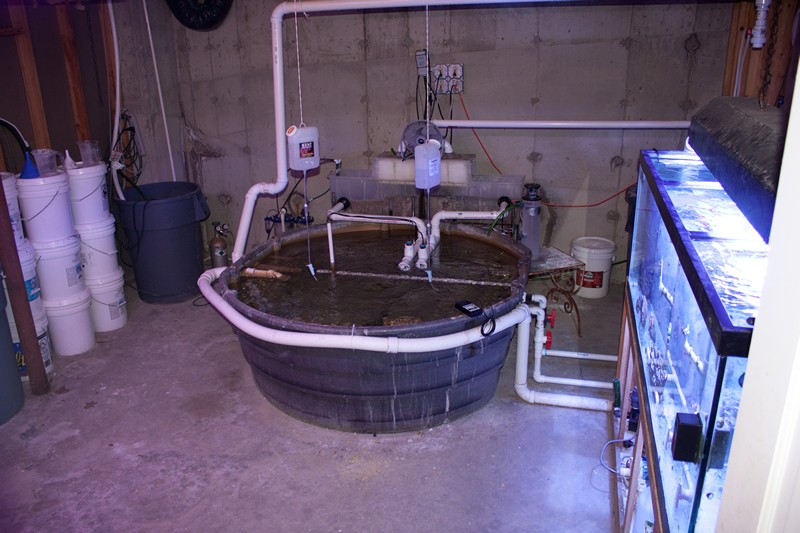
| Filtration | 2 x Marineland Tidepool II sumps with trays |
| Kalkwasser | Deltec Stirrer |
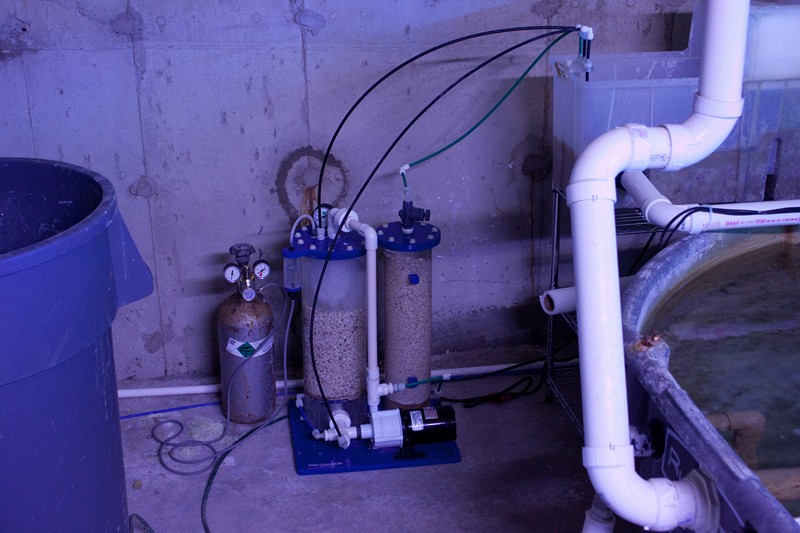
| Calcium Reactor | MTC ProCal |
| Wavemaker | tunze 7094 Controller |
| Powerheads | tunze Turbelle Stream 6105 |
| Main Circulation | Iwaki 100RLT – half to display; half to frag tank (1000 gals/hr) |
| Skimmer Pump | Iwaki 100RLT |
| Skimmer | MTC HSA 1000 |
| Frag Lighting | 3 x 250 watt Radiums on PFO-HQI ballasts 2 x 60 inch UVL Super Actinic bulbs on an IceCap 660 ballast |
| Primary Lighting | 4 x 400 watt Radiums on PFO-HQI ballsts 2 x 48 inch ReefBrite Blue LEDs 4 x 48 inch UVL Aquasun bulbs on an IceCap 660 ballast |
| Frag Tank | 180 gallon Oceanic tank and stand |
| Sump | 300 gallon Agway livestock trough |
| Display Tank | 240 gallon Glasscages tank and stand (48 x 48 x 24) |
| Item | Used |
|---|---|
| Sand Bed | 1 inch/ 5 micron |
| Supplemental | 200 lbs live rock in sump |
| Display | 200 lbs live rock various varieties |

| Item | Used |
|---|---|
| Salt | Coralife |
| Iodine | Kent Marine Tech-I |
| Added Calcium and Alk | ESV B-Ionic 2 part |
| Calcium Hydroxide | ESV kalk |
| Reactor Media | CaribSea ARM coarse media |
| Light | Time |
|---|---|
| 400 watt Radiums | 9AM to 7PM (10 hrs) |
| Aquasun VHOs | 8AM to 8PM (12 hrs) |
| ReefBrite Blue LEDS | 6AM to 10PM (16 hrs) |
Hard Corals
- Acropora Tortuosa (Oregon Tort)
- Acropora Tortuosa (ORA Tort)

- Acropora Lokani (30,000 Leagues)
- Acropora Valida (Tyree Purple Monster)
- Acropora Abrolhosensis
- Acropora Gemmifera
- Acropora Humilis
- Acropora Millepora
- Acropora Nana
- Acropora Plana
- Acropora Prostrata

- Acropora Tenuis
- Acropora Secale
- AcroporaTuraki
- Blastomussa
- Cyphastrea
- Favia
- Hydnophora
- Montipora Capricornis
- Montipora Digitata
- Pocillipora

- Seriatopora
- Stylophora
- Turbinaria
Soft Corals
- Palythoa (Purple Death)
- Ricordea
- Zoanthids
- Actinodiscus

- Gorgonian
- Goniopora

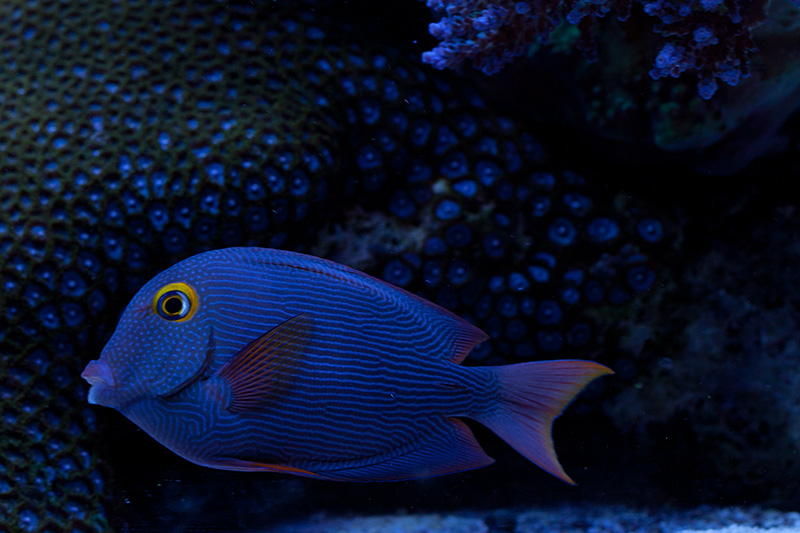
Fish
- 1 Coral Beauty
- 1 Kole Tang
- 1 Royal Gramma
- 1 South Seas Devil fish
- 1 Tilefish

- 1 Yellow Tang
- 2 Banggai Cardinal
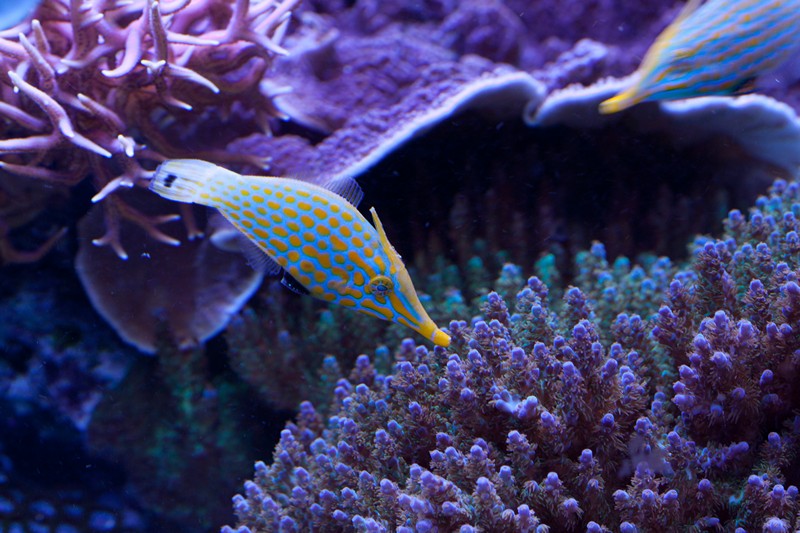
- 1 Longnose Filefish
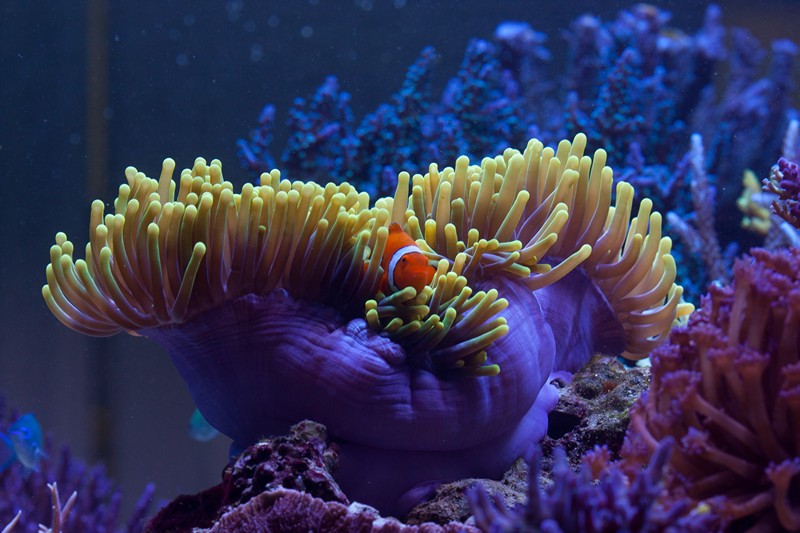
- 2 True Percula
- 3 Red-Striped Cardinals
- 3 Yellow Clown Gobies
- 1 Black Clown Gobie
- 20 Damsels
- 13 Bartlett Anthias
- 2 Lyre Tail Anthias

Invertebrates
- 1 Bullseye Pistol Shrimp
- 2 Pinstriped Tuxedo Urchins
- 2 skunk cleaner shrimp
- 5+ emerald crabs
- 10+ Peppermint Shrimp
- 10+ red leg hermits
- 100+ blue leg hermits

- 100+ Turbo snails
Maintenance Schedule
Daily: clean glass, feed twice (frozen: brine+, mysis, cyclop -eeze, arctic pods, bloodworms, sushi grade fish eggs), check basement, worry about developing algae bloom, top off sump with RO if not right on, check pH monitor for 8.1 and temp for 80, add 200 ml of B-Ionic 2 part if pH is 8.0 or less.
Weekly: 50 gallon water change (Coralife salt), clean skimmer, clean teeth on overflow, clean anti-siphon hole in return line, pull and inspect Stockman drain, mix next weeks water, clean and refill Deltec Kalk stirrer, add 100 ml Kent Tech-I iodine, siphon detritus as needed.
Monthly: siphon sand bed clean, run 2 trays of carbon or 2 combination carbon/phosphate remover filter pads for 2 days or so to uncloud water, test water for Ca (Elos), Mg (Salifert), pH (Pinpoint), salinity (D-D refractometer), kH (Salifert). Make adjustments as necessary to hit 420 ppm Ca, 1250 ppm Mg, kH 8, pH 8.1, salinity 35 ppt.
Quartlery: Take out the 2 Tunzes and replace with clean standbys, then leave the dirty ones to soak in vinegar for a couple days, take out 2 Maxi-jets in frag tank and replace with clean ones then soak old ones in vinegar, remove and clean stockman drain, clean pump intake screens, vacuum sump bottom, rinse live rock in sump with old tank water saved in 40 gallon garbi can, sell frags and make some new frags.
6 Months: change RO/DI carbon block and 0.5 micron pre-filter.
9 Months: Change VHOs and record date on end of tube and in tank journal
Annually: Change MHs, exchange 2 main pumps for clean pumps and disassemble and clean old pumps for next year using Muriatic Acid, change RO/DI DI cartridge and RO cartridge, 300 gallon water change (usually associated with some major event like plumbing change or re-aquascape or, heaven forbid, a pest treatment or just a major sump cleanout.
When Needed: add sand if bottom shows, run phosphate remover, clean scale off heaters, buy cleanup crew to knock back whatever algae bloom hits Mithrax for valonia, nudibrancs for Briopsys, etc; clean and refill calcium reactor, exchange CO2 bottle, replace RO float shutoff switch, trim corals or even remove whole overgrown colonies (this happens once a year at least and is always a little sad) change Via-Aqua powerhead on bottom of sump (keeps the surface stirred up).
There’s More to Consider
Very quickly I knew that being neat and clean wasn’t enough so I tried to consider every element I could. For instance I read an article showing corals absorbed sugar water faster when placed in a wave environment with a cycle that operated between 1 and 3 seconds so now I pulse my Tunzes on their fastest setting. I use two Tunzes on opposite sides of the tank and only run one at a time for a period of six hours so no coral is subject to excessive laminar flow which might cause it’s form to become irregular. I considered removing my kalkwasser stirrer, but then I found evidence linking kalk to phosphate removal. I added two small tray filters between the skimmer and the sump for ease of media addition. When the water gets cloudy or the sand forms a red diatom, I can add some carbon or phosphate remover for 48 hours or so and then easily dump it out, but I never leave the media in for extended periods as I fear it can be too effective in removing too much of both good and bad elements. Also the trays allow me to run 0.5 micron filter pads if the water seems to be getting heavy in dusty particulate, and even though I believe skimmers are not as important as originally thought I did increase the skimmer pump from an Iwaki 55 to an Iwaki 100 to insure the greatest bubble production possible. Unfortunately some years back I discovered that my basement is high in CO2 so I drilled a hole to the exterior of the house and ran an air hose from the skimmer air intake to the exterior of the house. Then too I try to keep pairs of fish and shrimp and shoals of fish all in an attempt to create mated pairs that spawn regularly and feed the system indirectly. I always keep a pair of cleaner shrimp in my tank as I find nearly all the fish will visit them on a regular basis so I must assume their is a need for parasite removal just as in nature. As a brief aside I have not had any outbreak of fish disease or parasites since I began the habit of keeping cleaner shrimp. All of which is to say I promote the overall health of each inhabitant in any way I can, and even more importantly I have the patience to stick with a creature even when it looks doomed. When I first purchased my tiny frag of Oregon Tort in 2003 it was a mere 1/2 inch in size, and fell into the sand initially and died half away, but I placed it carefully into a more secure location, gave it plenty of free space, and it grew slowly but steadily into the monster that it is today. My second heteractis magnifica I purchased in the spring of 2002 (for the record I would never advocate purchasing these anemones and will never buy one again; their survival rate is too low)and it started life with me in my 50 gallon tank under 150 watt metal halides. During the first few weeks it climbed around the tank and twice got sucked into a Maxijet powerhead intake screen, and I had to cut away pieces of its pedicle to free it. Eventually I built a tall rock pile as high as I could under the MH lights and topped it off with a perfectly smooth rock and then suddenly the anemone stopped wandering. When I tried to feed it frozen cubes it would take them in then spit them out half dissolved, but I persevered and simply took the half eaten waste out and fed the anemone again. It took years, but today the anemone has split 3 times and has grown in size and stinging ability many times over. The changes came slowly, one might even say glacially and that is where patience and dedication pays off. Clearly good things come to those who wait so if you’re just starting out I can’t stress enough the importance of patience and dedication.
Stick With It – Be Prepared
No matter how dedicated you think you are when you start, there comes a time in every reefers mind when they ask themselves if it really is all worth it. For me the worst moment came in August of 2003 while I was on vacation. All of New England experienced a blackout and my house was without power for 48 hours. When the tank sitter finally arrived more than half the tank was dead. Perhaps the bigger miracle is the fact that I didn’t lose everything, but there I feel the benefit of the basement sump played a big role. In any case, I was distraught at the loss and ready to throw in the towel. Fortunately my wife gave me the encouragement I needed, and I made sure to never have that problem again by purchasing a generator. Virtually every mistake you can think of has been made so if you are starting out today take the time to learn from other’s disasters and prepare yourself for the inevitable. What will you do when the power goes out? How will you handle a main circulation pump that suddenly freezes up? Who will check your tank when you’re on vacation? Do you know what to do if you overdose alkalinity and cause a sudden precipitation event? (The answer is do nothing.) Nearly always there will be simple answers whether that be battery operated air bubblers or a neighbors kid, but if you haven’t thought about it the frustration you feel when the problem suddenly hits can be debilitating. Plan for the worst and you’ll find it easier to handle the unexpected. Because if you quit you’ll never reach that dream you had in mind when you started.
It’s All About Friends
In the end though, there is one critical element without which I could never have succeeded: my fellow reefers. Whether it is Dana Riddles articles on light, frags from super aquarist Keith Berkelhammer, or help from Jason Edward of Greenwich Aquaria with routine care and vacation reef sitting, I could never have the tank I do today without all the help. The hard work of our reefing community is unbelievable. The growing availability of homegrown frags and even fish means we should all be able to enjoy this hobby for decades to come. So if you want to be a successful coral gardner too, my advice is find some friends who have already done it, read as much as you can stand before you start, and take your time to do it “right”.

0 Comments