

Recently, I was reminded by a friend how great today’s smart phones are for photography. It seems he wasn’t talking about your casual photography, where you shoot a photo or two during a party or take some pictures of your fish tank. He seemed genuinely convinced that smart phones now pretty much had replaced the big, bulky cameras of yore. The reason I mention it is that I encounter many people, mostly on the internet, who believe the same thing. Often, people claim smart phones produce high quality, sharp images. I completely agree. When viewing life through a smart phone, that is. The tiny screens of smart phones have high pixel densities, which is why everything looks so sleek. The same goes for the photographs and videos you shoot with said phone. However, when I look at footage made by the latest generation smart phones on my 24 inch computer screen, I’m less than impressed. Oftentimes, the images lack contrast, exhibit lots of noise and they’re simply not sharp. I know, photography is my passion, so my standards may be different from those of the average person. Most people won’t carry a lumpy camera around anyway, and instead rely on their compact phone. But if you would like to print your images, especially at larger sizes, or if you like to view them on larger screens, my thesis is that smart phones do not compare to DSLR’s or similar cameras. So, in my humble opinion, smart phones produce images which look great on smart phones only.

Still shot of an Anthelia polyp, made with a Nikon D610 camera. Images made with DSLR’s can be viewed on large screens, or printed in magazines, without loss of quality.
That ends my rant about smart phones! Thanks for bearing with me. My point is that for the photography enthusiast or professional, a quality camera such as a DSLR (or mirrorless camera) is a must. Not only do these cameras produce the best images, they give you lots of room for creative photography, including high resolution time-lapse photography (even though some smart phones do a reasonable job in this respect as well).
In this article, I will focus on time-lapse photography using a DSLR camera and macro lens to document the behavior of marine life in aquaria. Just to give you a heads up: I am primarily a marine biologist, not a professional photographer. I am simply trying to convey my thoughts about, and experiences with, photography. My opinions and recommendations, therefore, may conflict with those of the photography experts out there. In addition, if you’re not familiar with photography, it may help to read up on this subject before continuing with this article.
What is time-lapse photography?
Time-lapse photography is a technique where captured images are viewed at a much faster rate than that used to capture them. This reads a bit abstract, so let me give you a clear example; if we photograph a subject at one image per second for some time, we can compile those images into a video and play it at thirty frames per second, effectively speeding up time by a factor of thirty. If we further reduce the rate at which we photograph our subject in real time, say one image every five seconds, we can speed up real time by a factor of 150. So, time-lapse is all about speeding up processes we can record in everyday life. In this case, we will accelerate animal behavior.
Time-lapse video featuring Acroporids. Like all videos in this article, I recommend watching them on a large screen rather than your phone.
Why time-lapse photography?
Some of you may wonder why I even bother producing time-lapse videos, since you can also make a casual movie of aquarium life with a phone or consumer handycam. Well, I use time-lapse mainly to reveal behavior which otherwise would not be apparent on everyday time scales. Corals, for example, move their tentacles and mouths quite slowly, making these animals appear much more static than they actually are. The same goes for many other invertebrates, which from our human perspective, move about quite slowly. When using a macro lens, you can further reveal interesting behavior or morphological details you may have never seen before. For example, the feeding habits of crinoids, sea cucumbers and corals can be visualized in minute detail. Below, you can see three examples. The first segment shows the movement of a crinoid’s arms and pinnules (arm branches). You can also see details such as sticky tube feet on the pinnules, which the crinoid uses to trap food particles. The second one shows a sea cucumber munching away on coral sand, digesting detrital matter present in the sand. In the third segment, you can witness the feeding habits of tiny stony coral polyps, here capturing live copepods. Such videos are educational and add depth to the aquarium hobby.
Crinoids do move about, albeit slowly. With time-lapse, we can see these creatures are quite busy feeding on food particles.
A sea cucumber (Holothuria atra) ingesting coral sand.
Stylophora pistillata polyps feeding on copepods. Note that several polyps actually “compete” for the same food items. I wouldn’t call this true competition since the polyps form one larger organism, and also share nutrients.
The camera
If you’re interested in making decent time-lapse videos, you’ll need some gear to do that. When it comes to gear, as always there’s many ways to go about it. First, let’s discuss the main tool, the camera. When we talk about digital cameras, we often refer to DSLR’s, which is short for Digital Single-Lens Reflex camera. DSLR cameras use a mirror which reflects light passing through the lens to the viewfinder. This allows the photographer to capture (almost) exactly that which is seen through the viewfinder. During picture taking, the mirror flips up briefly to allow light to hit the camera sensor.
I use two DSLR’s made by Nikon, although competing manufacturers also produce high quality cameras. My older camera is a DX model, a D5000, and the other is a D610 with a full frame/FX sensor. These are neither the very best nor the newest cameras made by Nikon, but in many cases, including mine, there’s a budget to consider. The DX sensor format is used by Nikon, and is quite similar to APS-C sensors of other brands such as Canon. With a sensor size of 24 by 16 mm, it is typical of consumer DSLR cameras. Cameras with this sensor size produce decent quality images under most conditions. When light is lacking, however, or when you cannot or don’t want to use a flash, using a larger full frame/FX sensor can be beneficial. As aquaria are often relatively dark compared to most conditions, and using a flash is difficult when shooting at least hundreds of images for a short time-lapse sequence, I invested in a full frame camera with FX sensor. With a size of 36 by 24 mm, it is over twice as large as its smaller DX cousin and therefore captures more light. The D610 is quite affordable for a full frame model, and allows me to shoot low noise images without a flash under low light conditions. Of course, other full frame models and brands exist with also do the trick.

My tools of the trade; a Nikon D610 with full frame sensor (left), and a Nikon D5000 with smaller DX sensor (right). The difference in sensor size is reflected by the camera mirrors.
When shooting with a macro lens, an advantage of DX cameras is the so-called crop factor, where the DX sensor captures a smaller area than FX cameras. This helps bring the subject that is photographed closer, providing more detail. On the other hand, modern cameras have sensors which capture lots of pixels, allowing for aggressive manual cropping using imaging software. My D610, for example, shows a wider field of view using the same lens as my D5000, but with its 24 Megapixel sensor, I can dramatically crop the image when I produce a time-lapse video to bring my subject closer. So, in the end, it’s up to you what type of camera you use.
Now, why wouldn’t you buy a full HD (1920 x 1080 pixels) or 4K (usually 3840 x 2160 pixels) video camera and record video to create time-lapse footage? Of course, that strategy is a good way to go, but it does have its technical and creative limitations. I prefer making 4K videos which include movement, where the video is zooming in, panning to the left or right, up or down or even rotates for dramatic effect. In order to do that, you need to capture frames with a higher resolution than the 4K frame, which usually contains 3840 x 2160 = 8.3 Megapixels. Now, my 12 and 24 Megapixel cameras take care of that, allowing me to move the larger frame around digitally through the smaller 4K frame (see editing below for details). Of course, you can also physically move a video camera around using motorized devices, but to me this seems more cumbersome. In addition, shooting at 24 Megapixels (or even higher) allows for aggressive cropping when you produce full HD videos. As full HD video has a resolution of 1920 x 1080 = 2.1 Megapixels, the crop factor is significant at 3.3. This means you can digitally “blow up” your subject to reveal the smallest details (see editing).
Macro time-lapse of a Cladonema radiata, a tiny jellyfish. By zooming in digitally, it creates a more dramatic effect.
Having lots of pixels to work with allows for all sorts of creative effects, such as this rotating sequence of a Scolymia australis coral.
I am mostly discussing DSRL’s in this article, my first choice for aquarium photography. When you operate in the field, however, these cameras can become even more cumbersome and expensive. A proper underwater housing for a Nikon will set you back thousands of dollars. An affordable alternative for field setups is a quality action cam such as those from the GoPro series.
This video was made by Dr. Pim Bongaerts off Heron Island, Australia using a Canon G12.
The lens
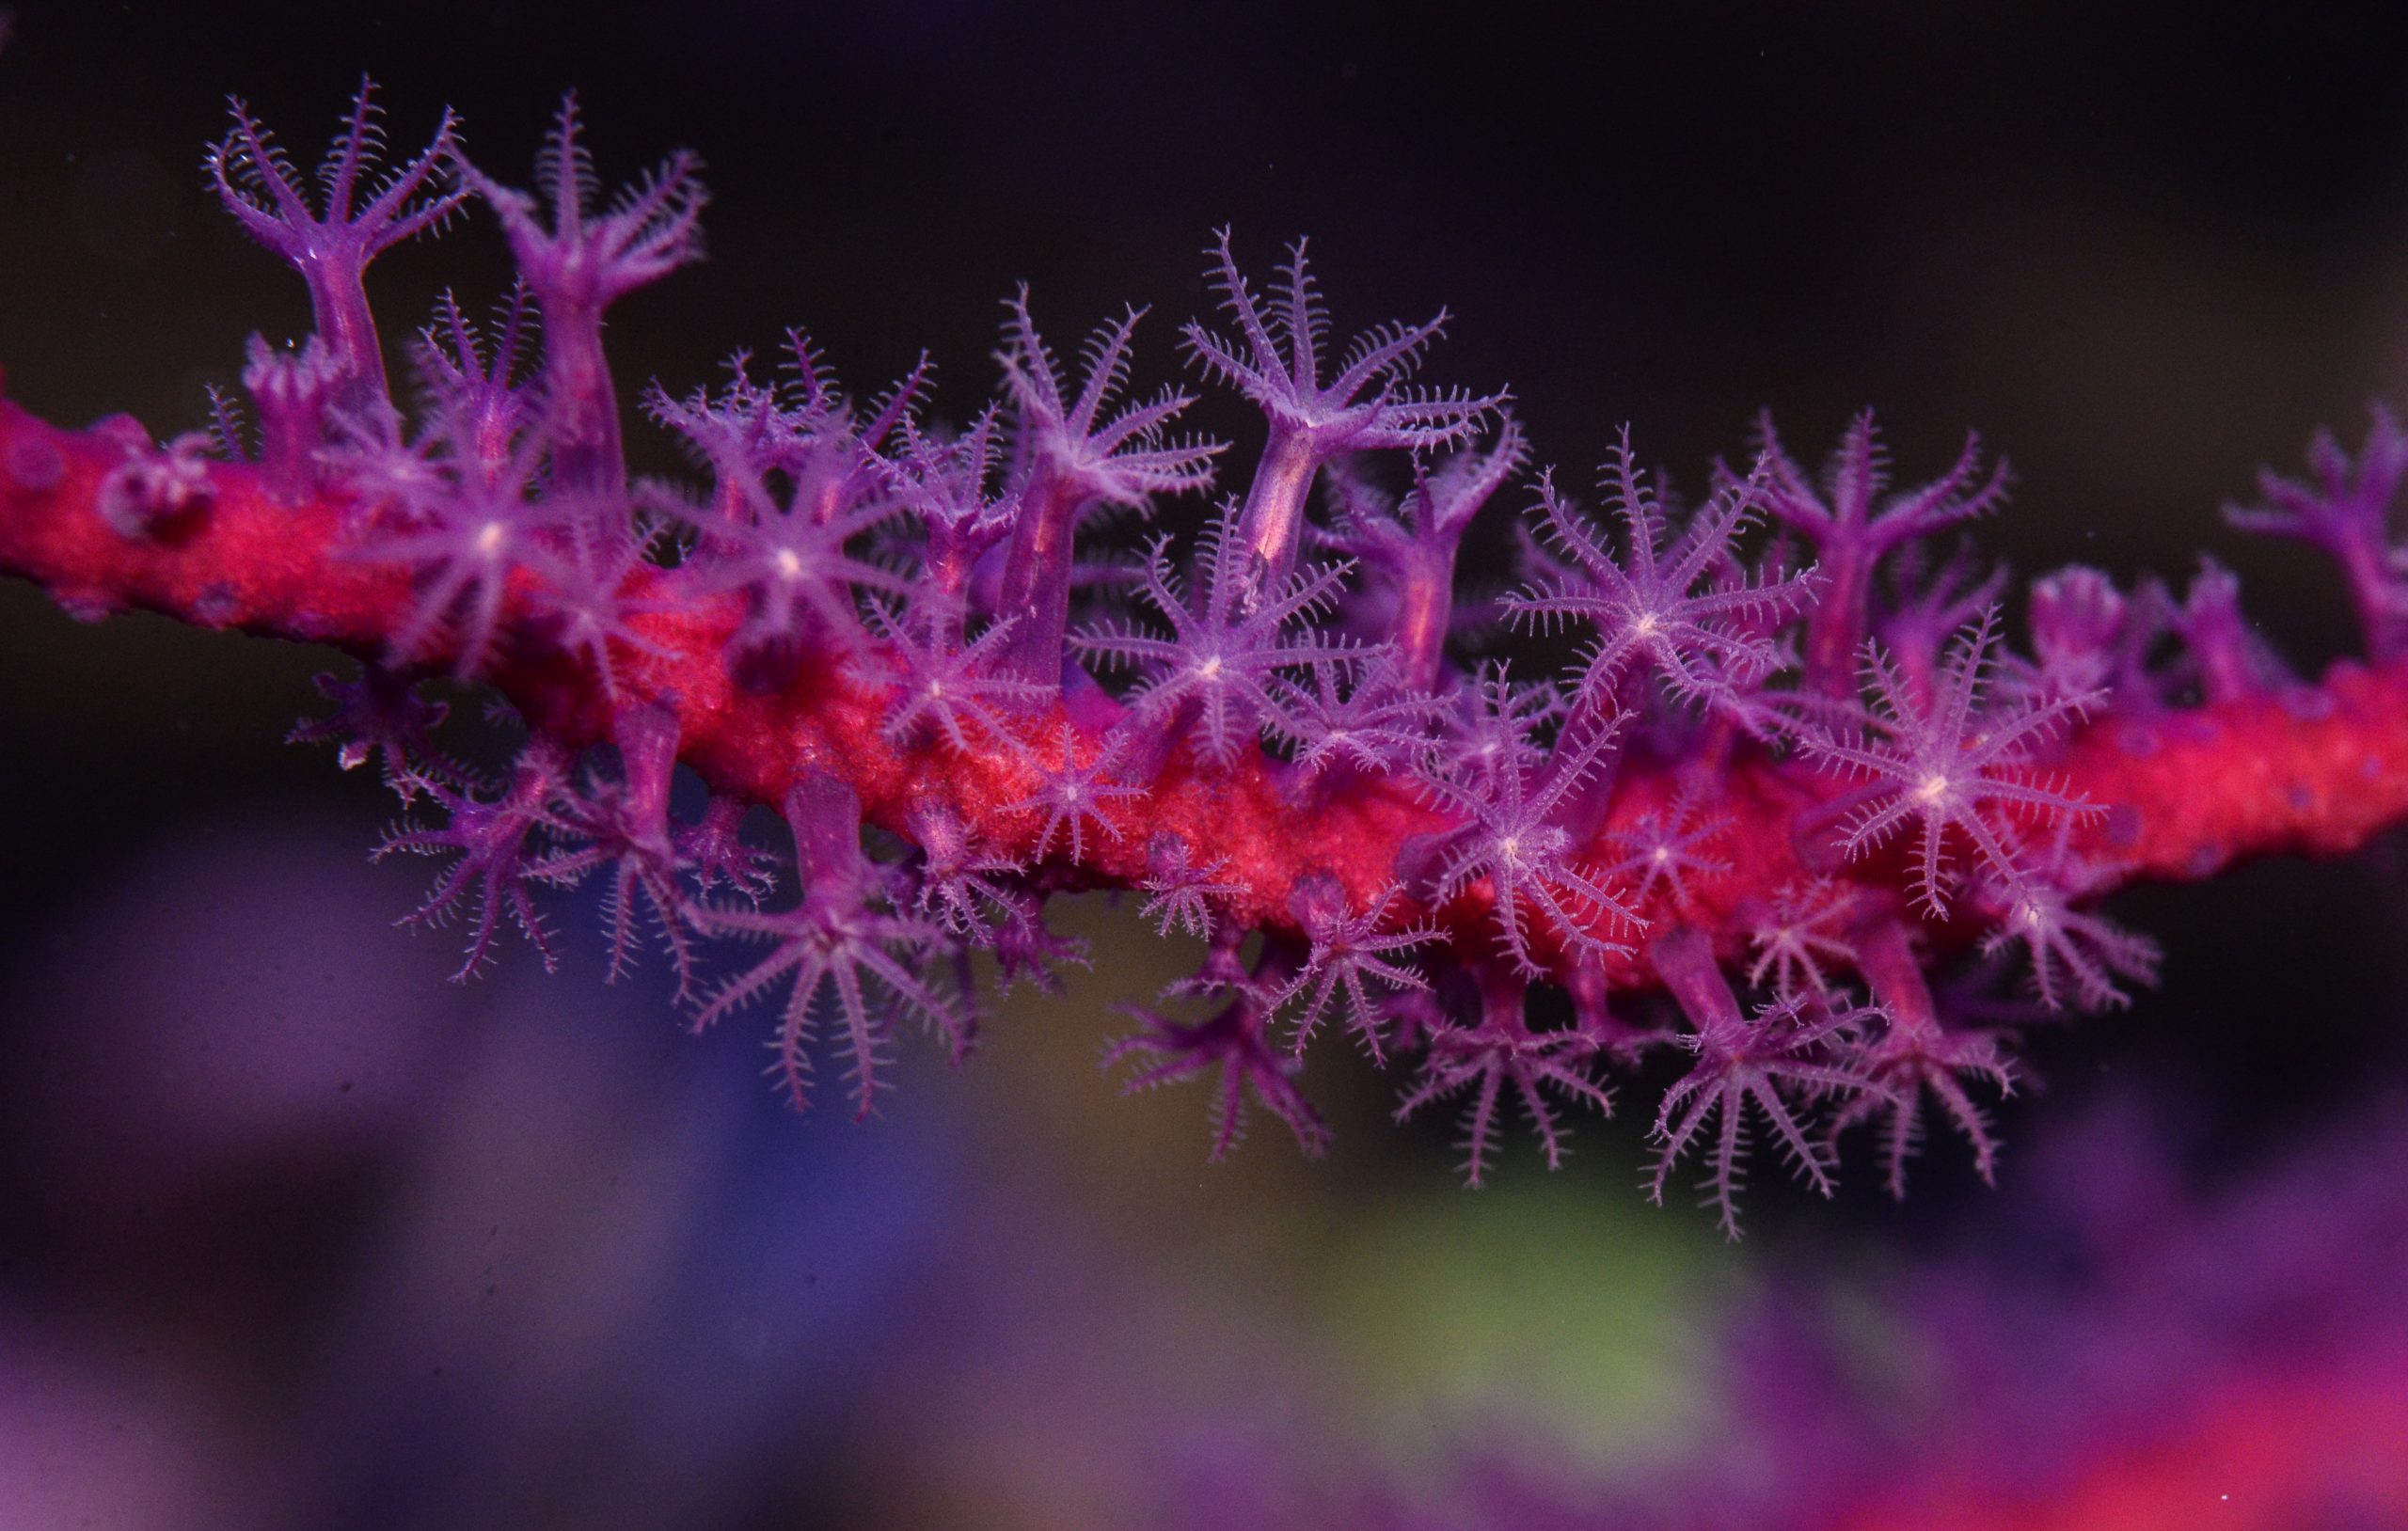
Image taken with the D610 and 60 mm Nikkor AF-D. After cropping, these Menella polyps are revealed in high detail.
The second critical part of your gear is the lens, which screws onto the DSLR camera body. As I mentioned above, I won’t discuss all aspects of time-lapse photography here but rather focus on macro and close-up photography. Although several definitions exist, macro photography is usually defined as as shooting images of small subjects where the image captured on the sensor is life-size or greater. After digital cropping of the image, the end result is a dramatic enlargement of the subject, revealing lots of detail.
Many types of macro lenses exist, with various focal lengths. I mostly use a 60 mm Nikkor lens (type AF-D), which has a very short focal distance. This means that I have to get close to my subject in order to capture it in maximum detail. Using a 105 mm lens would be more convenient for marine life, as it allows you to obtain maximum close-ups of subjects that are further away from the camera. For example, a coral may be fixed onto live rock at four inches from the aquarium’s front panel. With a 60 mm lens, you wouldn’t be able to get the most out of the lens as the coral would be beyond its focus distance. The 105 mm lens, however, would have no problem achieving maximum close-up due its longer focal length. That’s why insect lovers prefer longer macro lenses, so they don’t scare away their subjects by getting too close. Of course, cropping your images later will solve (part of) that problem. With a 200 mm macro lens, you would be able to get very close to subjects even further away from the camera.

My Nikon D610, equipped with a borrowed 200 mm macro lens. Notice the long distance between the camera and aquarium.
Macro lenses of 105 mm and upwards do have several disadvantages, however. The first issue is obtaining sharp images when photographing by hand. The longer the focal length of the lens, the more small hand movements are augmented by the lens, often resulting in images with reduced sharpness. As we are dealing with time-lapse photography, this first issue is of course irrelevant. As time-lapse footage consists of many individual photographs, a tripod or something similar is required to prevent the video from becoming shaky. A second disadvantage is price level; macro lenses beyond 100 mm often carry a hefty price tag. If you’re not on a budget, and serious about photography, investing in a 105, 180 or 200 mm macro lens is a good strategy. This allows you to also shoot macro footage of aquarium life at longer distances from the camera, thus located further away from the aquarium’s front panel.
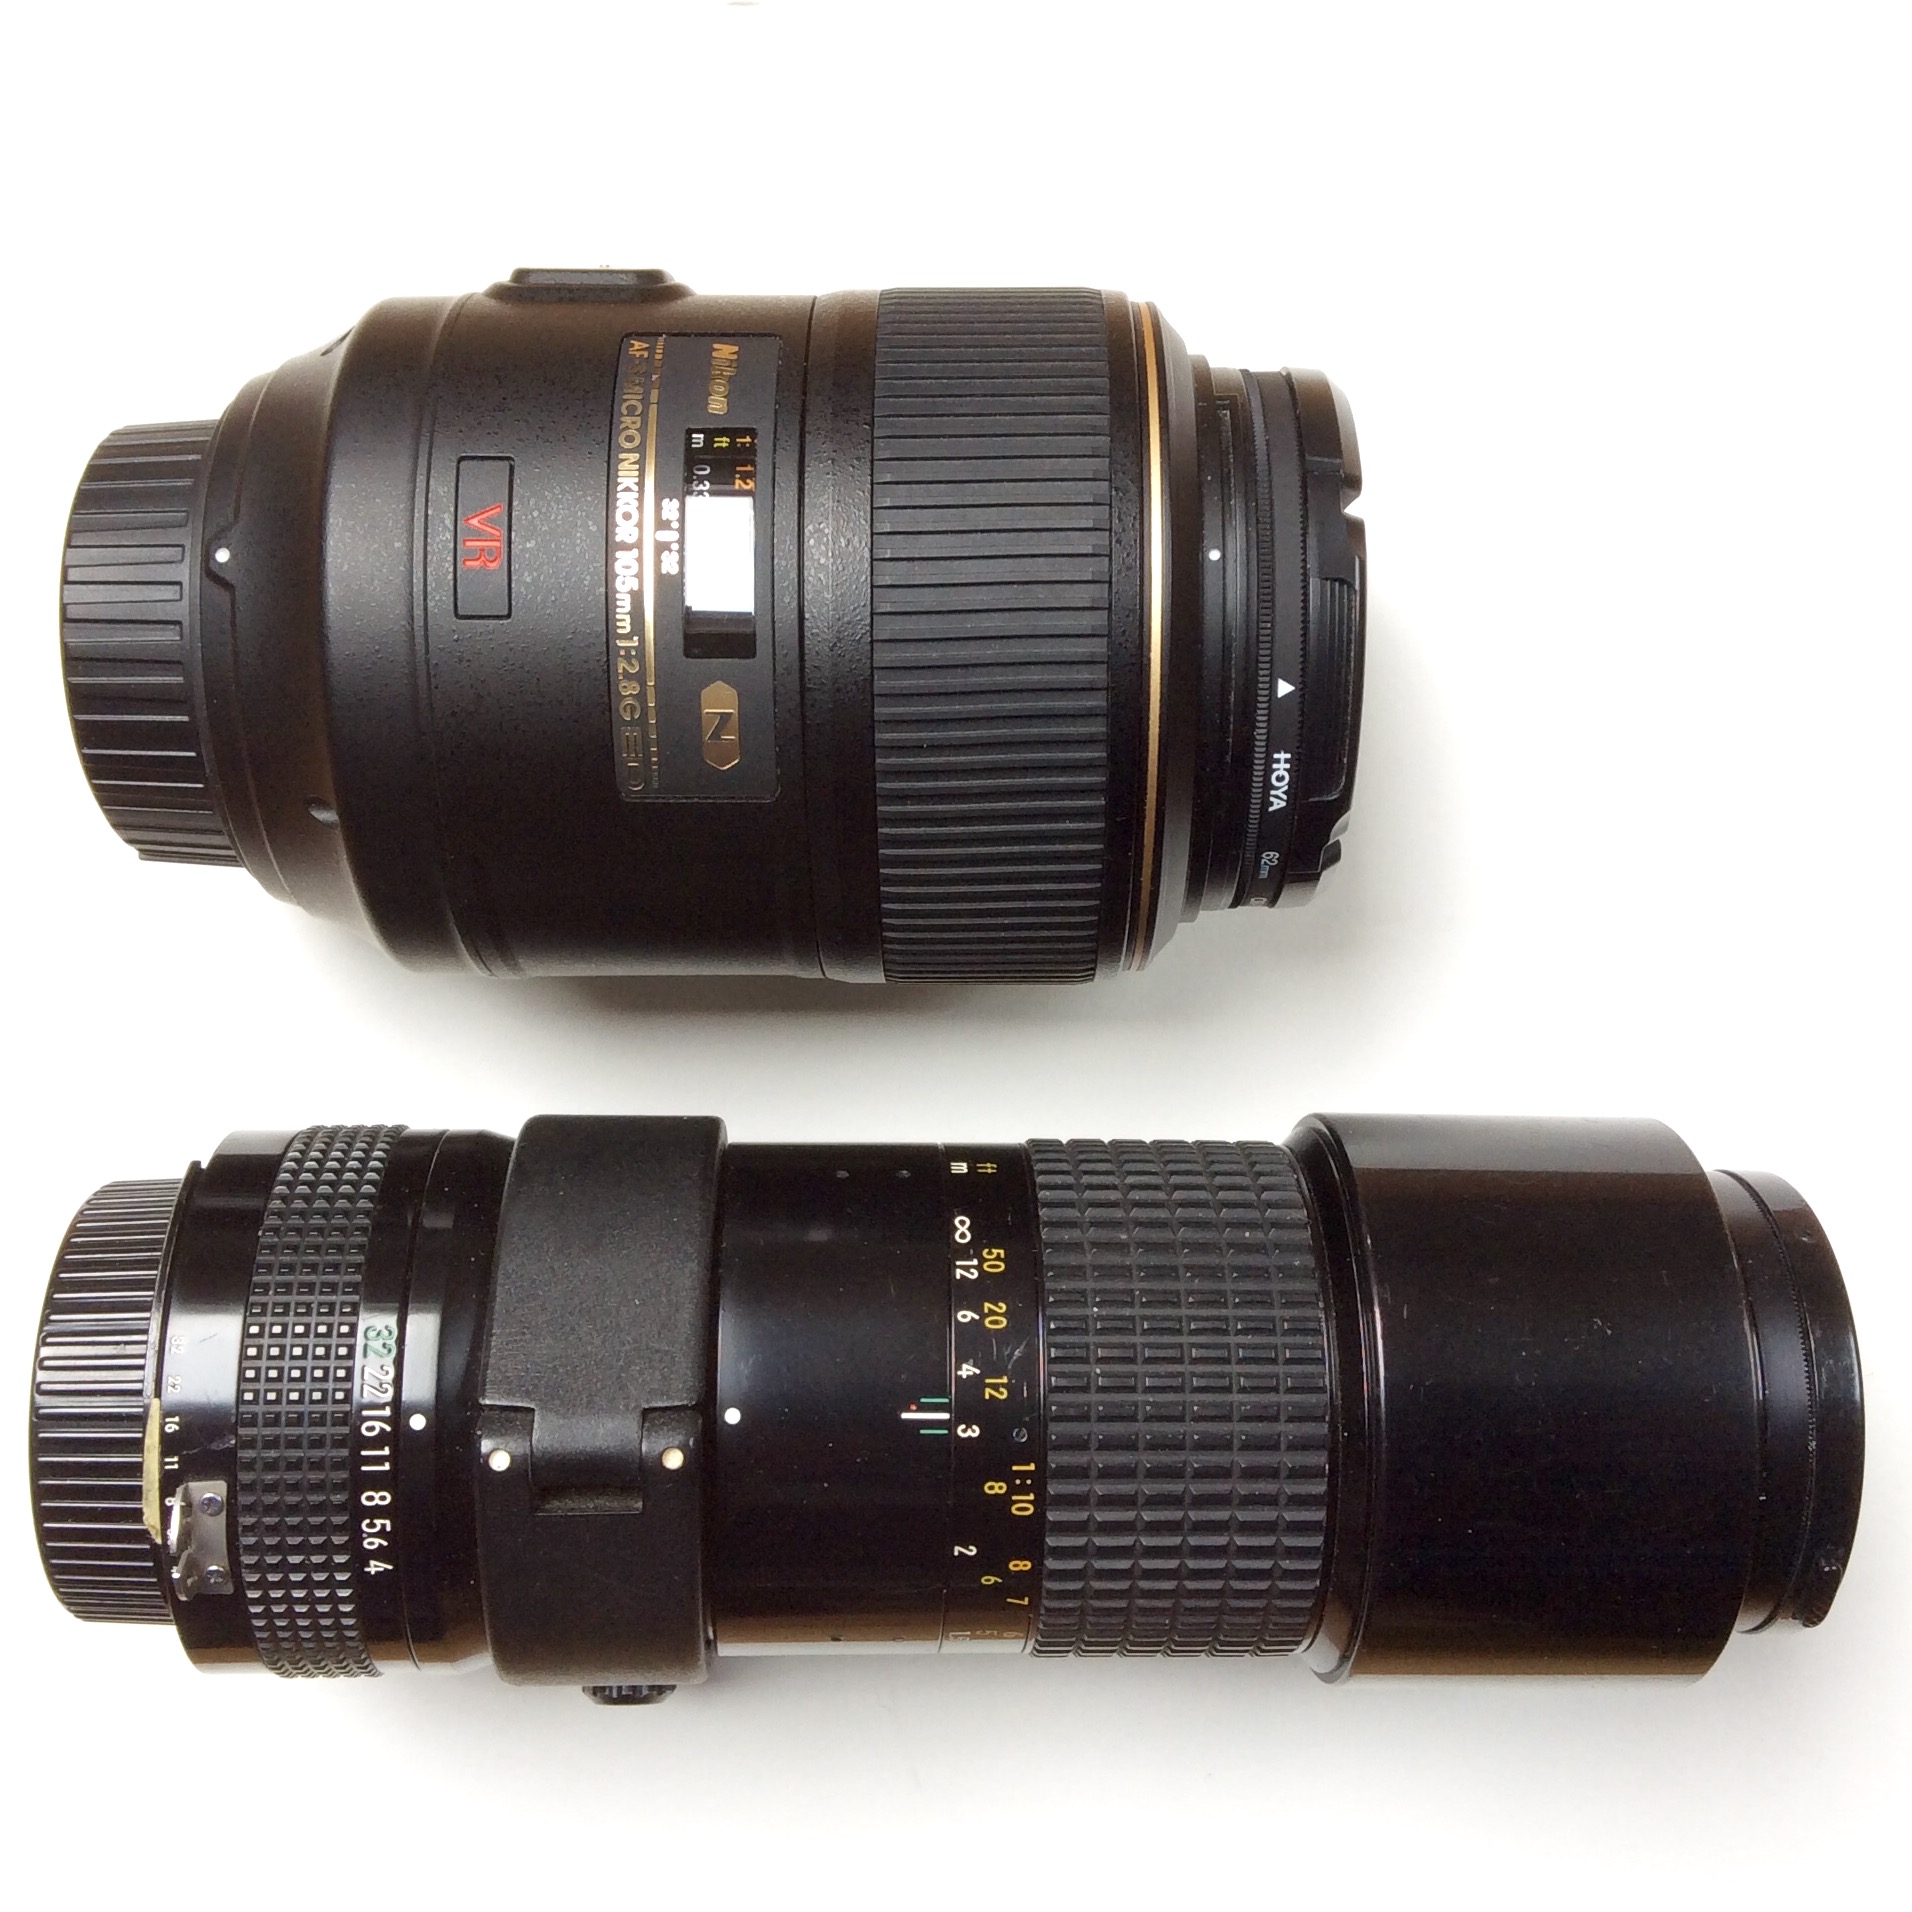
Two great macro lenses which I sometimes borrow from a friend; a 105 mm (top) and 200 mm (bottom). Image: Rick van Kesteren.
Tripods and other camera supports
When doing time-lapse work, stability is key. Remember, time-lapse videos are nothing more than lots of photographs being displayed in quick succession. If the frame, i.e. that which is seen by the camera, changes even slightly during shooting, this will result in poor quality videos (see editing). An exception is a motorized or otherwise mechanical setup where the camera moves around slowly, in smooth fashion.
In the same way as for cameras and lenses, when choosing a tripod you can select from countless brands, types and price levels. If you shoot with longer macro lenses, especially at 200 mm, a sturdy tripod is important. This is because the DSLR produces vibrations, which can translate into blurry images if the tripod is not sufficiently stable. Using a mirrorless camera will fix that problem as well. I mostly shoot at 60 mm, so I often make do with a cheap, 30 euro aluminum tripod. I am partial though to the heavier, sturdy tripods produced by Manfrotto.
Your standard tripod usually is sufficient for time-lapse and macro work, but sometimes a situation asks for a different approach. For example, my friend and I recently made time-lapse videos of corals directly shot from above, as we were dealing with species that are best viewed that way. These were Scolymia australis corals, amongst others. We fed them with frozen feed (Mysis and Artemia) and recorded their feeding behavior. To do this, we put a camera on a microscope mount, and suspended it above a small aquarium in which the corals were placed.

Two setups for time-lapse work; a regular tripod (left) and a microscope mount (right). The coral on the right was also shot under blue light to enhance coral fluorescence.

A frame of the video produced using the camera on the microscope mount.
Sometimes, an aquarium is placed on a support with an edge, preventing you from moving the camera and tripod close enough to the subject. In such cases, you can mount additional horizontal supports to move your camera away from the tripod, allowing the camera to hover above the edge and closer to the aquarium’s front panel. Another useful tool for shooting time-lapse with macro lenses is a focusing rail, which allows you to move the camera in very small increments for easier focusing on the subject.
Extension tubes
As I already mentioned, producing time-lapse footage using a DSLR (or mirrorless camera) allows you to be very creative. An interesting addition to your setup is an extension tube, which moves the lens further away from the camera sensor, magnifying the subject. This is especially powerful in combination with a macro lens, allowing you to get very close to your subject for high magnification. If you are interested in capturing the smallest details, this is the way to go.

My D610 with 60 mm Nikkor and Meike extension tube, consisting of three separate rings. The additional LED spot provides the much needed light, as the long tube makes it harder for light to hit the camera’s sensor.
As always, each setup has its disadvantages. The longer your extension tube, the higher the magnification. However, with higher magnification, the so-called depth of field (DOF) is affected. DOF is the distance range in which objects appear sharp in an image. For example, with a narrow DOF, only parts of the subject are sharp, and the fore- and background are blurry. A narrow DOF is typical for macro lenses, especially when using extension tubes, making it harder to produce sharp images. Narrow DOF also occurs when using microscopes. When targeting a single coral polyp using an extension tube, even getting the the entire polyp sharp can be a challenge. The trick is to reduce the camera’s aperture manually, increasing DOF to an acceptable level. With my 60 mm Nikkor lens, I mostly use apertures in the range of F10 to F32, higher numbers indicating smaller apertures and wider DOF. The smaller, the better. Of course, this reduces the amount of light passing through the camera. My primary strategy here is to use additional spot lights, to provide the camera with as much light as possible. This also helps solving the second issue of extension tubes, which is reduced light capture by your camera.
If your images remain too dark still, the next step is to increase exposure time by reducing the shutter speed. If you go too low, you images will become blurry due to movements of your subject (also see setting up). Yet another trick here is to increase the light sensitivity of your camera’s sensor, indicated by the ISO value. The higher the ISO value, the higher the camera’s sensitivity to light. Again, there’s always a disadvantage, as higher ISO values reduce the camera’s signal-to-noise ratio. When the ISO level is set too high, this translates to noisy, grainy footage, which in most cases is undesirable (unless you want to create a certain look). More expensive cameras, especially those with larger full frame sensors, have high signal to noise ratios (i.e. high light sensitivity). This allows you to work at higher ISO levels without compromising image quality. For example, my Nikon D610 produces low noise images at ISO 2,500, allowing me to work with small apertures for sufficient DOF and higher shutter speeds for sharp images. Without extension tubes, and with good aquarium lighting, more affordable DX/APS-C cameras also work fine in combination with macro lenses. The advantage of these cameras is that their smaller sensor results in a 1.5x crop factor, making extension tubes less important as the subject already is enlarged.
This video of an Echinopora lamellosa rejecting food items was made with my Nikon D610, 60 mm Nikkor AF-D and a 36 mm Meike extension tube. Note the limited depth of field, despite selecting a very small aperture.
Capturing fluorescence
Next to extension tubes, countless other creative options exist to produce an interesting video. One of my personal favorites is fluorescence photography using a yellow long-pass filter. Although I realize some photography purists out there will scold this approach, for me it still works well. By illuminating corals or other marine life with blue light (450 nm wavelength works well), you excite their fluorescent pigments. If you capture this scene using a yellow long-pass filter, the blue excitation light is removed which prevents washed-out blue images and brings out the fluorescent colors. Now, many photographers may prefer to correct for the blue light by manually adjusting white balance, which is basically telling the camera what white looks like under a specific light source. Many cameras allow you to do this by photographing a white object under the light conditions you’re working in, and then using that image for white balance. I personally have found this method to be cumbersome, and for some reason I cannot obtain the same high quality under blue light as compared to using a yellow filter. Whatever method you prefer, my main point here is that the marine life in your aquarium allows you to be especially creative with time lapse photography by revealing their fluorescence.
For this video, I captured fluorescent zoanthids under blue light with a yellow long-pass filter. I added zoom effects later for a more dramatic scene.
Setting up
When I set up my cameras for a wonderful day of aquarium time-lapsing, I first determine which subjects I would like to shoot. Sometimes I’ll use a tripod, in other cases I will use a low tech solution: text books. When I photograph corals in my small eight gallon aquarium, which sits on a table, I just stack heavy text books until my camera is in the right position. Next, I make sure my subject is well-lit. Sessile life (such as corals) is easy, as it’s not going anywhere. I often use LED spots to make my subjects easier to photograph. When I just want to capture fluorescence, I turn off all the lights except some blue LED’s. I also turn off all water current pumps, for two reasons. First, this allows me to use low shutter speeds (down to half a second) under low light conditions without getting blurry images. Second, this ensures my time-lapse footage doesn’t look spasmodic. You don’t want coral polyps to look like they’re in some kind of fit, which is what happens when the movements of waving coral polyps are accelerated. What you want to capture are the movements by the coral, anemone or other creature itself. A good example is the footage of a sea cucumber below, which I shot in a friend’s aquarium when there was still some flow in the aquarium. As you can see, even low water flow translates into jerky movements in time-lapse:
This sea cucumber captures plankton (possibly bacteria, micro algae and other microscopic life) with its sticky tentacles, after which it transfers food items to the mouth. Although the sea cucumber’s fascinating feeding behavior is clearly visible, the animal’s jerky tentacle movements-caused by water flow-detract from the video.
Although turning off water flow can be harmful to marine life, especially to corals under strong lighting, this usually poses no problem on short time scales. I often photograph under strong light and no water flow for about 30 minutes. When a sequence is done, I turn on water flow to allow the animals to recover. If you do this once in a while for brief periods, there are no long-term side effects to your animals or aquarium.
Once I’ve set up my camera, turned on the necessary lights and shut down water flow, I’ll make some test photographs. After several years of photography, you’ll have some idea about the right camera settings in a given situation. Based on what I see on my camera screen, I adjust the aperture, shutter speed, ISO value and white balance where needed. It is important that all settings are set to manual, including white balance. For example, if auto white balance is used, this could translate into weird color variations when viewing your footage later. This is because when the subject moves around the camera often sees different color combinations, for example when a coral polyp expands. By setting white balance manually, automatic color adjustments by the camera are prevented and the video will look more natural. If you shoot in RAW mode, you’ll have maximum flexibility to correct white balance later (see editing).
When I have satisfied myself that all settings are correct, I start my time-lapse. As this process differs between camera brands and types, I’ll discuss this only briefly. In your camera’s shooting menu, you’re likely to find an option called interval timer shooting or something similar. You can also use an external interval timer, but most cameras don’t need one. When you select interval timer shooting on a Nikon, you can select the time between photographs (the interval), and the number of photographs to be shot (calculating interval time). After starting the camera, I make sure not to disturb the sequence in any way by keeping some distance.
Stimulating behavior
Next to recording fluorescence, I love to document feeding behavior. This can be tricky as a coral or anemone won’t wait for you to set up your gear. If you would like to record this, make sure everything’s ready to go. I use frozen feed such as Mysis, Artemia or copepods, and ensure it’s well thawed in seawater. With a long plastic pipette, I spray some of the food over my subject, and start shooting.
A Fungiid coral eating brine shrimp. Note how the coral’s tentacles and microscopic cilia (not visible with the naked eye) transport food to the mouth.
Another type of interesting behavior is the expansion of coral polyps. To record this, I again set up everything as usual, after which I spray some seawater jets onto the coral with a pipette. This usually disturbs the coral only minimally, resulting in quick polyp expansion. For example, many small-polyped corals (e.g. Acropora, Montipora, Stylophora and Pocillopora spp.) and zoanthids expand within a minute after spraying them with some seawater. If you want to produce a usable video from this relatively fast behavior, you will need to shoot at least one photo every second (also see editing). If I only have a minute, I’ll set my cameras at three images per second, even though my Nikons won’t maintain that shooting rate once their image buffers get saturated. If you disturb the same coral with a water jet once more, you will have more time to record its expansion. Another strategy is to carefully and briefly touch the coral with the same pipet in the area you are shooting. Oftentimes, it takes the coral about ten minutes to fully expand from this more significant disturbance. When it takes this long for a coral to recover, I shoot an image once every three seconds (also see calculating interval time). The most spectacular coral behaviors I’ve seen recorded so far are external digestion of other corals or they prey, and excavation of Fungiid corals after burial.
Corals display all sorts of interesting behaviors which can be revealed with time-lapse photography. Dr. Pim Bongaerts recorded this Lobactis scutaria excavating itself by pulsed inflation, after artificial burial.
Photography tanks
Another great tool for successful time-lapse work are photography tanks. By transferring your subject to a separate tank, you won’t be bothered by nosy fish, hermit crabs or snails that swim or crawl in front of the lens. Unless you prefer a more natural setting, of course. You can also perfectly position your subject for maximum depth of field. Another advantage is less water column for your camera to penetrate through, improving video clarity. Finally, you can put any light source you want over the aquarium.

Photographing corals in separate tanks has the advantage of a disturbance-free environment. Note the longer distance between the left camera and the aquarium due to the longer focal length of the lens (200 mm). The camera on the right was equipped with a 105 mm macro lens.
Calculating interval time
When doing time-lapse, people often wonder how frequently they have to shoot a subject for a decent video. In other words, what is the required interval time between photographs? Well, this depends on the time scale of the scene you are recording. Again, I’ll focus on marine life in aquaria. Generally speaking, the longer the process you’re recording, the lower the shooting frequency, and so the longer the interval time between images. For example, if you time-lapse your aquarium over an entire day, it doesn’t make sense to shoot the tank every second. First, you’ll amass a huge quantity of data which burdens your hard drive (and processor during editing). Second, your video would become quite long, even when edited at 60 frames per second. On the other hand, if you record an expanding polyp over the course of a minute, you will need to shoot images at a much higher rate to smoothly document this fast process and end up with a video which constitutes more than a quick flash.
So, first find out how long the behavior or process you would like to record will take. If you just randomly shoot a coral in your tank, I would shoot an image once every three seconds, with a total of 300 images. This will take you 3 * 300 = 900 seconds = 15 minutes. This is a sufficient amount of time to see a coral move around its tentacles, expand or contract. If you’re shooting a snail or starfish, it’s best to increase your shooting frequency to around one image per second, to smoothly record the animal’s faster movements. If you record your aquarium over an entire day, say twelve hours, I would record images at a much lower frequency. If you shoot 300 images, and edit your video at 30 frames per second, you obtain a time-lapse video of 10 seconds. Such a sequence is sufficiently long to include in a video. You may even want to reduce that time somewhat to maintain audience attention.
Also consider how long you would like your video to be. Since the internet (e.g. YouTube, Vimeo, stock photography websites) is quite saturated with videos, short ones usually do best. I have made several longer videos for YouTube, but judging from their statistics, people nowadays have short attention spans and often don’t watch the entire video. So, if you’re going to make longer time-lapse videos (at least of marine life), do so primarily for your own enjoyment. Let’s say you would like to make a one minute video; at 30 frames per second, this will require 30 * 60 = 1800 images. If you prefer a higher frame rate, e.g. 60 frames per second, you obviously require twice that. By now, you can probably imagine that making longer videos, especially at 4K resolution, requires a considerable amount of data and effort.
Using the following formula, you can calculate the required interval time between shots:
Interval Time = Shooting Duration / (Video Length * Frame Rate)
Here, interval time, shooting duration and video length are expressed in seconds, and frame rate is expressed as images per second. For example, when you record a coral polyp taking ten minutes (600 seconds) to recover from a disturbance, and you aim for a ten second video with 30 frames per second, the required interval time between images would be:
Interval Time = 600 / (10 * 30) = 2 seconds
In this video, time is accelerated by factor of 60, as 600 seconds are squeezed into 10 seconds. If you shoot a time-lapse video of your aquarium over a period of 12 hours (43,200 seconds), with a final video length of one minute and 30 frames per second, the required interval would be:
Interval Time = 43200 / (60 * 30) = 24 seconds
In this case, we accelerate time by a factor of 720. As I mentioned above, longer processes require longer intervals between shots, unless you don’t mind huge data sets with hundreds of gigabytes per video that you don’t really need.
Starfish move quite fast, so you’ll have to shoot lots of images in rapid succession to obtain a smooth video. It seems cumbersome when compared to shooting regular video, but it allows you to heavily crop the footage later, allowing you to visualize the smallest details. You can also simulate smooth camera movement by panning or rotating the footage.
Editing your video
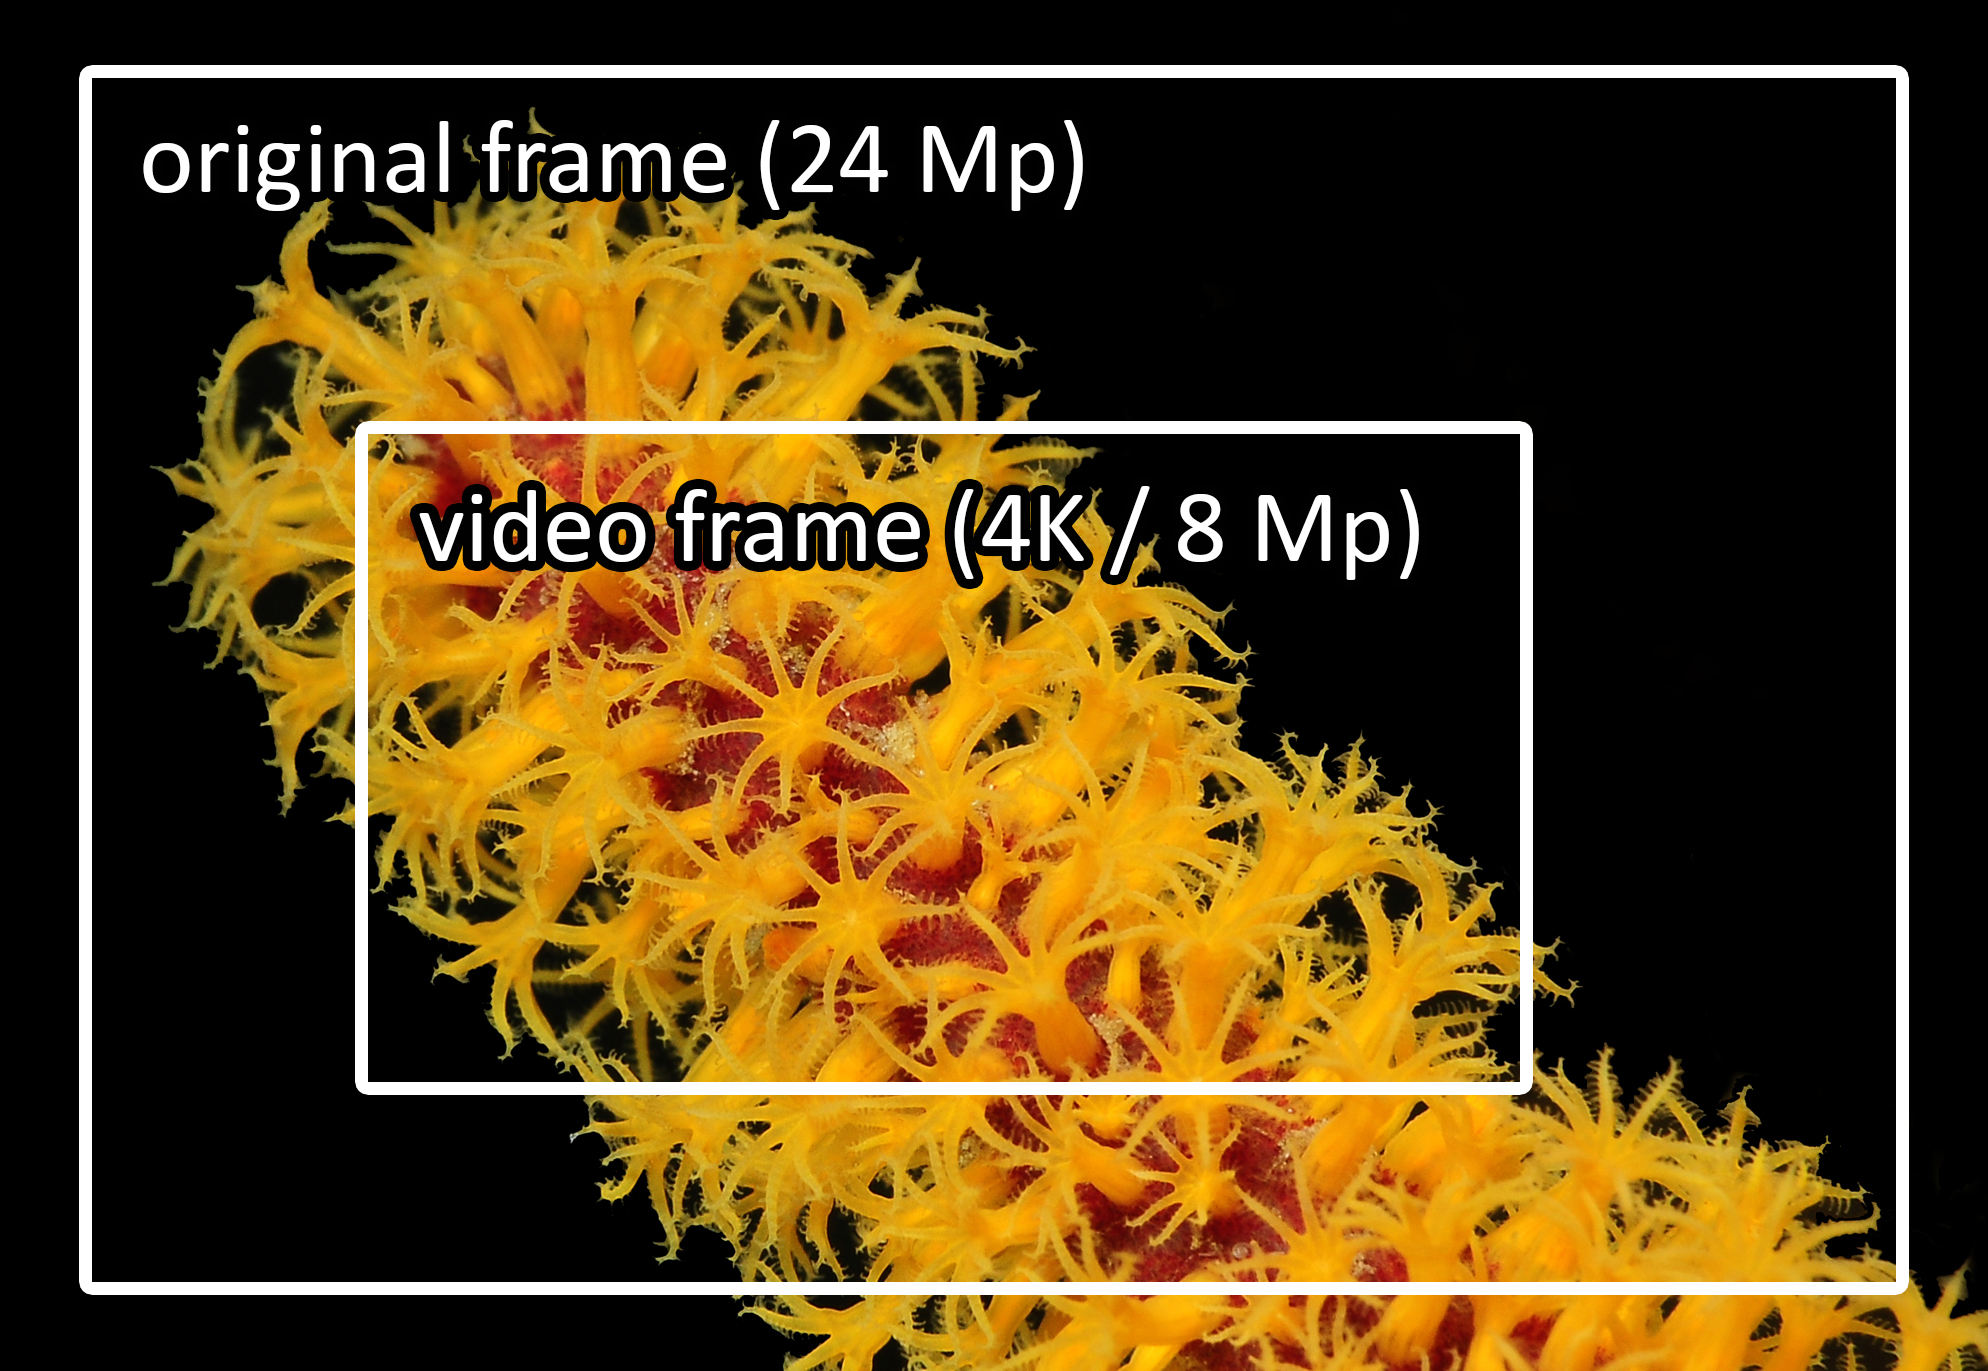
Shooting at resolutions higher than your video frame allows for cropping and panning effects.
After a hard day’s work, the fun’s not over yet. Now we get ready to edit our video. This can take as much time as the actual photography itself. Again, there are many ways to go about it here. I personally use a Windows computer with Adobe Premiere Pro CC. Of course, working with an Apple and other software will also do the trick. If you like to edit video in 4K and higher resolutions, like I do, I suggest you invest in a powerful machine. What you need is a fast processor, lots of RAM and large hard drives.
When I shoot with my D610, I always record at the highest resolution of about 24 Megapixels. As this resolution contains surplus information when editing a 4K video, it allows me to do two things. First, I can crop my image to fit the 4K frame, resulting in an enlarged image. This brings out the smaller details. In this case, the crop factor is 1.6x, which is great for macro photography. A second benefit of shooting at higher resolutions is that you can move the larger frame through the smaller 4K frame to simulate smooth camera panning. This gives an extra dimension to your videos. If you produce a full HD video, the crop factor is even larger (3.3x), although I’ve found that such aggressive cropping reduces video quality a bit.

Effect when cropping 24 Mp (6016 x 4016) footage to 4K (3840 x 2160) and full HD (1920 x 1080) resolutions. High resolution provides lots of information, with the possibility to crop without compromising image quality.
People who are familiar with time-lapse know that this technique can result in video artifacts. Even when all camera settings including white balance are set to manual, oftentimes one notorious issue remains: flicker. The annoying flicker is due to variable amounts of light hitting the camera sensor, causing lighter and darker images to follow up one another. This exposure variation is due to slight mechanical variations in the camera, such as shutter speed and aperture size. You can minimize this issue by using slower shutter speeds (below 1/60th of a second) and larger apertures (below F10). Unfortunately, for macro photography, we are restricted to using smaller apertures to maintain a workable depth of field. One trick is to set the desired aperture, and then twisting the lens partially off the camera to make it think it’s operating with a manual lens. This way, the aperture won’t open and close in the between shots all the time, preventing a significant amount of flicker. Another strategy is to simply remove video flicker during post-processing, which is what I often do. Digital Anarchy provides a great anti-flicker filter for Adobe Premiere. In the first video below, I did not remove flicker as I was unaware of the issue at the time. For the second one, I used a post-processing filter. The third video even had issues with a shaky tripod, which I was able to remove using Premiere’s warp stabilizer effect. I won’t go into all software details here, but YouTube has some great tutorials on how to edit time-lapse videos and work with post-processing filters and effects in Adobe Premiere.
Although these Stylophora pistillata polyps look great, the flicker is a bit distracting. Disabling lens aperture or video post-processing can take care of that.
This video was post-processed, with considerably reduced flicker.
One thing I’ll finally discuss briefly is shooting in RAW mode. Many photographers will prefer this uncompressed mode, as it gives them maximum flexibility when editing their photographs or videos later. When doing time-lapse work I always shoot in JPEG fine, so in compressed mode. The main reason is that compiling 4K footage from hundreds to thousands of 24 Megapixel photographs takes quite a toll on my computer. This is especially true when using anti-flicker filters, which can result in a 24-hour encoding time for a video of several minutes. If your computer can handle it, shooting in RAW is a preferred option, as it gives you more room for post-processing such as white balance correction.
Concluding remarks
DSLR’s can be cumbersome, but in terms of image quality, they still reign supreme.
Acknowledgements
I would like to thank Rick van Kesteren, Dinesh Hoogen Stoevenbeld and Glenn Fong for their support.

0 Comments