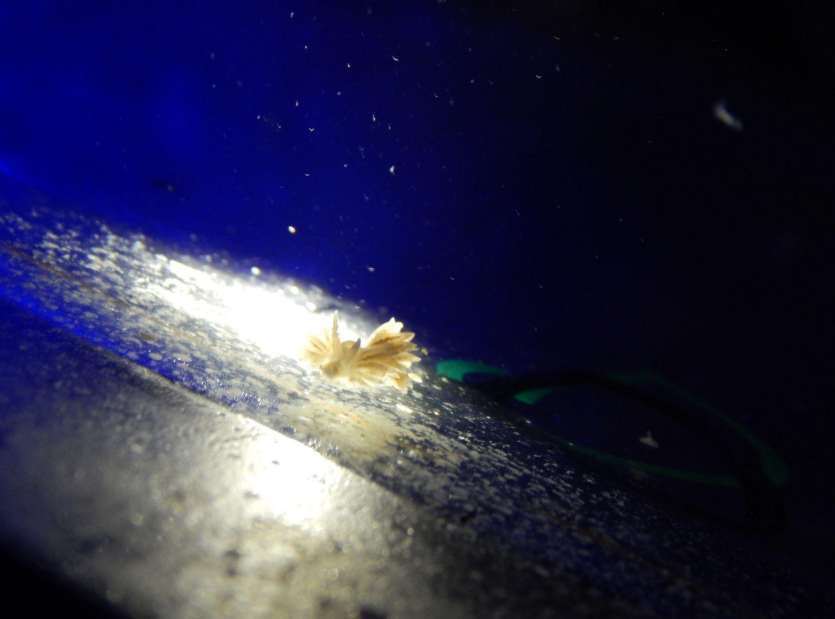
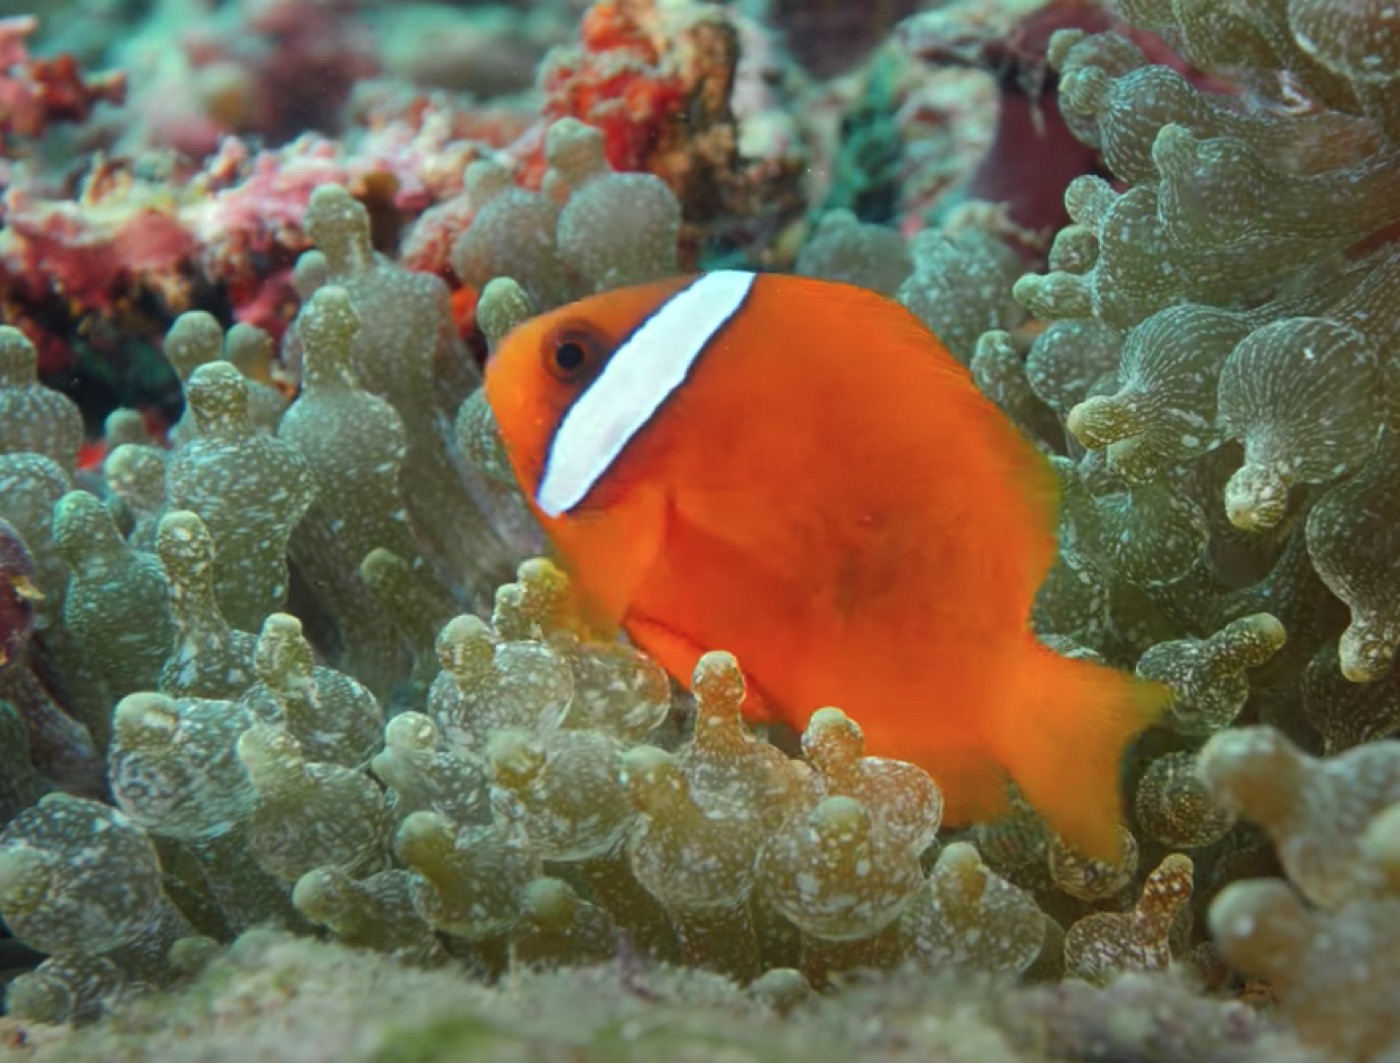
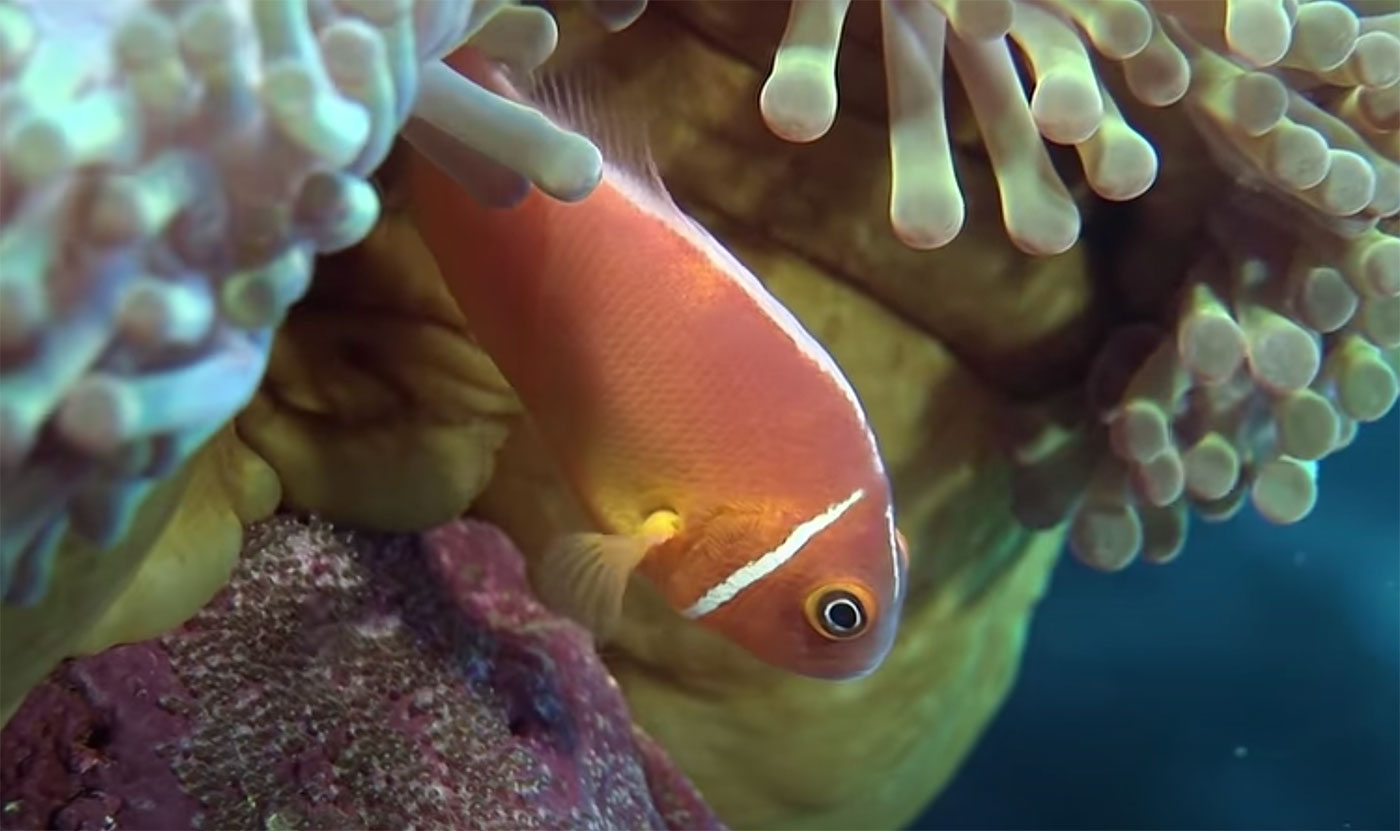
PACKAGING
AND SHIPPING CORALS FOR THE WINTER MONTHS by
Richard J. Durso
Sponsored
in part by:
Proud
sponsor of this column
Introduction: Shipping
live corals is always tricky, however shipping live corals during
the winter months is downright risky during cold spells, snow
storms and freezing rain. If you have an option I would suggest
not even shipping livestock during the winter months. But if
you must ship during the winter months hopefully this article
will provide a good guide line to insure that your corals will
survive the trip.
During
the milder spring & fall months some items can survive two
day shipping. However, during the fridged winter months nothing
is worth risking two day service on. Only ship live corals
by overnight shipping! Is priority overnight shipping worth
the extra cost? It depends on if it is actually offered in
your area. Just because you pay extra for priority overnight
shipping does not mean it will arrive at your door at 10:30am
in the case of FedEx Priority Overnight [1]. To quote
the web site “Overnight delivery by 10:30 a.m. to most US addresses; by noon or 4:30 p.m. in remote areas”; what they consider remote areas might surprise
you.
There
are several companies offering overnight delivery services.
To keep this article simple it only focuses on shipping with
FedEx. Priority Overnight is commonly offered as the fastest
shipping method by most on-line sellers. However, FedEx does
offer even faster options:
FedEx
First Overnight [2]: Overnight shipping by 8 to 8:30am
based on destination zip code [3].
FedEx
Same Day [4]: Door to door within hours, depending upon
availability.
Best
Way to Ship: The single
best tip I can provide is to not have the corals shipped to
your door. Instead, have FedEx ship to the local depot and
have them hold them there until you can pick up the package.
This sounds complicated, but it is really easy. Just call the
shipper you plan to use (such as FedEx) to find the closest
depot, get the address and phone number. Have the shipper
send to this address. Be sure to tell them this is the drop
off depot. In the case of FedEx the shipping document has a
special check mark to indicate this. This offers several advantages:
Your package is not left on a cold door step if you happen
not to be home.
Your package is not on an ice cold
truck for several hours before reaching your door.
No extra fee if shipped on Saturday
to the depot as there is no delivery to pay extra for. (Typically
an extra $10.00 is charged for Saturday delivery if sent
to your door).
Therein
is the secret. Most people work Monday thru Friday and do not
want to take a day off to receive a shipment. If you have
a depot within driving distance, you can pick up on Saturday
with no time off from work, no extra fee to pay, and your corals
are neither subjected to several extra hours on a cold truck
nor any rough handling by the driver. If the package is going
to be held at the depot then you have no reason to pay extra
for priority overnight shipping. The FedEx Standard Overnight
[5] shipping method is sufficient.
Preparing
Coral Frags for Shipping: What if
you are going to be the shipper? How do you package the corals
to insure they will survive? Like anything else in this great
hobby, you can do it in many ways. The following documents
one of my recent coral shipments to a fellow hobbyist located
in the state of Washington (I’m in New York). A coast to coast
shipment in the dead of winter seemed like the ideal shipping
to document.
Figure 1 - Coral Frags
Figure 2 – Coral attached to monofilament line
Figure 3 - Coral attached to monofilament line
Pictured
in Figure 1 are the three coral frags being shipped. Clockwise
from the top, Metallic Green Montipora digitata, Orange
Montipora capricornis, and a Greenish unidentified plating
Montipora sp. The corals are kept in small holding dishes
with fresh tank water during preparation for shipping. Both
plating Montipora corals produced significant mucus and
the water was changed as needed.
Stony
corals ideally are shipped floating in the bag. This helps
the coral shed excess mucus from the stress of shipping by allowing
the coral to sway and bounce around a bit. My early attempts
involved trying to tie a knot around the base of the coral to
hang it. I had very poor success rates with the coral staying
tied – the rough handling during shipment frequently dislodged
the coral from the monofilament line (fishing line). And as
you can imagine tying a knot around a plating coral is no easy
task without doing some damage to the coral.
I’ve
found that attaching the monofilament line using super glue
gel to the base of the coral where the coral was separated worked
much better. See Figure 2 and Figure 3! The glue is placed
directly on the porous skeleton and not on live tissue. When
the package arrives it is very easy to remove the monofilament
line – the super glue blob snaps right off.
The
super glue gel will take a few minutes to harden enough to support
the coral’s weight. I suggest leaving the coral submerged in
its holding dish. The super glue gel will develop a thickened
skin instantly once placed in water.
Figure 4 – Cutting Styrofoam to attach monofilament
line.
Figure 5 – Slide the monofilament line into the cut
Styrofoam.
In
Figure 4 the Styrofoam is cut about halfway thru with a thin
sharp knife. This creates a slot where the monofilament line
will be placed. The shape of the Styrofoam is not important;
I just happened to have L-shaped Styrofoam handy which I cut
into thin slices about ½ inch thick. Any chunk of Styrofoam
in the area of 2 x 2 x ½ inches will be more than plenty to
keep typical sized coral frags floating.
Take
the monofilament line and wrap it around the Styrofoam as shown
in Figure 5. Be sure the line stays snug in the slot cut with
the knife. Typically, it is not necessary to tie this into
a knot to keep it snug. If enough extra line is present and
you have nothing better to do, feel free to tie a knot. Notice
in Figure 5 that the super glued monofilament line is easily
holding the weight of the coral frag even out of water.
Bagging
Coral Frags:
Figure 6 – Large Montipora digitata coral frag
floating in bag.
Figure 7 - Montipora capricornis coral frag floating
in bag.
Figure 8 – Three bags of coral frags ready to be shipped.
Figures
6, 7 and 8 show the corals bagged with the coral frags free
floating from the small section of Styrofoam. Only place enough
water in the bag to keep the coral suspended off the bottom
of the bag. Excess water is not needed and only adds to the
shipping weight of the package.
Several
years ago I had issues with bags leaking and rupturing during
shipping. I attribute this to cheap bags typically used by
local fish stores and other on-line suppliers (I reused the
bags). I now use very strong polyethylene bags (commonly called
poly bags) that are 8 x 20 inches and 4 ml thick. The typical
kitchen garbage bag is about .6 mil think while industrial trash
liner bags are typically 1.2 ml thick. A 4 mil thick shipping
bag will not get punctured and I have yet to see one leak.
Double bagging is not needed. There are lots of vendors on
the Internet selling quality poly bags. Expect to pay something
around $80 for a box of 1000 (split an order with friends or
local reef club)
Figure 9 – Tying a knot that is simple to remove.
Figure 10 – Easy to remove water tight knot.
I’m
amazed at what some vendors have done to seal bags. Some of
them are just about impossible to open. I received bag from
more than one vendor sealed with metal tabs that just could
not be removed without pliers or wire cutters. Some of them
tie knots that are impossible to remove without destroying the
bag. (I only make this point because I’ve talked to many hobbyists
who keep bags for future use).
I’ll
briefly describe what I do: Spin the bag to make a handle
like you normally would in closing a bag. (Do not spin it
so far that the bag becomes firm and rounded like it is pressurized.
The air in the bag may expand during shipping via overnight
air methods. The bag should have some room for the air to expand
into – see Figure 8.) Take a rubber band and wrap once around
the twisted plastic bag and pull the end of the rubber band
through the loop as pictured in Figure 9. Then wrap 2 more
times around the twisted bag – make sure the bag does not untwist
while handling it. Then fold the twist flap in half to bend
over it as shown in Figure 10. Wrap the rubber band around
a few more times until all slack is used. That in itself is
enough to make a water tight sealed bag. However, just to be
safe wrap two or three more rubber bands as tight as possible.
To open the bag, simply take the folded twisted plastic handle
and pull it straight. With a strong pull the rubber bands will
pop right off and you can untwist the bag to open.
Packaging:
Figure 11 – Shipping box lined with aluminum foil.
Figure 12 – Bags added to shipping box.
Figure 13 – Empty space filled with filler bags.
It
is important to take care in packaging the corals. I remove
the Styrofoam box liner from the shipping box. Then just as
used in cooking, I use a layer of aluminum foil to help retain
heat as shown in Figure 11. In all honesty, I have no proof
that this makes a real difference. However, it only takes a
few seconds to add the foil and the theory seems sound to me.
The extra care taken to improve packaging impresses the customer
which may be worth it in itself.
Each
of the coral bags are placed into a single larger bag, in effect
double bagging them all at once. Just in case something should
leak, it will contain the water. The second bag also acts as
an insulation barrier to retain heat (see Figure 12)
With
the bag of corals centered in the shipping box the extra space
in the shipping box is used up with filler bags. Filler bags
are just bags filled with Styrofoam peanuts as shown in Figures
12 and 13. I find keeping the peanuts in bags reduces the mess
in opening the box and makes it easier to be reused.
Figure 14 – 20 Hour heat pack.
Figure 15 – Wrapping heat pack.
Figure 16 – Wrapped heat pack.
A critical
part of the success in shipping corals during the winter months
is having a heat source that will last overnight. Typical
heat packs sold as pocket warmers at store checkout counters
tend to last from 4 to 7 hours. This is not long enough to
be useful for shipping purposes. Some people think that adding
two or three heat packs will make up the difference of a heat
pack not lasting long enough. Do not do this! Two or three
heat packs will be more than enough to cook the corals. Heat
packs lasting 12 to 16 hours can be used in a pinch if you can
not find something better or if temperatures are expected to
be unseasonable warm. Ideally, you want heat packs which last
20 or more hours, which can often be found at sporting goods
stores. The heat pack pictured in Figure 14 is a 20 hour heat
pack (the package pictured says “Warm Pack”; however, it is
typically called a heat pack).
Proud
sponsor of this column
Heat
packs are nothing more than a few simple ingredients such as
(iron, water, cellulose, vermiculite, activated carbon, salts)
which creates an exothermic reaction once exposed to oxygen
in the air. An exothermic reaction gives off heat, just like
our heat pack. The iron powder and the oxygen in the bag react
to form iron oxide. This process is called oxidation. The salt
speeds up this reaction and is therefore a catalyst. The vermiculite
ensures that the heat stays in the baggie. The iron oxide that
is formed is a compound [9].
Fe
+ O2 ---> Fe2O3 + heat
Different
vendors use different methods to generate the heat. The backside
of the heat pack pictured in Figure 14 says it will maintain
a minimum temperature of 104°F (40°C) for 20 hours. It claims
an average temperature of 130°F (54°C) with a maximum temperature
reaching 155°F (68°C). It’s easy to see why two or more heat
packs can easily raise the shipping water temperature beyond
the range corals can survive at.
To
prevent the heat pack from overheating the bag which it lays
on during shipping, the heat pack should be wrapped in several
layers of paper as shown in Figure 16. The paper helps to diffuse
the heat and prevent localized hot spots in the media from over
heating the bag it is in contact with. Figure 15 shows the
heat pack removed from the packaging. Some heat packs need
to be squished and crumpled up a few times in order to start
the reaction process. The particular product documented here
does not. The instructions on the back of the product will
specify if anything special needs to be done. I prefer to handle
the heat pack until I can feel it getting warm. If the packaging
had any holes which allowed air to interact with the product,
it could be a dud. Make sure the heat pack starts warming up
before sealing the package for shipping. This type of heat
pack can not be reused once it has been used. Discard it in
the trash.
Figure 17 – Finishing touches
Figure 18 – Completed
Figure 19 – Boxed.
Finally
a top layer of aluminum foil is put in place to help trap heat
rising from the heat pack as pictured in Figure 17. The Styrofoam
cover should fit snugly. It’s not a bad idea to run a strip
of tape all the way around the Styrofoam box to prevent the
two parts from separating, plus making the package air tight.
As pictured in Figure 18 the Styrofoam package is inserted into
large plastic bag and taped shut to create as snug a fit to
the Styrofoam box as possible. This is then slid into the shipping
box as pictured in Figure 19. All seams on the shipping box
should be carefully taped shut. If the box is not already
marked as “Perishable” and markings showing which way to stack
the box then draw this information directly on the box manually.
You could try asking for such stickers when you drop off the
box for delivery.
Special
Considerations: When filling
out papers to ship the package, take care in the wording you
use. Don’t lie outright claiming it is a box of shoes or something,
but don’t outright declare the corals as animals either. If
they ask you if it is a plant or an animal… put on your best
confused face and agree it’s a plant. The person behind the
counter has likely been trained that they do not accept live
animals as cargo for shipping. To quote the web site “FedEx does not accept live animal shipments as part
of its regularly scheduled service. Live animals will be accepted
when the shipment is coordinated and approved by the FedEx Live
Animal Desk.” [6]. This is generally meant
for domestic animals such as cats and dogs which can not be
shipped in unpressurized and unheated cargo space. FedEx has
a Flying Tigers Air Cargo Service which they use to transport
such animals. It is not worth having this debate with the
clerk. FedEx does have a Live Animals department [6] which
you can call if you are interested in getting more official
details.
A more
specific reason why FedEx may not accept your shipment is a
little known and often forgotten policy. I’ve yet to have a
shipping clerk ever reference it. FedEx Restrictions, section
15, which states “Ornamental Marine Life, including Live
Fish. FedEx will accept, on an exceptional basis, shipments
of ornamental marine life. The term "ornamental marine
life" includes live freshwater plants or fish, and hermit
crabs that are not for human consumption or bait purposes, are
maintained in closed systems for personal, pet industry or hobby
purposes, and which will not be placed in waters of the U.S.
Coralwill not be accepted. “ [7]
The
phrase “Coral will not be accepted” is the part to worry
about.
Proud
sponsor of this column
Although
not the focus of this article, Restrictions, section 15 does
make references to fish as well “FedEx
will accept shipments of ornamental marine life when either
the shipper or recipient is a licensed commercial or business
entity who is in the business of selling live freshwater plants,
fish or hermit crabs and who is not prohibited from making such
shipments by federal, state, or local regulations. For example,
shipments from pet stores to consumers are acceptable. Shipments
must be sent via FedEx Priority Overnight service, and shipments
must be tendered to FedEx on days that will not require transit
over a weekend or holiday. Signature Release is not available
for these shipments. “ [7]
“Licensed
commercial or business entity” can ship such items but this
does not leave much room for the hobbyist.
FedEx
Restrictions 16, starts by saying “The following items are prohibited and will not be accepted:” [7] and proceeds to list
a conflicting item: “b. Live animals, including
birds, reptiles, fish except via our Flying Tigers® Air Cargo Service.”
It
has been my experience that if corals arrive dead and they were
delivered on time and the box was not physically damaged then
FedEx will not compensate you for the value of the animals even
if you paid extra for the insurance. They tend to be quick
to jump at “we don’t allow shipments of live animals” and move
to push you off the phone. I’ve read message threads on the
bulletin boards with mixed experiences on this topic. Some
have better luck than others. They may also blame the death
on inadequate packaging if the packaging was not inspected prior
to shipping. FedEx Restrictions, section 15 states “Pre-shipment procedures, which include but are not limited to packaging
approval, must be met prior to FedEx accepting any ornamental
marine life shipment. Customers must contact their FedEx Account
Executive to complete these pre-shipment approval procedures.” [7]
And:
“NOTE:
The packaging of live fish for domestic shipping must be tested
and approved by the FedEx Packaging Design and Development department
prior to any live fish shipment being accepted by FedEx.”
[7]
Luckily
very little of this is ever enforced. It seems it could make
a significant dent in this hobby if it was.
Outcome: The temperature
outside here in New York was a crisp 21°F (-6°C) when I dropped
the package off at FedEx at 3pm. By 10:00pm that night the
temperature had dropped down to 9°F (-13°C) and I was a bit
worried about the shipment. It got much colder than I expected
it to and I probably should have held off another day for a
warmer night.
When
the package arrived in Washington at 12:20pm, the local temperature
was 47°F (8°C). According to the fellow hobbyist the temperate
of the bags was at 61°F (16°C) and the pH had dropped to 7.5.
After floating the bag for 20 minutes the Montipora digitata
polyps were already starting to extend. They were slowly acclimated
over 1.5 hours and then super glued to the reef structure.
Within 4 hours of being added to the tank the corals were showing
full polyp extension. The scrolling Montipora corals took a
little longer to show the polyps, but were fully extended later
that night.
Proud
sponsor of this column
Summary: This was
clearly a complete success. The package traveled over 2,600
miles taking close to 24 hours to be delivered from the time
I dropped it off at FedEx to the time the package arrived at
its destination. Considering seawater with a salinity 35ppt
(such as my tank water) will begin to freeze at 28°F (-2°C)
[8] and this package spent several hours at temperatures well
below freezing, a drop of less than 18 degrees in the shipping
water was pretty impressive. A heat pack lasting more than
20 hours, or a night with warmer temperatures would reduce this
temperature drop significantly.
If
I had the resources, I would like to be able to send out multiple
packages one night with a temperature recording device to be
able to more accurately test the difference between packaging
methods. If you have access to such recording devices and
would like to help with this please feel free to contact me.