

When my small laboratory needed a larger aquarium, I was shocked by prices quoted by local retailers. The cost of shipping a fragile glass or acrylic box from the mainland to the most isolated archipelago in the world (Hawai’i) greatly increases the prices on almost every commodity, including pet supplies. Since my lab does not have unlimited funds, I began researching the pros and cons of building a large plywood aquarium with the dimensions of ~96 x 24 x 24 inches – ~239 gallons (244 x 61 x 61 cm; 906 liters).
Building of this 240-gallon plywood tank will be described here.
The internet is generally a good resource of information but I did find some sites containing DIY tips for building plywood tanks that presented outdated or inaccurate information. This article will attempt to correct that information and detail the trials and tribulations of plywood aquarium construction along with updated information as well as construction time, a cost breakout and lessons learned.
After some research, I decided to go with non-pressure treated oak plywood (pre-sanded furniture grade) coated with Sherwin-Williams Tank Clad HS epoxy paint, and fasteners designed for pressure-treated deck lumber. The details for these decisions will be outlined in this article. Procedures will be discussed as well.
Safety
If you decide to take on this project, be aware that you’ll deal with potentially noxious and/or flammable chemicals, dusts, and vapors, handle products capable of cutting or sticking, and use noisy power tools that will make dust, splinters, etc. Safety gear including heavy duty leather work gloves, eye, proper respiratory and hearing protection is a must. Craftsmen (two or three will be required for lifting depending upon the size) with average construction experience can do the job.
Recommended Equipment
Building a plywood aquarium could conceivably be done with just a couple of hand tools (screwdriver, hand saw) and a lot of dedication. However, these tools will make the job much easier:
- Electric drill motor (variable speed) and drill bits, drivers
- Circular saw with framing blade
- Builder’s square and/or large t-square made for sheetrock
- Electric sander (vibrating/oscillating or belt)
- Paint stirrer (for use with a power drill motor), one for 1-gallon container and another for a 5-gallon pail
- 1 caulk gun
Material List
- 2 – 4’x8′ ¾” oak plywood sheets
- 2 lbs. Deck Screws, 2″ Grip Rite Primeguard Plus (1 pound = ~100 two inch screws). Available at Lowes and other home improvement centers.
- 2 panes 3/8″ non-tempered glass (21″ x 94″)
- 1 tube Loctite™ Premium PL polyurethane adhesive (10 ounces). Available at Lowes and other home improvement centers, but see comments in Lessons Learned at the conclusion of this article
- Square stock, ¾”x ¾”, 24 feet
- Quarter-round stock, ¾”, 8 feet
- 12 tubes (2.8 oz.) silicone cement – the label must state it is aquarium safe! But try to find aquarium-safe silicone in a 10 ounce tube.
Initial Considerations
This project should not be approached in a haphazard manner. First of all, one should consider their carpentry skills. Making a large aquarium is not the place to learn how to use various hand tools.
Is there sufficient work space available – use of epoxy will require a warm, well-ventilated work place? Some of the materials used in this project are extremely flammable – keep these away from any ignition sources including natural gas pilot flames (such as that one in the water heater in your garage!).
Consider the weight of the aquarium and placement (floor joists should run perpendicular to the length of the tank). This aquarium, when full, will weight almost 2,000 pounds (909 kilograms). Hobbyists should research this further and determine if their floor is capable of supporting this much weight.
Carefully research the requirements of your aquarium – plywood and glass thickness are critical but smaller details such as fastener selection can make a major difference in the longevity of the finished product.
The following will describe the materials used in this product and various considerations:
Plywood
I used pre-sanded, non-treated, furniture grade oak plywood.
Plywood is an engineered wood product consisting of multiple layers of wood ‘peeled’ from a log and then glued together under heat and pressure to form a strong sheet. The grains of the individual wood layers are alternated to achieve strength and stiffness.
Plywood is available in ‘interior’ and ‘exterior’ grades. In general, the difference is the type of glue used to bond the veneers together – exterior plywood uses glue that is more water-resistant than interior grades. More importantly, exterior plywood can contain chemicals to prevent rot and provide fire, insects, and fungus resistance – these are sometimes called ‘pressure treated’ and may contain toxic chemicals such as copper, borate, or perhaps a mix of copper, chromium and arsenic (the use of chromium/arsenic as a preservative was banned for residential use in 2004 but is still available for agricultural and industrial use). Various preservatives include:
- CCA: Chromated Copper Arsenic
- ACQ: Alkaline Copper Quat, Types B and D
- CBA-A and CA-B: Copper Azole. Azole is an anti-fungal ingredient.
- Borates: Often seen in big box home improvement stores’ lumber
Selection of treated versus non-treated wood brings up another consideration, the type of fasteners used. Some treated lumbers’ chemicals are aggressive (corrosive) to fasteners (such as screws, nails, etc.), causing their integrity to degrade over a period of time. Ask your dealer his products’ preservatives (often, lumber is listed a ‘pressure treated’ without elaboration).
Interior plywood can be used in exterior applications if (repeat if) it is properly sealed from the elements.
Plywood is available in a variety of thicknesses, ranging from ¼” to 1″. See Table 1.
| Inches Fraction | Inches Decimal | Millimeters |
|---|---|---|
| 1/4″ | 0.25 | 6.35 |
| 11/32″ | 0.34375 | 8.73125 |
| 15/32″ | 0.46875 | 11.90625 |
| 1/2″ | 0.5 | 12.7 |
| 19/32″ | 0.59375 | 15.08125 |
| 23/32″ | 0.71875 | 18.25625 |
| 3/4″ | 0.75 | 19.05 |
| 1″ | 1.0 | 25.4 |
Be aware that these dimensions are not absolute – a plywood sheet can stray up to about 1/32″ (0.03125″ or 0.794mm) from the advertised thickness.
Plywood is also available in grades from A to D. Grade A is relatively free of surface irregularities such as knotholes and is generally sanded smooth. As the scale slides to D grade, more imperfections are allowed. Often, the grade of the plywood will contain two letters, such as A-C, meaning one side of the sheet is grade A and the other is C. There isn’t a great deal of difference in prices of plywood according to grade. One other note – avoid structural plywood – it is composed of wood chips bonded with resins, and usually has a low grade (C-D, for example). This stuff is often used for making concrete forms.
Plywood is available in sheets up to 4 feet wide by 8 feet long. The edges from the factory are square and true – plan your work to use these edges as much as possible. The factory edges (after minor sanding to remove and burrs or splinters) should be mating edges for the bottom and side seams of the aquarium.
Fasteners
Fasteners, for our purposes, refer to wood screws. Choice of fasteners is critical – not any wood screw will do! Treated lumber can be very corrosive to fasteners and use of hot-dip galvanized or stainless steel is recommended. When purchasing the fasteners, look for those made for use with treated lumber and outdoor use (these are usually guaranteed to never rust).
Wood Glue
Various glues formulated specifically for use with wood and wood products are available. Some brands are water based while others are solvent based. I chose polyurethane glue made by Loctite™ (Premium PL polyurethane construction adhesive). This product is thick, viscous and sticky enough to hold the side panels in place while making final adjustments and driving the first screws. When dry, the product is water-resistant but not water proof and must be coated with layers of protective epoxy paint.
Glass
I decided to use glass as the viewing panes in this project simply because of its availability. As with other components, there are a couple of choices to be made when selecting glass. Most importantly, the glass must be able to withstand the force exerted by the water, which means proper selection of its thickness. A secondary but equally
important consideration is its ability to withstand the force of an external blow. For these reasons, engineers have developed guides for use in selection of aquarium glass according to aquarium depth and various safety factors.
Glass is available in two forms – tempered and un-tempered. Although tempered glass is the stronger of the two, it has a couple of major disadvantages. When tempered glass fails, it does so in a catastrophic manner, breaking into many small pieces. It is sometimes called ‘safety glass’ since it breaks into more-or-less square pieces where the edges aren’t quite as sharp (and hence dangerous) as the razor-sharp shards of un-tempered glass.
Although tempered glass has the potential of presenting less of a hazardous when broken, its ability to disintegrate suddenly is a handicap when it comes to aquaria. Un-tempered glass is preferred since it will usually (hopefully) simply crack thus allowing a relatively slow release of water as opposed to the possibility of sudden release of hundreds of gallons of corrosive water when tempered glass fails.
A second disadvantage is that tempered glass generally cannot be drilled or edges polished after the tempering process is completed.
The most common type of glass is called ‘float glass’ which has uniform thickness and hence ‘smoothness.’ Glass is available in a variety of thicknesses. See Table 2.
| Thickness (inches) | Thickness (mm) |
|---|---|
| 3/16″ | 4.76 |
| 1/4″ | 6.35 |
| 3/8″ | 9.52 |
| 1/2″ | 12.7 |
| 3/4″ | 19 |
| 1″ | 25.4 |
| Inches Fraction | Inches Decimal | Millimeters |
|---|---|---|
| 1/8″ | 0.125 | 3.175 |
Glass Safety Factor
As we know, glass is a brittle substance and has a very limited ability to bend before breaking. Forces that cause aquarium glass to bend can be internal or external, such as an accidental bump or pressure exerted by the water contained within. The thicker the glass, the stronger it is and therefore able to withstand greater forces.
The thickness of the glass you’ll need is dependent upon the top to bottom depth of the aquarium, and not the length or the width. There are advantages to an aquarium of reduced depth besides construction costs – shallow aquaria are less expensive to illuminate, easier to maintain, and offer a greater surface area to volume ratio.
Engineers have calculated a safety factor for use when calculating glass thickness. Various websites offer differing advice on exactly which safety factor should be used (there seems to be a consensus that a factor of 3.8 is OK).
For this project, I decided upon glass of 3/8″ thickness (0.375″ or ~9.5mm). This offers a safety factor of 2.5. I obtained this information from this website:
www.theaquatools.com/building-your-aquarium
Starphire™ glass is a trade name for high clarity glass made of silica with low iron content. It is more expensive than float glass and will not be discussed further.
Silicone Cement
Silicone cement is used to adhere glass panes to the epoxy-coated plywood frame. Use only an ‘aquarium grade’ cement – these are engineered to withstand constant immersion in water and do not contain any biocides. It is available in pet shops and larger home improvement centers but usually in small containers. Check with a local glazier for 10 ounce tubes for use in a caulk gun if your job is a large one.
Silicone usually cures in 24 hours, but this time is dependent upon temperature, humidity and thickness of the applied product. Note that silicone can be applied at a temperature range of -35°F (-37°C) to 140°F° (60°C).
Interestingly, some manufacturers (such as DAP™) recommend a maximum aquarium size (30 gallons and water depth not to exceed 18″) while others (Loctite™) do not. I suppose this is wording recommended by DAP’s attorney and is meant to limit liability. This aquarium is 24 inches deep (with the glass surface exposed to a total depth of 23 ¾” even at overflow, but normally only about 21 ¾”). Further, the surface area of the glass/plywood interface is quite large and offers a massive bonding area. The plywood also braces a substantial portion of the glass. Personally, I am not concerned about label boilerplate in this case; however, this is an individual’s decision and should be based on consideration of all factors.
Epoxy Coatings
Note: The following is not intended to be used in lieu of manufacturers’ technical support and is intended only for informational purposes.
Glossary
There are a number of terms used when discussing use of epoxy paint, and these are a few of them:
- Induction
- See ‘Sweat In’.
- Pot Life
- Period for which two mutually reactive chemicals remain useful when mixed.
- Reducer
- A solvent used to dilute the viscosity of a paint (“thinning”), or used to clean brushes, rollers, etc.
- Reduction
- Thinning of paint with an appropriate reducer. Thinning is general required only if using a paint gun to spray the aquarium. Reduction is done after the two parts are thoroughly mixed. Excessive reduction can lead to various problems, including appearance.
- Sweat In
- The time required for the two components of epoxy paint to react. Sweat in time is dependent upon mixing components in the proper ratio, relative humidity and temperature, but is generally 15-30 minutes. See manufacturer’s directions. Sweat-in is sometimes referred to as ‘induction’.
After a good deal of research, I decided on using Sherwin Williams’ Tank Clad epoxy, with the standard activator. This decision was based on the product’s NSF approval for potable water and good resistance to deterioration even after long-term immersion in seawater. The color I chose was Light Blue.
Sweat-in time is about 15 minutes, and Tank Clad has a pot life of about 2 hours (at ~75°F and 60% relative humidity).
These are data for this product: Sherwin-Williams Tank Clad HS
- Amine epoxy
- Recommended for Potable Water: Yes
- NSF-61 Approved: Yes
- Seawater Immersion: Yes
- Minimum Tank Size (potable): 60,000 gallons
- Coverage: ~2.5 gallons were required for this project.
- Colors: Light Blue (Sanitary White is also available)
- Approximate Price (Paint, 4 gallons and 1 Gallon Activator): $385
- Application: Roller with solvent resistant core; natural bristle brush
Other products were investigated as well, and are listed later in this article.
Epoxy paints consist of two parts – a resin (paint) and an activator (hardener) that must be mixed in proper proportions and applied within a specified time under strict conditions. Multiple layers are generally required in order to ensure a durable waterproof coating.
It is essential that an epoxy coating meets these criteria:
- Formulated for continuous immersion in water and seawater
- Good chemical resistance
- Low Volatile Organic Content (VOC)*
- Non-toxic when cured (should meet NSF/ANSI Standard 61 guidelines**)
- Offer good resistance to abrasion
These products were evaluated according to information gathered from sales representatives or the internet.
*Note 1: These products may not be available in all parts of the US, such as the metropolitan Los Angeles area where the South Coast Air Quality Management District has banned epoxies with high volatile organic compounds or VOCs. Other restrictions are in place in Maricopa County, Arizona, and Virginia northward including most northeastern U.S. states.
**Note 2: National Safety Foundation regulations for materials in contact with potable water. Paints rated for potable water may state a minimum tank size. I was puzzled by one manufacturer’s recommendation for use of its product on tanks exceeding a capacity of 60,000 gallons. A representative explained that their product will slowly release organic compounds into the water and their solution to this pollution is dilution.
To put these numbers in perspective, consider a tank some 20 feet in diameter and 25 feet tall will hold about 60,000 gallons (58,718 to be exact). The square footage of coated interior (walls and bottom) will be 1,884. Hence, there are 31 gallons per square foot of coated internal surface area. The aquarium described here has ~26 square feet of surface area and a working volume of ~203 gallons, which equals 7.8 gallons per square foot of coated internal surface area (recall this tanks has 2 viewing panes). This aquarium has about 75 square feet lumber surface area (inside and outside. It has 2 glass viewing panes. Add 22.5 square feet if only one glass viewing pane is installed).
Since these coatings are recommended for large tanks, they are often not available in one gallon containers, and more often are sold in 5-gallon buckets.
Mixing and Applying Epoxy Paint
Although painting is a skill most can reasonably perform, application of epoxy paint requires an understanding of all phases in order to achieve success. Strict adherence to manufacture’s mixing and application protocols are necessary to achieve a long-lasting finish. Of particular importance is temperature of the paint itself, ambient air and the object to be coated – all must exceed the minimum required temperature.
Use brushes and roller covers that are approved for use with epoxy. In this case, natural bristle brushes and covers designed for use with epoxy were used. Some suggest that brushes can be kept in a refrigerator to prevent the epoxy from hardening during periods between coats. I personally would not recommend this, as we would get into issues of pot life, temperature, moisture condensation, and so on. The brushes I found at Lowe’s were about $4 each and I used them only once and did not try to save them. The same was true for the covers. These items are a minor portion of the project’s total cost.
If you must reuse the brushes/covers, use xylene for cleanup. You’ll have to shop around for a source as this is not normally stocked at big box home improvement centers.
Mixing
Mix each component with a low speed paint agitator, making sure no settled material remains on the bottom of the container. Paint containing high solids will likely need stirring with a stout, clean stick, such as a 1″x2″. Combine the parts in the ratio recommended by the manufacturer. Thoroughly mix the two combined parts with the paint agitator. Allow proper time for the solution to react, and mix again.
Do not mix paint that has exceeded its pot life with freshly mixed paint.
Application
Stripe coat all crevices and sharp angles to prevent early failures in these areas.
Application can proceed using a roller (with a solvent resistant core), a paint brush with natural fibers, or a spray gun. I found a roller cover recommended for use with epoxy paint at Lowes.
Do not apply the paint beyond the recommended pot life.
Do not try to coat the surface in one pass – two (or more) thin coats are better than one thick coat.
Coverage
Manufactures often provide information concerning how much paint will be needed for a job, usually in the number of square feet that can be covered per gallon. Most paints recommended for use with potable water will be applied to steel tanks and are not applicable to wood (since wood is much more porous than steel). This project used about ~2.5 gallons of paint.
Curing
Once the paint has been applied, the chemical reaction of the mixed components continues until the paint is fully cured. Proper curing depends upon temperature, humidity, air flow over the painted surface, coat thickness, proper mixing, and so on. Improper curing can manifest itself in a number of ways, including discoloration (often in the form of yellowing), blushing, poor gloss, soft surface, greasy feel, poor chemical resistance and so on.
Allow the aquarium paint to fully cure for 1 week before filling.
Various coating recommendations are found on the internet, and these were investigated, and rejected for one or more reasons:
Rust-Oleum W9100
- Recommended for Potable Water: No
- NSF-61 Approved: No
- Coverage (per gallon): 125 – 225 ft2
- Colors: White, Marlin Blue (light), Safety Blue (dark), Tan, Black, Gray
- Approximate Price (Paint, per gallon): ~$85
- Approximate Price (Activator, per gallon): ~$68
- Available in 1 gallon containers
- Reason for Rejection: Not approved for potable water
Rust-Oleum W9200
- Recommended for Potable Water: Yes
- NSF-61 Approved: Yes
- Minimum Tank Size (potable water): 1,000 gallons
- Coverage (per gallon, per coat): 125 – 225 ft2
- Colors: White, Marlin Blue, Safety Blue
- Approximate Price (Paint, 5 gallons): ~$380
- Approximate Price (Activator, for 5 gallons): ~$295
- Reason for Rejection: Too expensive
Sherwin-Williams Dura-Plate 235 NSF
- Modified epoxy phenalkamine
- Recommended for Potable Water: Yes
- NSF-61 Approved: Yes
- Minimum Tank Size: >60,000 gallons
- Colors: Mill White, Buff
- Available in 1 gallon containers
- Application: Roller with solvent resistant core; natural bristle brush
- Notes: Self-priming; Cures at 0º F
- Reason for Rejection: Blue not available, white was unacceptable
Sherwin-Williams Macropoxy 646 – PW
- Polyamide epoxy
- Recommended for Potable Water: Yes
- NSF-61 Approved: Yes
- Water Temperature not to exceed 73.4º F (23ºC)
- Minimum Tank Size (potable water): 1,500 gallons
- Coverage (per gallon, per coat):
- Colors: Mill White, Light Blue, Red
- Approximate Price (Paint, 1 gallon):
- Approximate Price (Activator, 1 gallon):
- Available in 1 gallon containers
- Application: Roller with solvent resistant core; natural bristle brush
- Reason for Rejection: Not approved for use at temperatures exceeding 73.4º F (23ºC)
Sherwin-Williams Macropoxy 846-NSF
- Polyamide epoxy
- Recommended for Potable Water: Yes
- NSF-61 Approved: Yes
- Water Temperature not to exceed 73.4º F (23ºC)
- Minimum Tank Size: 1,500 gallons
- Coverage (per gallon, per coat):
- Colors: Mill White, Light Blue
- Approximate Price (Paint, 1 gallon):
- Approximate Price (Activator, 1 gallon):
- Available in 1 gallon containers
- Application: Roller with solvent resistant core; natural bristle brush
- Reason for Rejection: Not approved for use at temperatures exceeding 73.4º F (23ºC)
Sherwin-Williams Macropoxy 646 – 100
- Polyamide epoxy
- Recommended for Potable Water: No
- NSF-61 Approved: No
- Seawater Immersion: Yes
- Coverage (per gallon, per coat):
- Colors: Mill White, Light Blue
- Application: Roller with solvent resistant core; natural bristle brush
- Reason for Rejection: Not approved for potable water
Gougeon Brothers, Inc. West System
- Recommended for Potable Water: No
- NSF-61 Approved: No
- Minimum Tank Size: Not applicable – made for boat building and repair
- Aliphatic amine
- Colors: West Systems states pigments can be added to their products. See www.westsysyems.com for details
- Approximate Price (Paint, 1 gallon): ~$97
- Approximate Price (Activator, 1 gallon): ~$145
- Application: Roller with solvent resistant core; natural bristle brush
- Reason for Rejection: Not approved for potable water
Construction Time: ~20 hours
Once construction materials were gathered, cutting and assembly of the wooden box was completed in about 6 hours over the course of several afternoons. Preparation for paint and coating application added another 6 hours. Glass installation took approximately 2 hours. Pouring of the concrete pad and block/support installation added 3 hours. Final sanding, paint touchup, and bulkhead/overflow addition required 3 hours.
Construction Photos
Photographs documented this project’s progression, and below are a few of them along with construction tips.
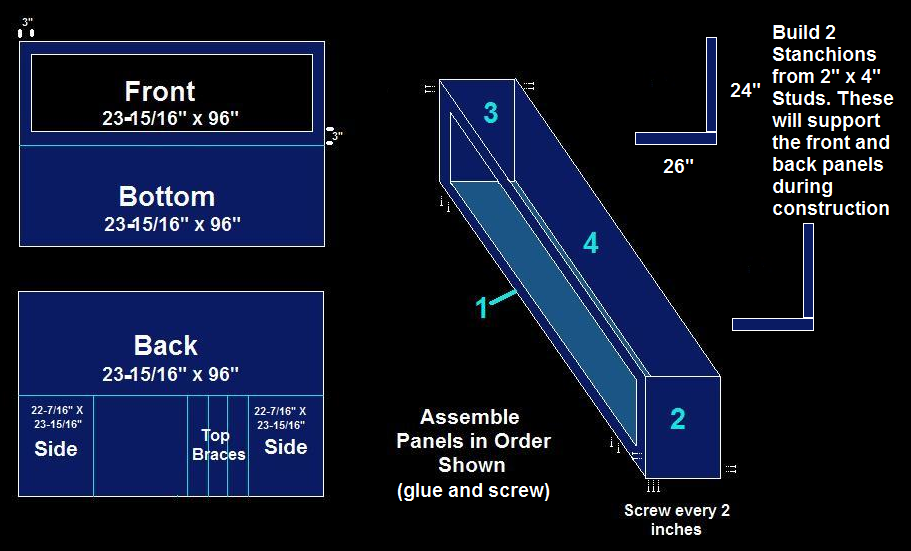
Figure 1. Pattern for cutting plywood for a 2’x 2′ x 8′ aquarium. Use plywood’s factory cut edges when attaching panels to the bottom. Top braces should not be added until after glass is installed.

Figure 2. Important! Detail of aquarium construction.
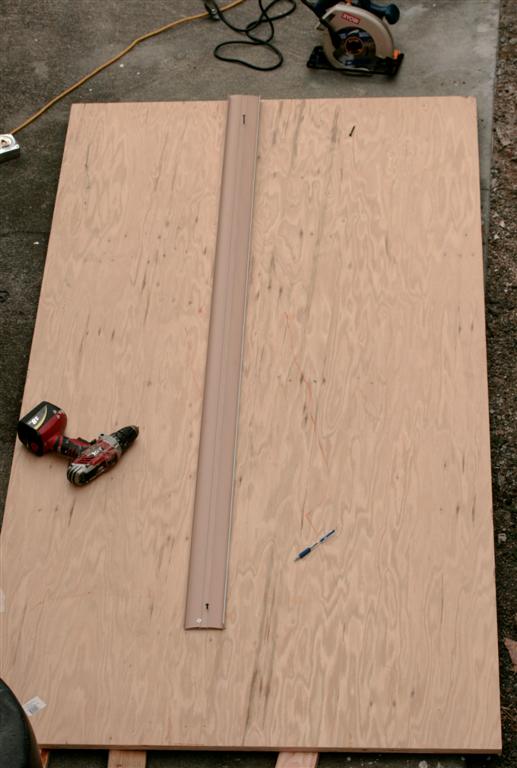
Figure 3. Getting started. Materials are gathered and the first cut is about to be made. A straight edge is screwed to the plywood to guide the circular saw, and is off center to place the blade (with a kerf of 1/8″) exactly down the center of the sheet. Mark the factory cut edges before cutting.

Figure 4. Carefully make a line a distance of ½ the plywood’s thickness from the edges of the bottom, front and back panels. Drill pilot holes for the screws every 2 inches.
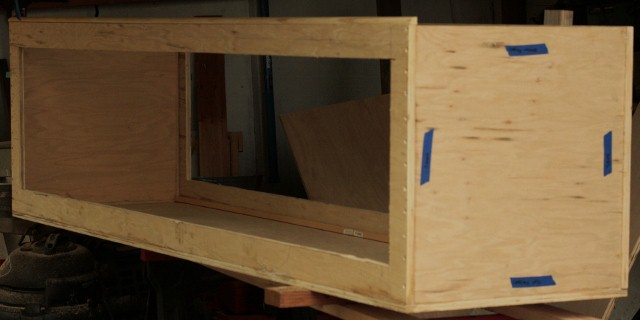
Figure 5. Beginning to take shape – almost ready to sand and seal. The blue tape indicates factory edges and one that needs sanding. Note the ¾” square stock running the length of the aquarium’s bottom. This reinforces the joint and provides a seat on which the glass can rest during installation. The counter-sunk screw holes have not yet been filled with wood putty.
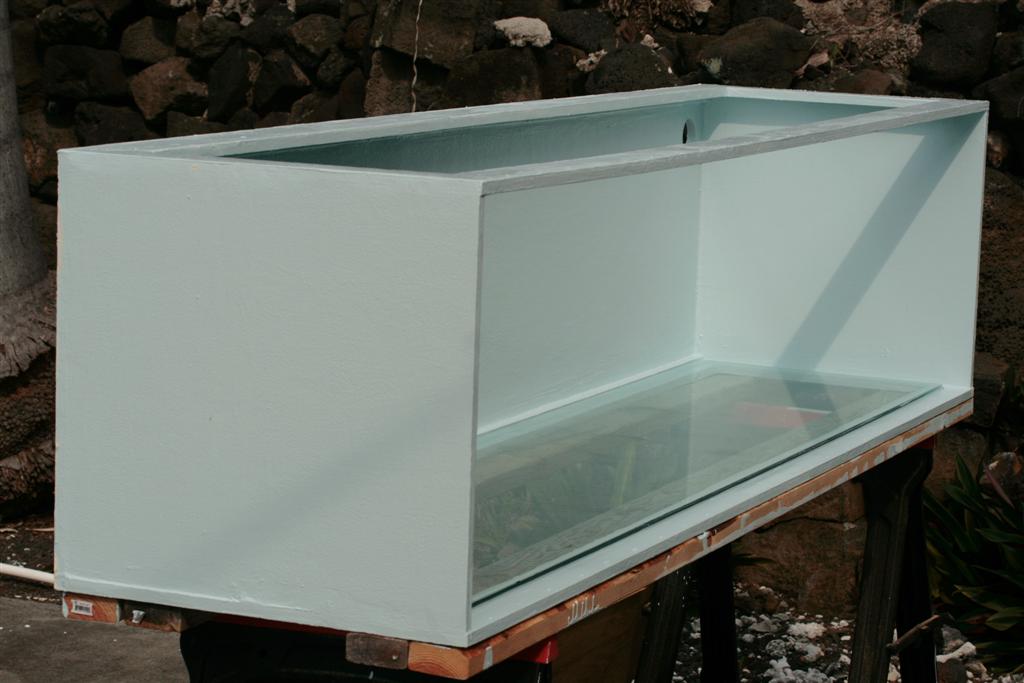
Figure 6. The fourth coat of epoxy paint has dried and the first pane of glass has been installed (the aquarium is on its side). Note the hole drilled for the overflow’s bulkhead at upper rear.
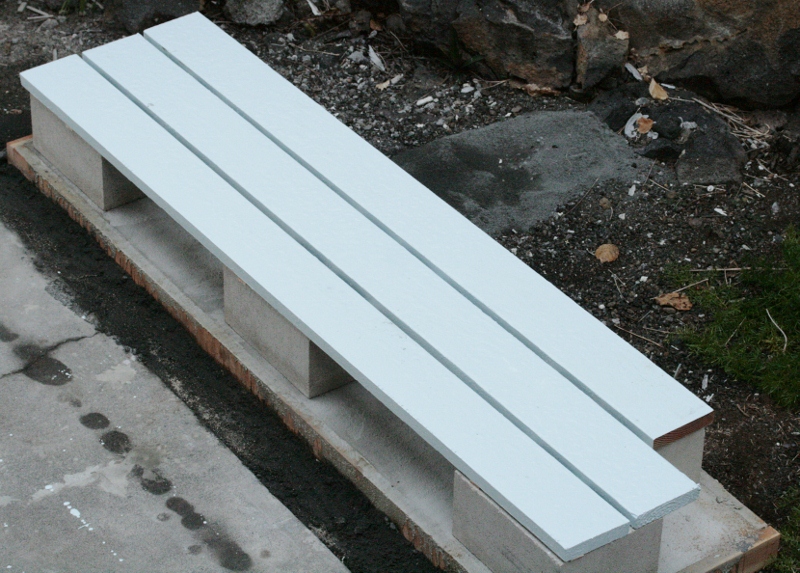
Figure 7. The inexpensive stand. Not likely to make it into Architectural Digest any time soon, but it is fully functional. The notch in the support at the lower right is accommodate the bulkhead fitting.

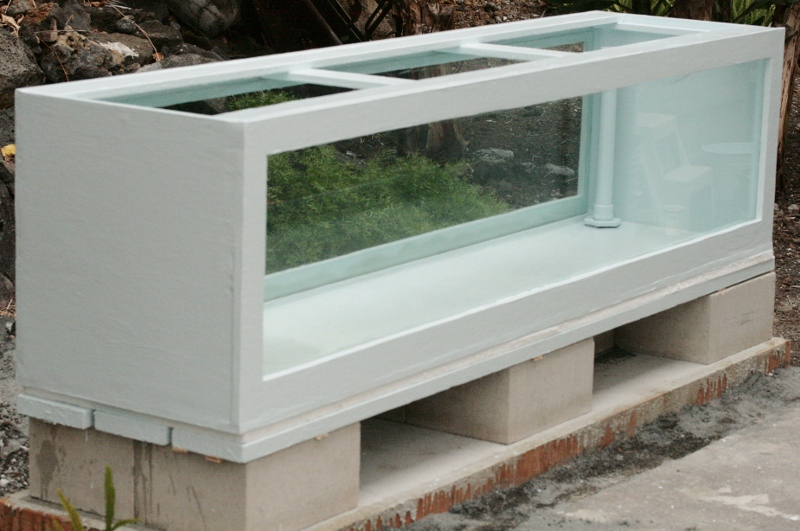
Figure 8. The completed aquarium on its stand. A sheet of 1″ Styrofoam material has been placed between the wood supports and the aquarium’s bottom for cushioning purposes.
Installing Glass Panels
This is the most critical and demanding part of this project in that a fragile material (glass) must be positioned in an exact position while working against a time line (the curing time of the silicone cement). At least two workers are required, and a third would add a safety factor (but is not necessary if the seat is installed as described in Figure 2).
- Turn the aquarium face down on a suitable level work space. It is very important that all face frames are supported (see Figure 6).
- Lightly sand the epoxy paint to roughen it and create a bonding surface for the silicone glue.
- Clean the contact glass surfaces with a solvent (acetone, naphtha, etc.).
- With two people, perform a ‘dry run’ inserting the glass. Lightly mark with a pencil the glass’ perimeter. Remove the glass and clean it again.
- Apply silicone glue to the epoxy surface where glass will make contact.
- This time, place the glass on the wooden seat created by the previously installed ¾” inch square wood stock, position the glass, and slide it off the seat into the silicone glue.
- Quickly press the glass into the glue, making sure to form a contiguous seam without bubbles. Place weights, if necessary, to keep the glass in good contact with the glue.
- Apply silicone to the perimeter of the glass where it makes contact with the epoxy coated wood inside and out. Failure to do this will result in unsightly particles getting into the seams and possibly becoming trapped.
- Allow the silicone to cure for at least 48 hours, and repeat the process for the second pane of glass (if applicable).
Final Steps – Installing the Braces
Braces along the top of an aquarium this size requires bracing in order to prevent bowing and glass and/or bond failure. Installation of braces should occur as one of the final steps since premature installation would prevent glass placement.
Do not hurry this critical step. This is what worked for me. Cut two 94.5″x3″ braces, and 4-23.5″ inch cross braces.
Protecting the Bottom
LeRoy Headlee of the Geothermal Aquaculture and Research Foundation (GARF) offers this idea to protect the epoxy coating on the aquarium’s bottom. He recommends using egg crate grating cut to fit the tank’s inside dimensions. A thin sheet of clear acrylic is said to also work well.
The Stand
This aquarium stand is a little different from most in that it will be outside (this is Hawai’i!) and was installed on a crushed lava bed. The design is based on those often seen in fish rooms with a few differences. The similarities – Concrete blocks support 2″x8″ boards covered with a sheet of Styrofoam insulation. Differences – a concrete slab had to be poured to achieve a rock solid base, and the lumber is coated with epoxy paint.
I would think that an outdoor installation would not be the norm, and would highly recommend that an aquarium of this size should be placed on a slab. If this is not possible, make sure the aquarium is perpendicular to floor joists in order to achieve maximum support. Bear in mind that this stand and aquarium (when full) will weight over 2,000 pounds. Check with a professional to get an opinion on aquarium placement.
Testing for Leaks
Before proceeding, have a means to quickly empty the aquarium (such as a pump), a wet vacuum, and paper towels on hand!
Once aquarium and its stand’s construction are complete, carefully level the base using a 48″ construction level. Once this is done, place a 1″ sheet of Styrofoam (sold in home improvement stores as insulation) and position the aquarium on top the stand and the sheet. Again, make sure the aquarium is level and use shims if necessary.
Slowly fill the aquarium with water and watch for leaks. If any are seen, note the location(s), empty the aquarium. Use silicone to plug the leaks.
Costs
As one can imagine, a project of this scope is not really inexpensive, and the cost-savings are achieved through sweat-equity. Here are the expenses involved:
Cost Breakout
- Epoxy paint: $400
- Glass: $400
- Plywood, oak, untreated (2 sheets): $85
- Lumber, 3-1″ x 4″: $16
- Lumber, 3-1″ x 1″; 2 – ¾” quarter rounds: $15
- Fasteners, 2 pounds: $17
- Fasteners, 1 pound: $8
- Polyurethane adhesive, 1-10 ounce tube: $8 (see comments below in Lessons Learned)
- Silicone cement: $36
- Sandpaper: $8
- Paint supplies, brushes, covers, tack cloth, etc.: $60
- Miscellaneous: $300 (mostly materials for the stand, bulkhead fitting, PVC pipe, etc.)
- Total: $1,353 US
Cutting Costs
Glass was the second most expensive item for this project, and I could have reduced my cash outlay by about $200 if I had decided to use only one sheet instead of two.
Get the silicone glue in 10 ounce tubes – it is less expensive. See further comments below.
Lessons Learned
Few projects are completed without reconsideration of some construction details, and that was certainly the case with this one.
I purchased two inexpensive plastic sawhorses to support the aquarium during assembly, painting and glass installation. Don’t repeat my mistake! Buy or make two heavy duty sawhorses. This aquarium gets heavy when fully assembled and the plastic sawhorses are pushed to their flimsy limits.
I got a price on the glass over the phone and did not request a written quote. When the glass was delivered, the price had jumped by $100. Needless to say I was upset and spoke with the manager. I am still attempting to get this issue resolved at the time of this writing. The fault here is mine – I had a misguided trust in the man’s word. Had I obtained a written quote, I would have a much stronger position. Get written quotes!
The polyurethane has its benefits – it is very viscous & sticky and can actually hold some of the panels in place during assembly. However, there is a trade-off: When dry it is bumpy (even if it has been tooled smooth just after application). So, it is an issue of fashion or function. Your choice. Wood glue is recommended by other builders, just be aware that its use will make assembly more difficult.
Using silicone in small 2.8 ounce squeeze tubes for a project of this size is nonsense – get 10 ounce tubes made for use with a caulk gun. Squeezing the small tubes to apply a glue bead with a length of about 20 feet (for one glass pane) is tiring, the glue began to skin over in the heat of a Hawaii afternoon, and hurries the critical positioning of the glass. It is less expensive. Check with local glazier supply outlets for this. I’ll repeat, fill in any gaps between the glass (inside and out) to prevent particles becoming trapped there.
There you have it – my experience in building a plywood aquarium. Now that it is done, I can use it in conducting some exciting new experiments – the real work is just getting started!
Questions? Comments? Leave messages below or email me at [email protected].

Looks amazing! Awesome job…I’m planning one myself, although a bit smaller because my current living space is limited. It’ll end up being about 160 gallons. Also, the only glass panel will be on the front of the tank. My question is about the heating of plywood aquariums. I’ve read they do a much better job at insulating and therefore require less wattage. In glass tanks it’s supposedly a 3-5:1 ratio of watts to gallons, so could you estimate the ratio for a plywood aquarium? Thanks in advance for your help!
Ian, We were taught in class never to thank people in advance.
Thanks for the very thorough tutorial.
Can you provide any details as to how you setup the internal overflow?
Thanks